Compocloset Cuddy Lite Composting Toilet Review

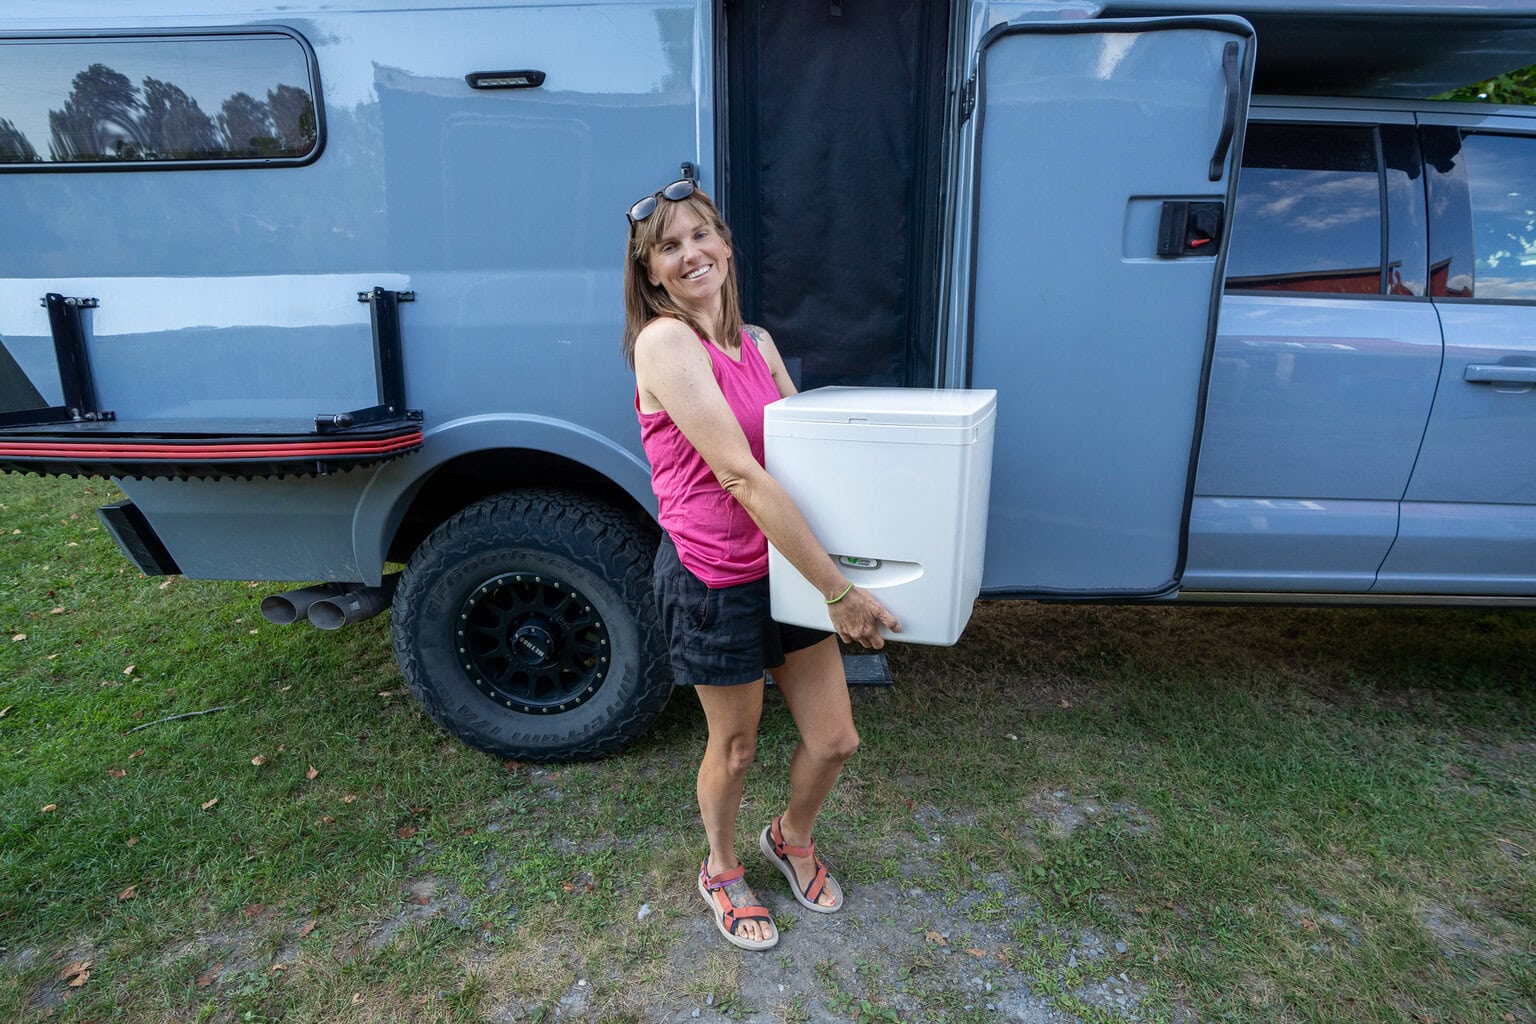
Looking for the best portable toilet for van life? After 9 years on the road and testing just about every popular toilet option – cassette toilets, pee jars, foldable toilets, and even the Trelino – the Compocloset Cuddy Lite is hands-down my favorite.

I’ve been using the Cuddy Lite every single day in my camper for the past four months, and it’s the first toilet I’ve tested that actually controls odors, feels sturdy, and is easy to empty. While it costs more than some competitors, it’s worth every penny if you want your van to not smell like a bathroom.

In this review, I’ll explain exactly how the Cuddy Lite works, how it compares to the Trelino and other camper toilets, and why I think it’s the best portable option for full-time van life.

Oh and if you’re thinking about getting the Cuddy Lite for yourself, I’ve got a discount code to share. You’ll find it at the bottom of this post once you’ve read my full review.

*This post is sponsored by CompoCloset. I only recommend products I truly love and think you will love too. If you have any questions about the Cuddy Lite, drop a comment at the bottom of this post!

Cuddy Lite Overview

Specs

  • Dimensions: 17″ deep x 15.2″ wide x 16.3″ tall
  • Weight: 19 lbs
  • Pee jug capacity: 1.7 gallons
  • Poop bin size: 3. gallons

Cuddy Lite Pros

  • Excellent odor control: There is no smell with the lid closed and far less odor when the lid is open compared to other portable toilets
  • Retractable solids cover: This blocks odors and hides the poop from your view when peeing. There is also a small hole at the front of the solids cover that drains into the pee jug, which helps when your aim isn’t perfect.
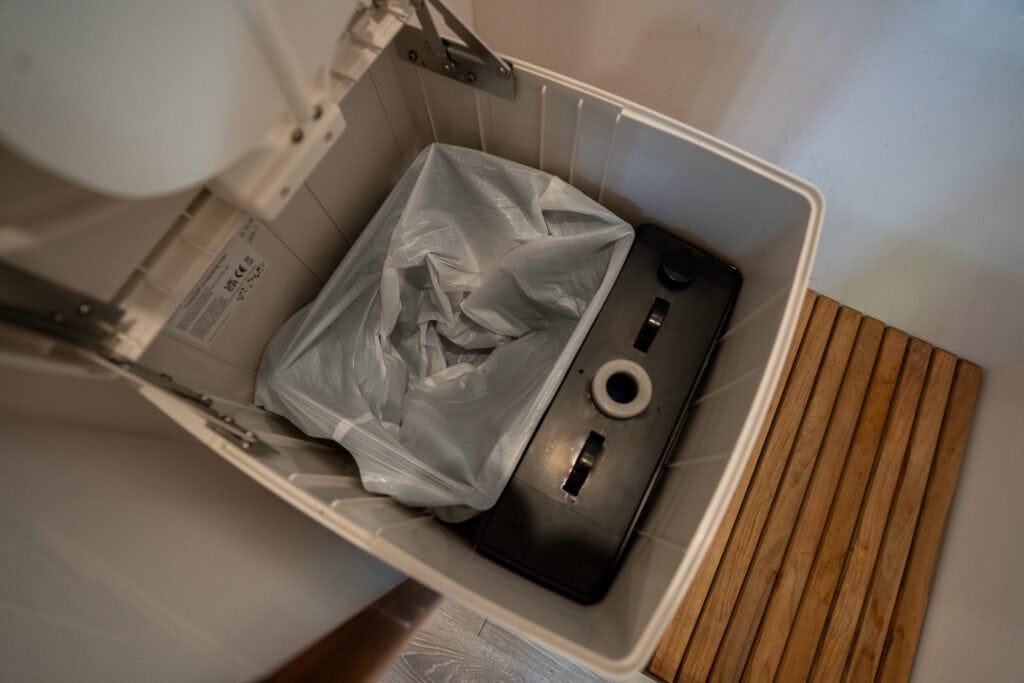
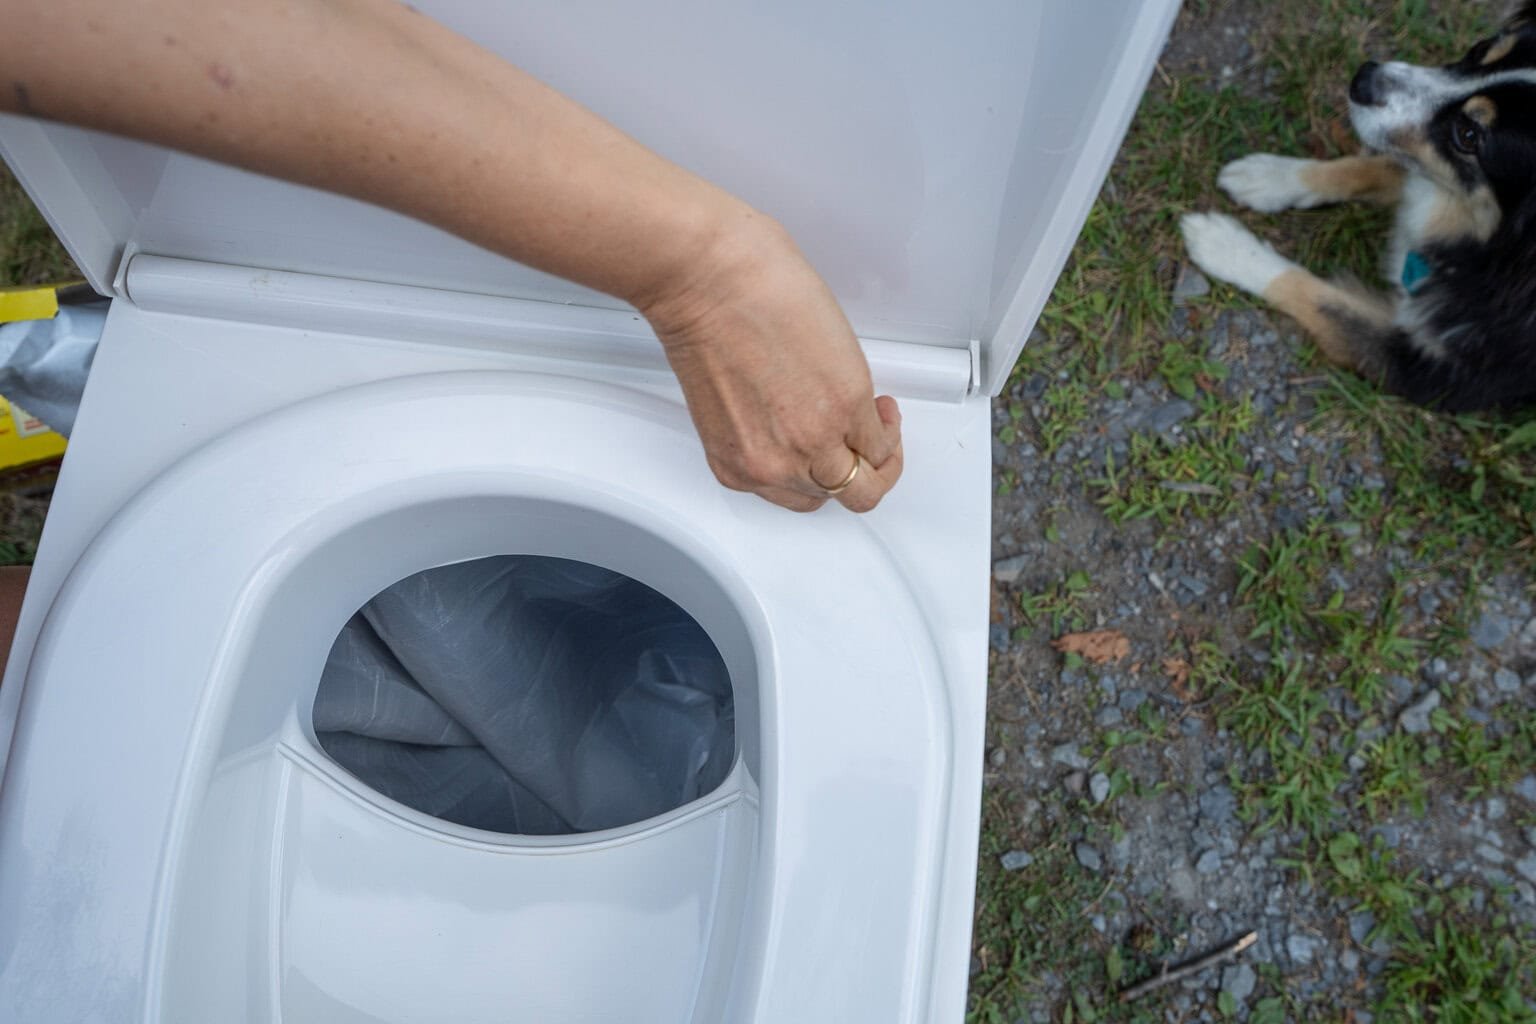
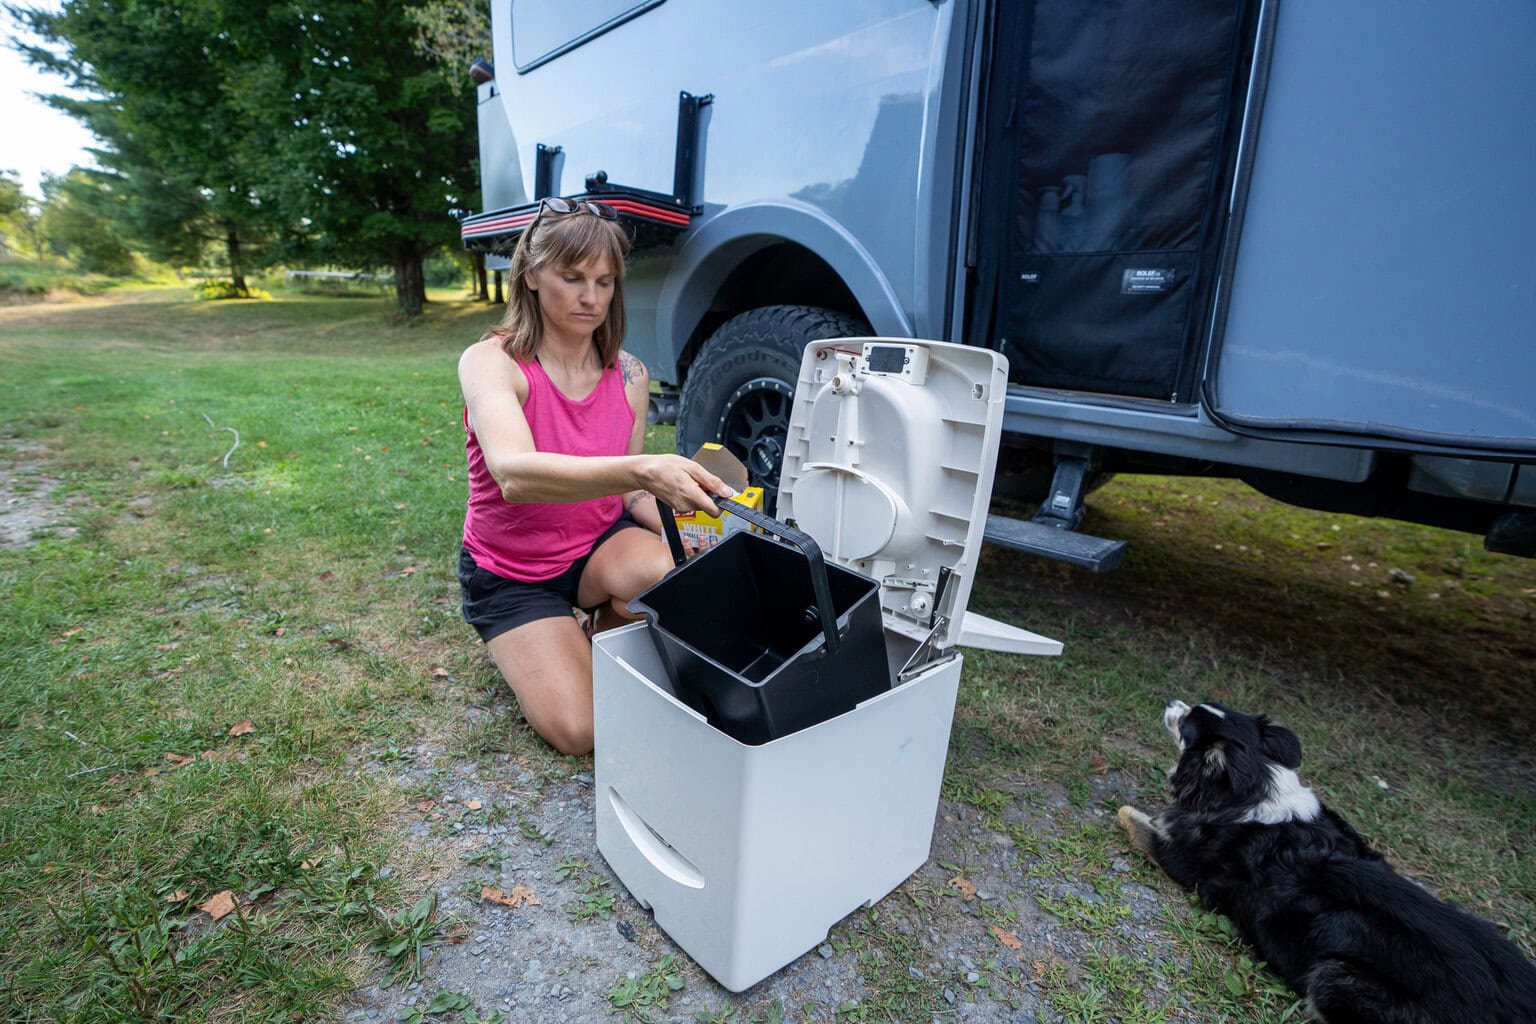
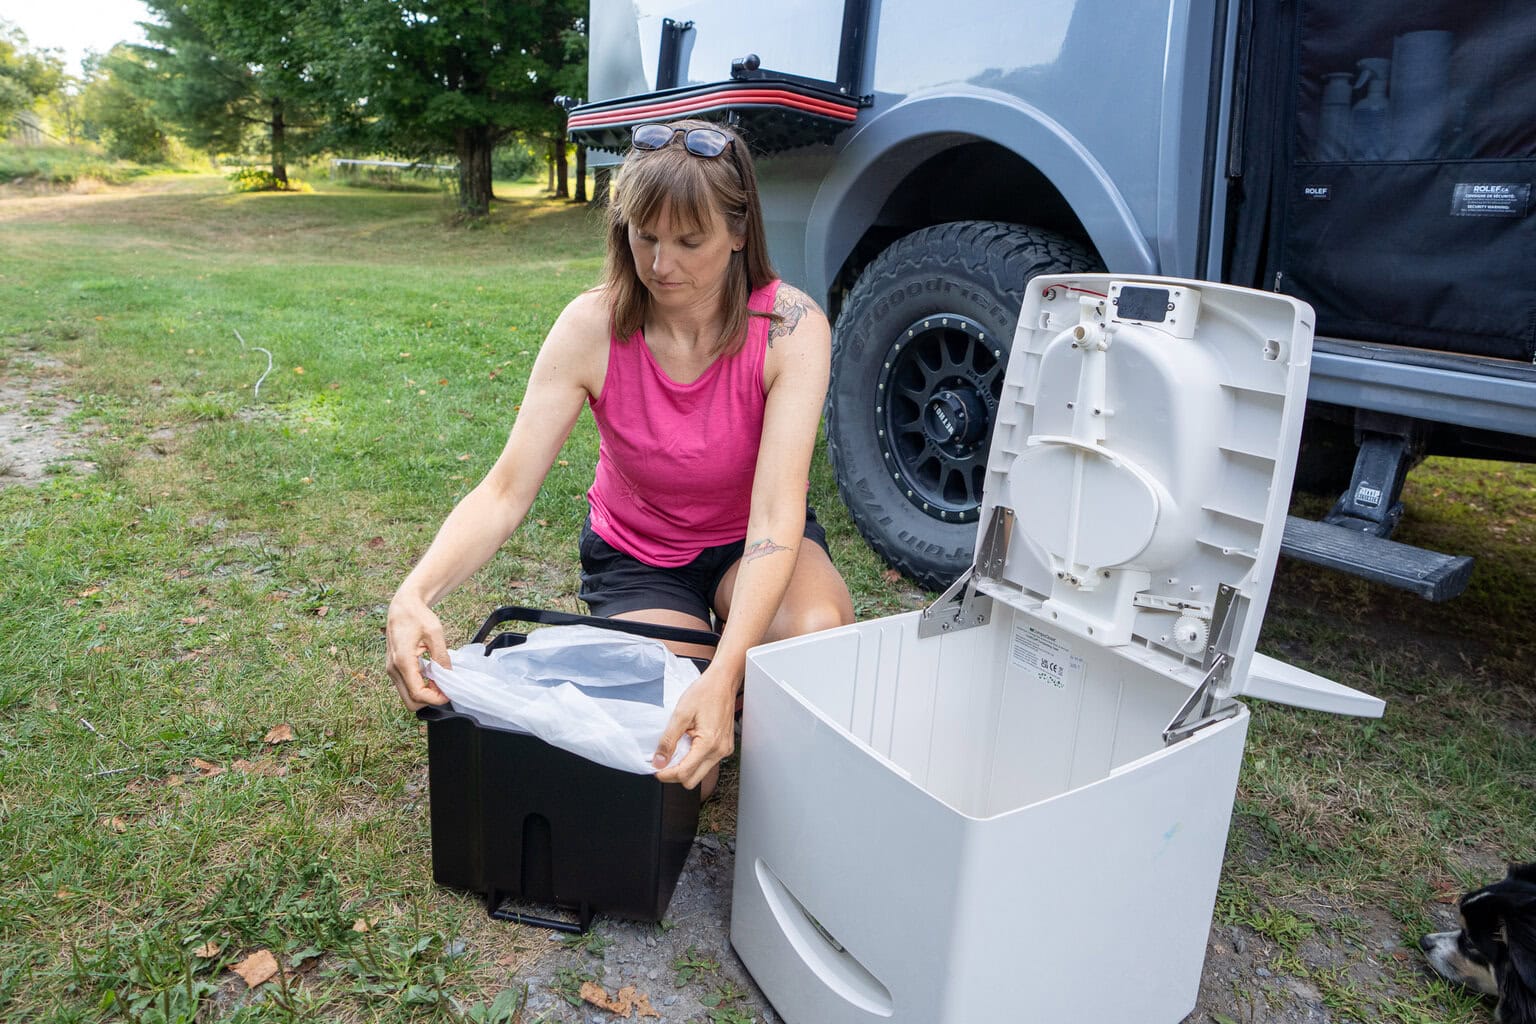
  • Bag-lined solids bin: This makes it so easy to empty the poop bin, and there’s no agitator to clean. Plus, it doesn’t require any special bag.
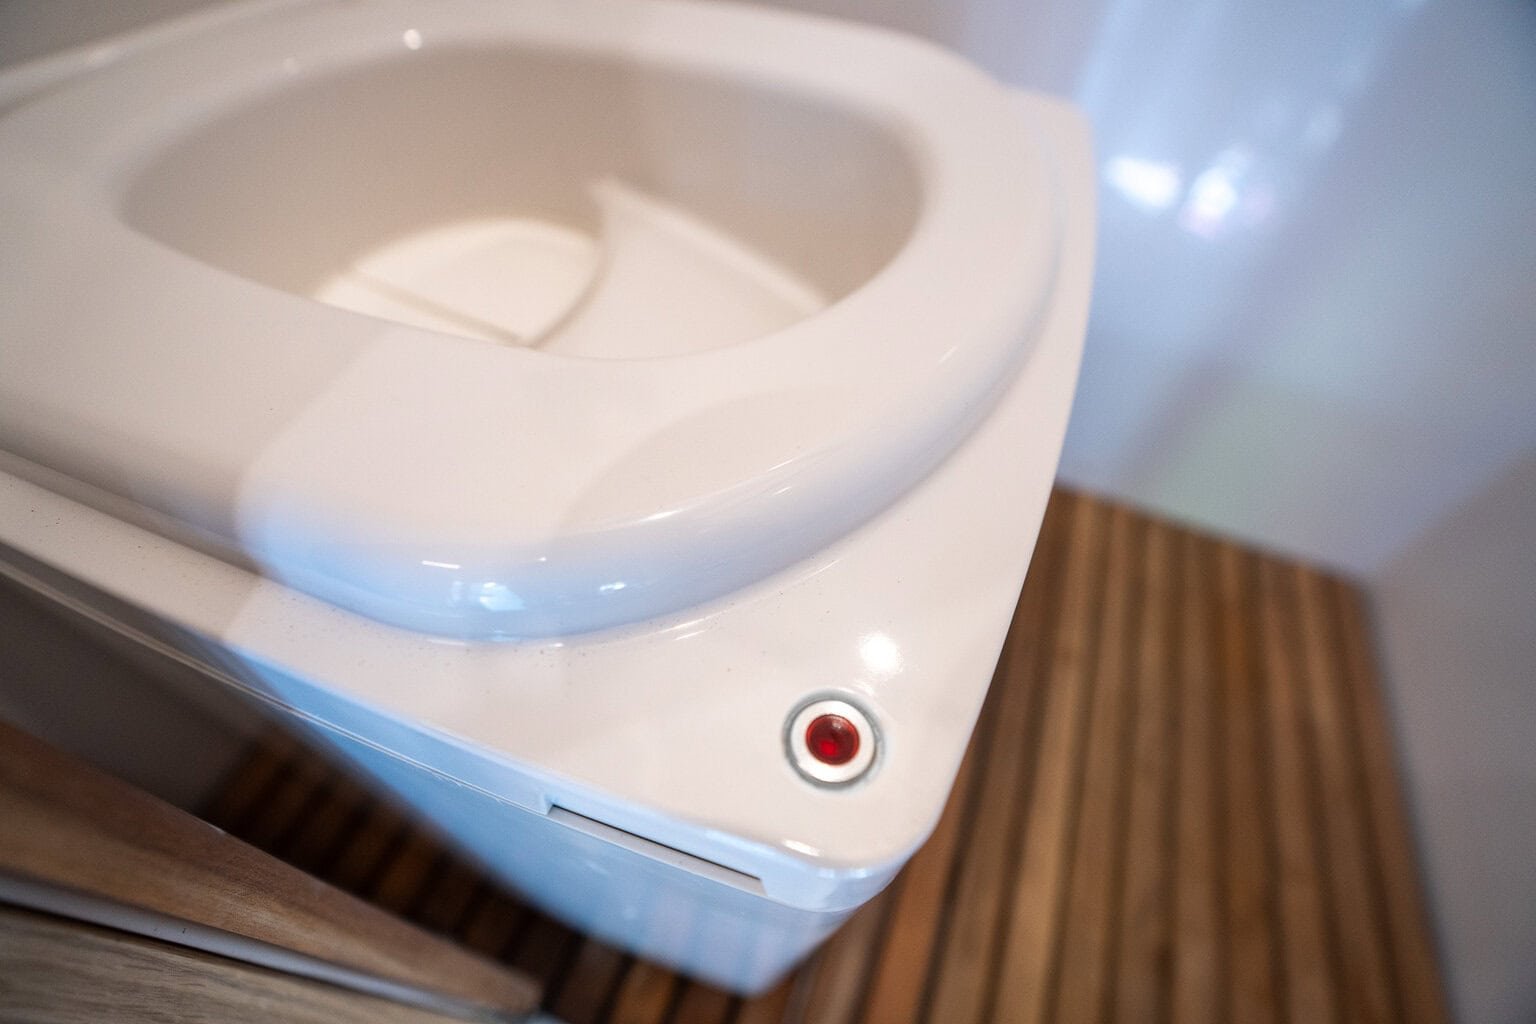
  • Pee jug indicator light: Powered by a 9V battery, this light tells you when the 1.7-gallon pee jug is full, eliminating the guesswork.
  • One-way pee jug valve: This is effective at trapping strong ammonia smells. As an experiment, I’ve gone up to 10 days without dumping the pee, and it still had minimal odor.
  • Black pee jug: The pee jug is black and completely opaque. This hides the contents and makes emptying it in public restrooms less awkward.
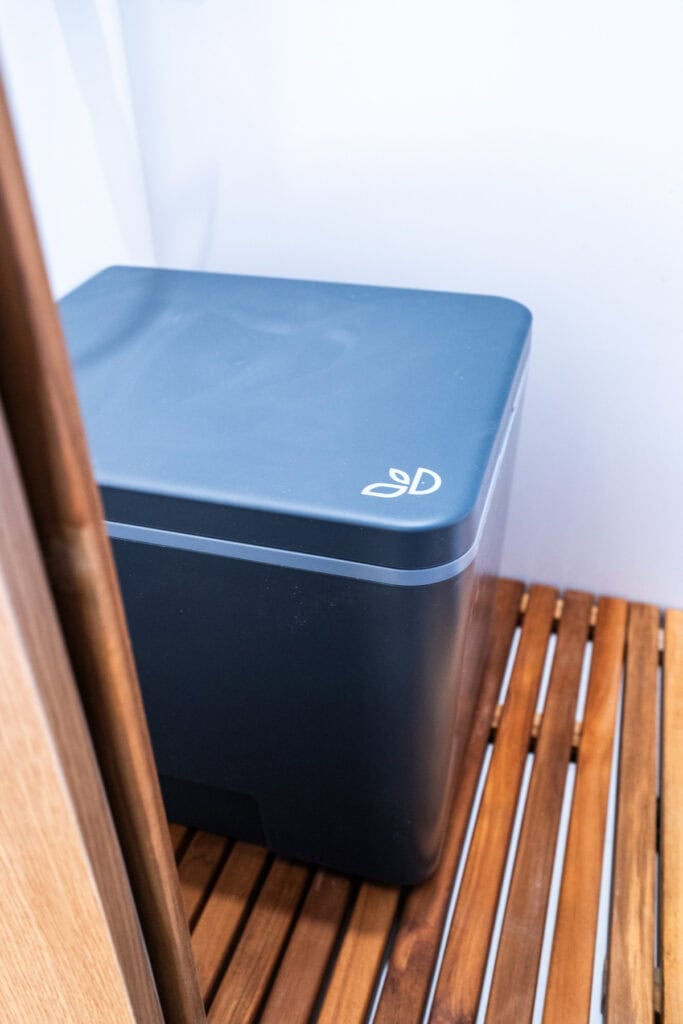
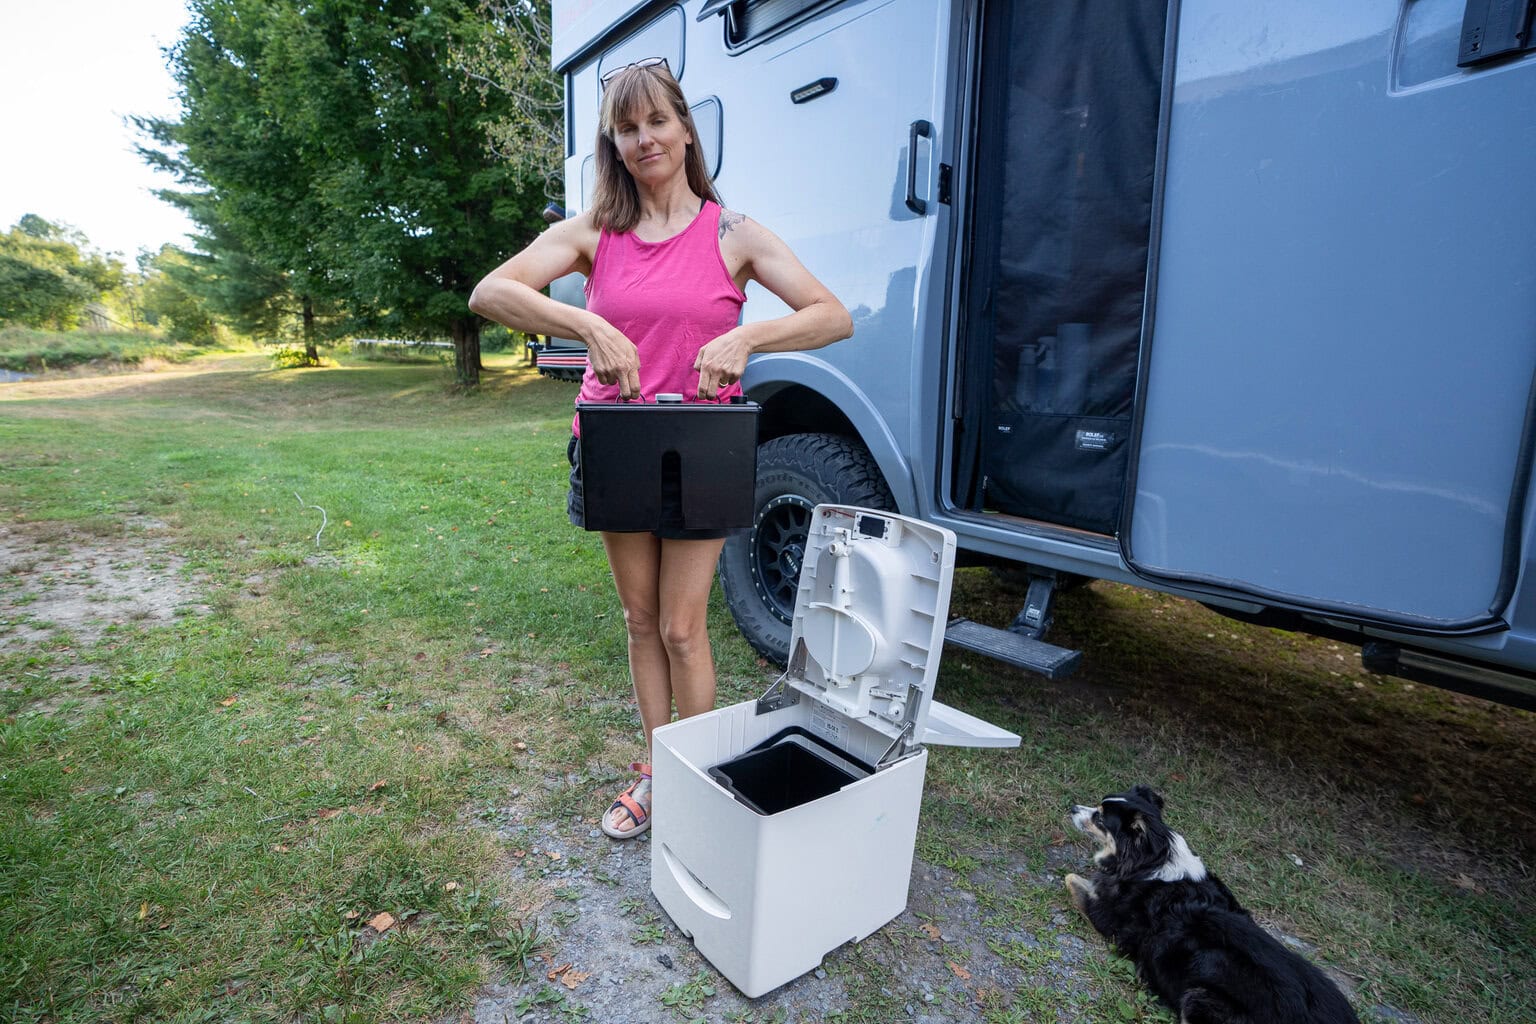
  • Sturdy and stable: At 19 lbs, the Cuddy Lite doesn’t slide around in my camper bathroom and feels secure even if I sit on it while we’re driving.
  • Hinged lid and seat: The seat stays upright when lifted, making it easy and sanitary to access the pee jug and poop bin when it’s time to empty them.
  • Completely portable: It works without power and doesn’t have to be vented to the outside like most traditional composting toilets.
Kristen Bor demonstrating how to use the Compocloset Cuddy Lite composting toilet standing in front of a truck camper

Cuddy Lite Cons

  • Pee jug requires two hands to carry when full: The two small loops make it awkward to carry when full.
  • Retractable cover can be tricky to clean: It moves around when you wipe it, and I wish this could be locked in place.
  • Not waterproof: It needs to be moved out of a wet bath before showering due to the indicator light.

How does the Cuddy Lite work?

The Compocloset Cuddy Lite is a portable urine-diverting “composting” toilet that diverts the pee into a pee jug while poop goes into a bag that you can throw in the garbage. Here is a step-by-step process for going to the bathroom using the Cuddy Lite:

  1. Lift the lid

  2. When peeing, sit a little closer to the front so pee funnels down into the pee jug.

  3. When the pee jug is full, the red indicator light turns on. Lift the toilet seat, remove the pee jug, unscrew the cap, and pour it into a nearby toilet, at a dump station, or outside following Leave No Trace.

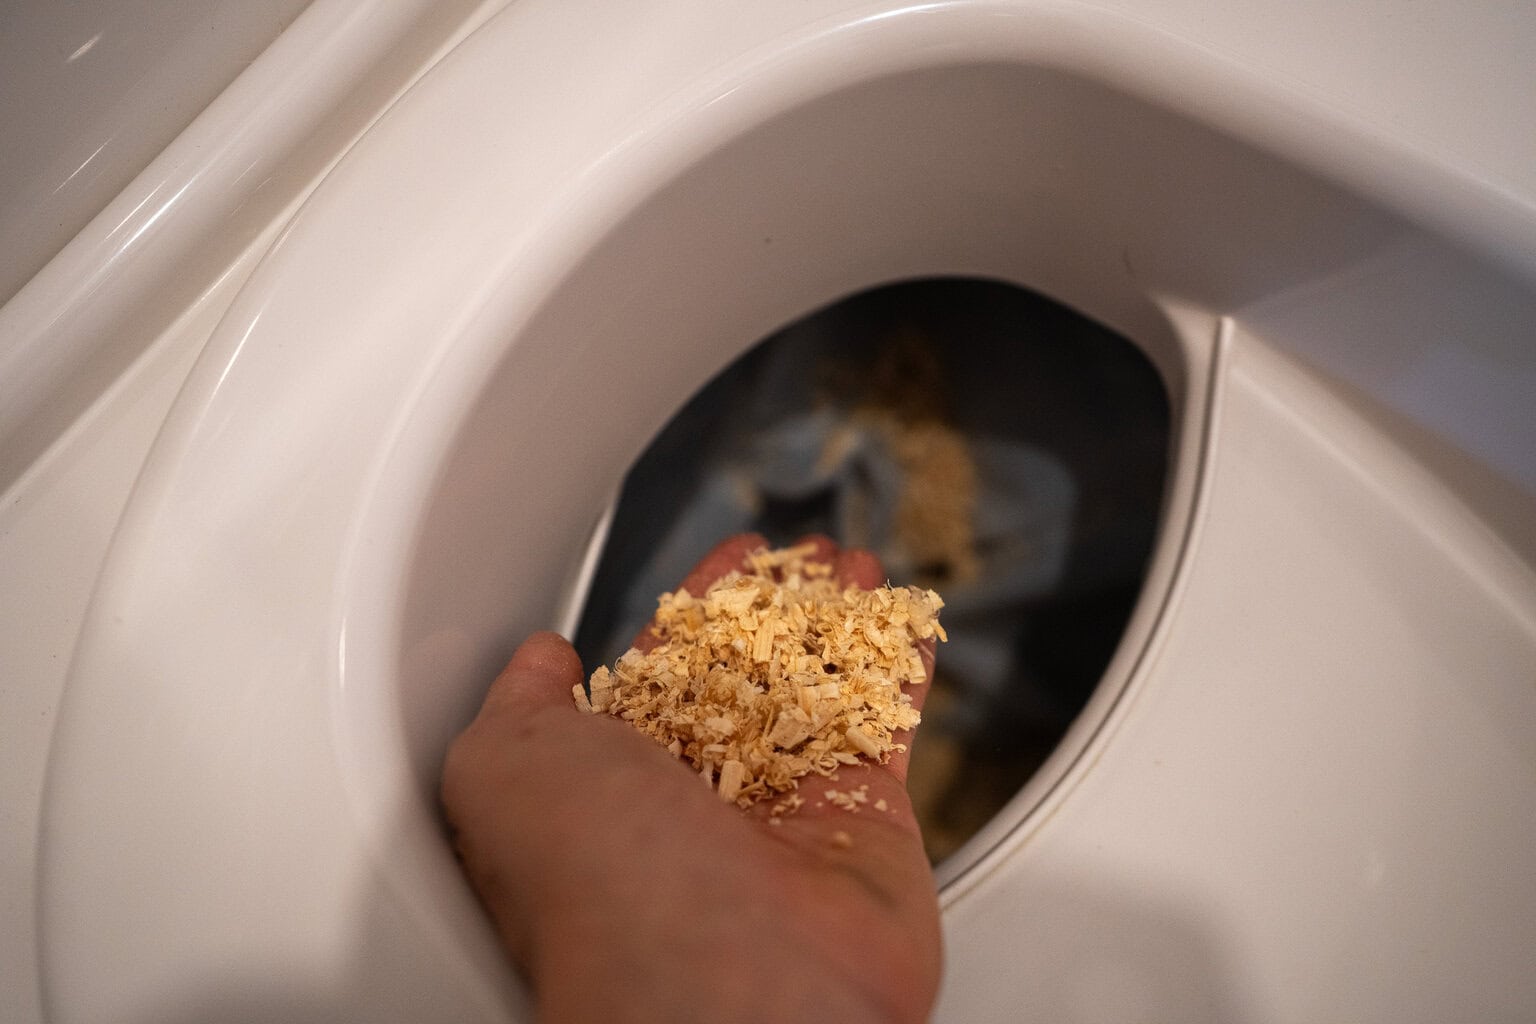
  4. When pooping, sit a little bit further back on the toilet seat. Turn the knob to open the retractable cover and do your business. Poop drops into a bag. Cover the poop with some composting material and close the retractable cover.

  5. When you’re ready to empty the poop, lift the seat cover, tie the bag closed and throw it in the nearest garbage can.

inside of the Cuddy Lite toilet
The pee jug is the front, and the solids bin is the open container in the back. You line it with a bag before going poop in it

Is the Cuddy Lite a Composting Toilet?

The Cuddy Lite is not a traditional composting toilet. Both the Cuddy Lite and a traditional composting toilet divert the pee into a pee jug. However, they differ in how the solids are handled.

A normal composting toilet has an internal agitator that mixes waste with a composting medium (like coconut coir) so the material can begin breaking down inside the unit, which means you need to manage moisture levels, stir the contents, and eventually dump a heavy bin of partially composted material.

The Cuddy Lite skips all of that. Instead, solids drop directly into a bag-lined bin with no agitator. After you go poop, you just tie off the bag and throw it in the trash. This makes the Cuddy Lite easier to empty and clean.

If you want to use the same bag for a few days without throwing it away, you can add compost material over each poop, but it isn’t technically “composting” your waste inside the toilet.

Hand dropping wood chips into the solids bin of the Cuddy Lite toilet

Overall Design

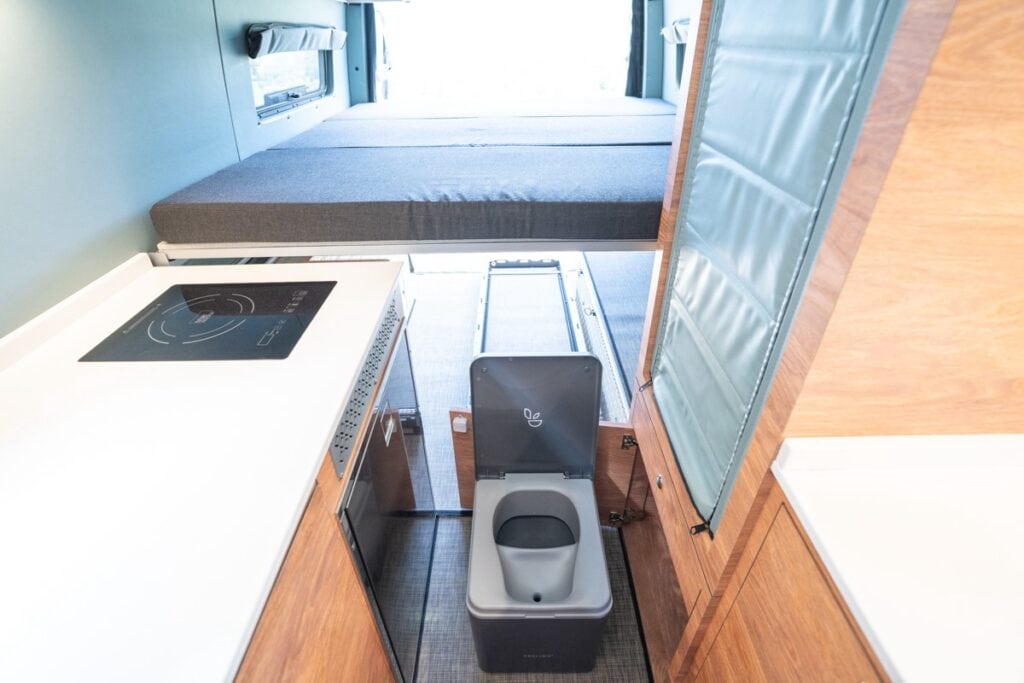
The Cuddy Lite is completely portable. It doesn’t require power, permanent installation, or to be vented to the outside, like many traditional composting toilets.

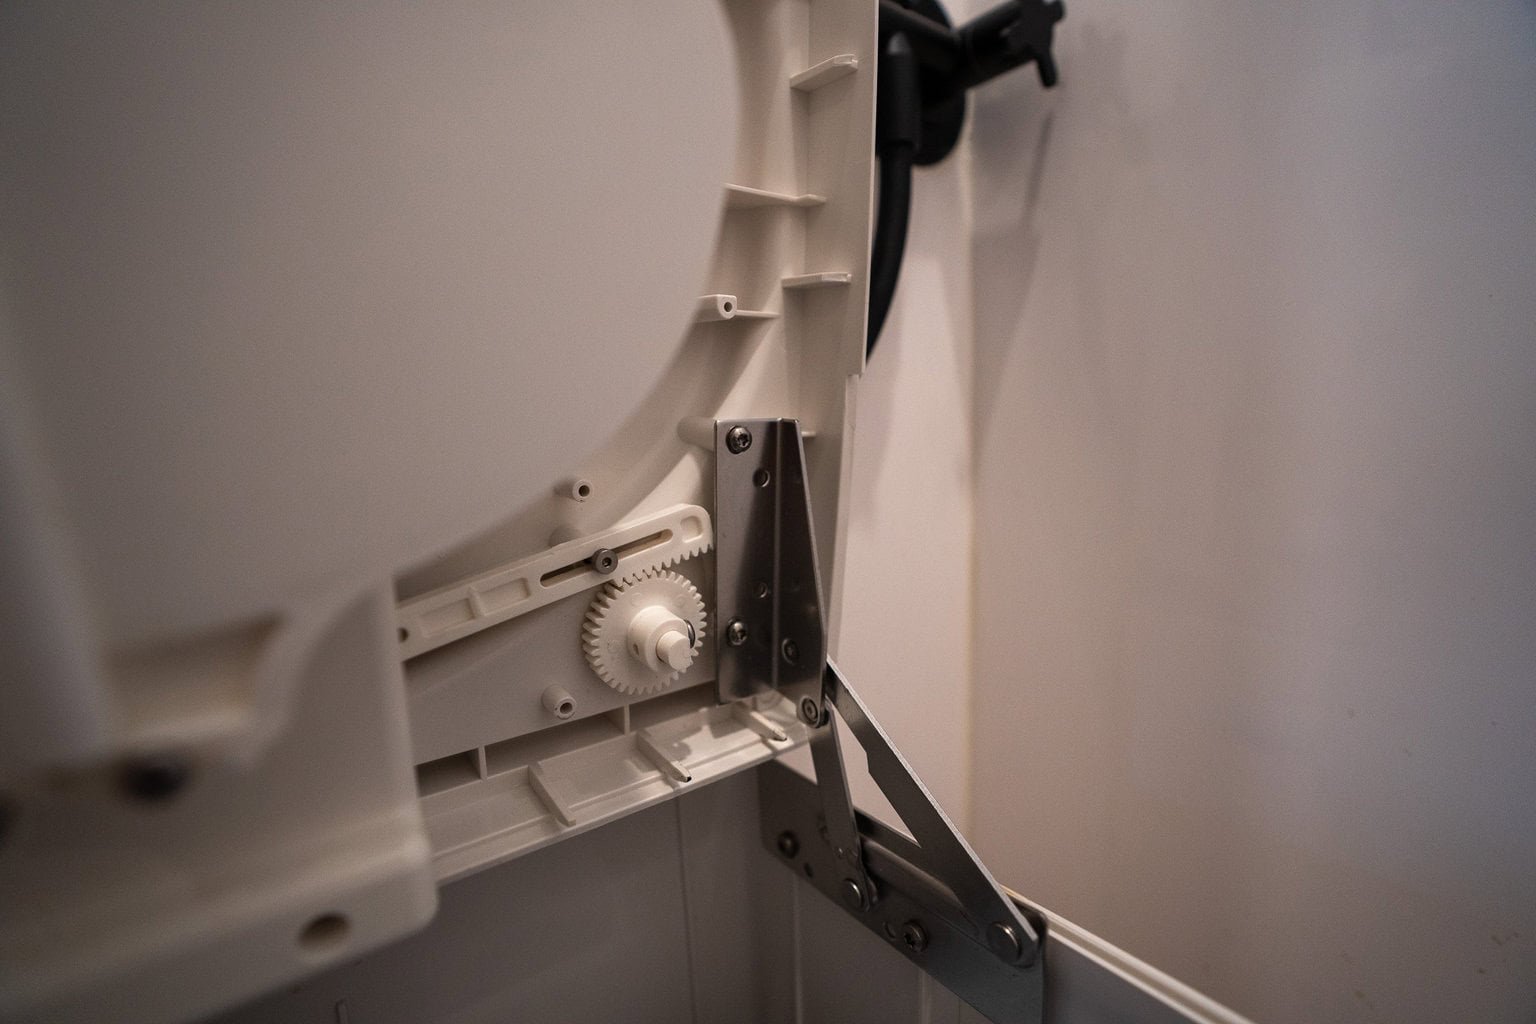
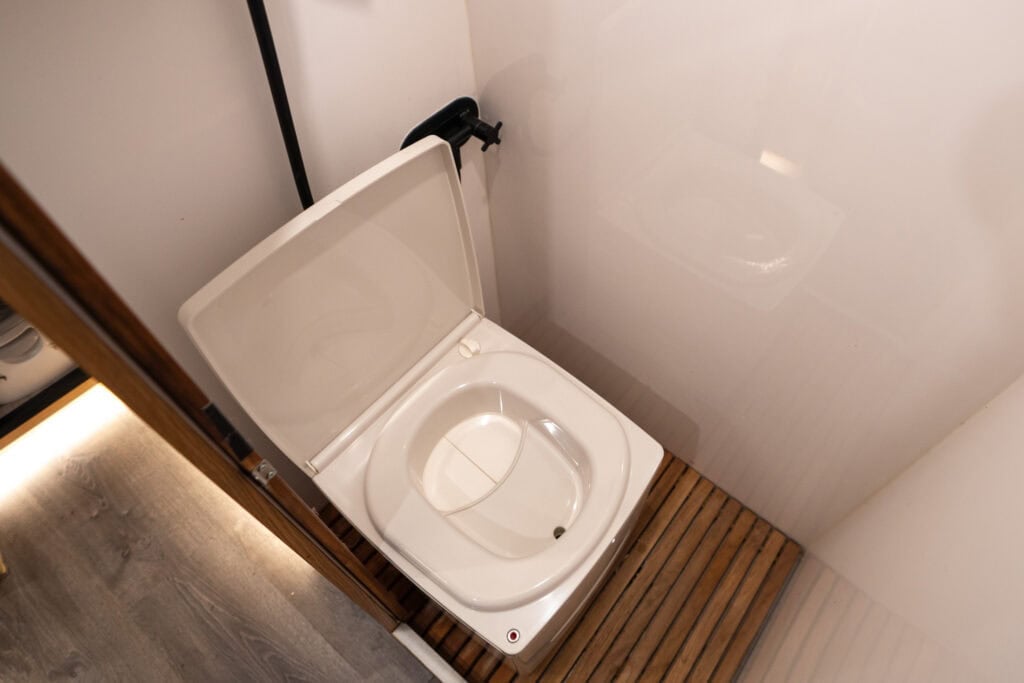
One of the first things I noticed about the Cuddy Lite is how solid it feels. The Cuddy Lite’s lid and seat are connected to the toilet via a set of heavy-duty hinges that keep the seat upright when it’s time to empty.

Hinge on the Cuddy Lite
Kristen Bor demonstrating how to use the Compocloset Cuddy Lite composting toilet standing in front of a truck camper

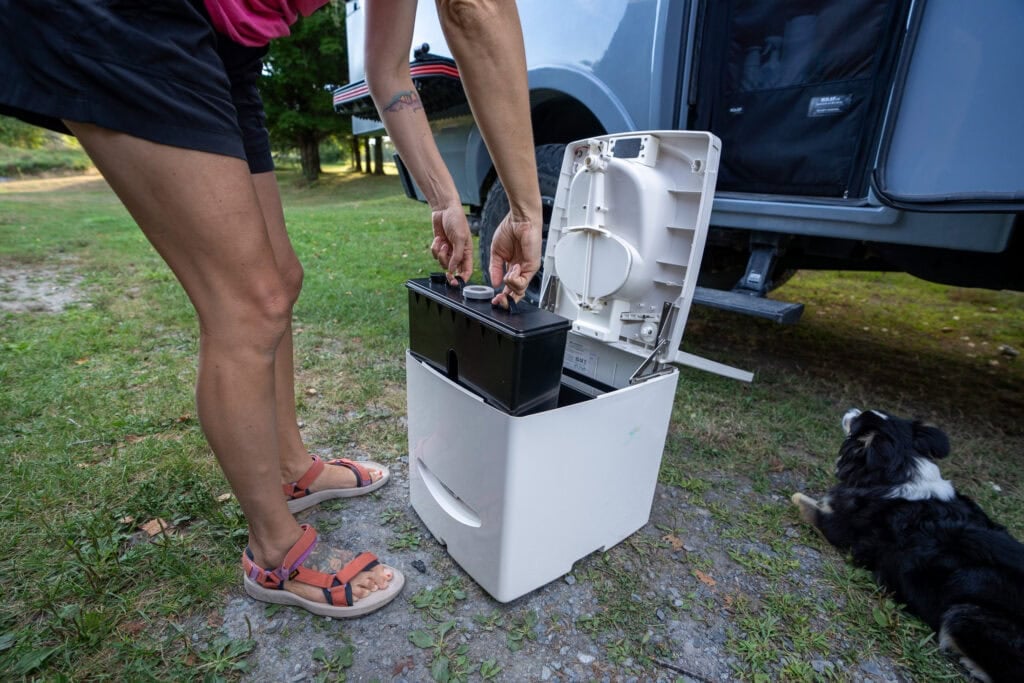
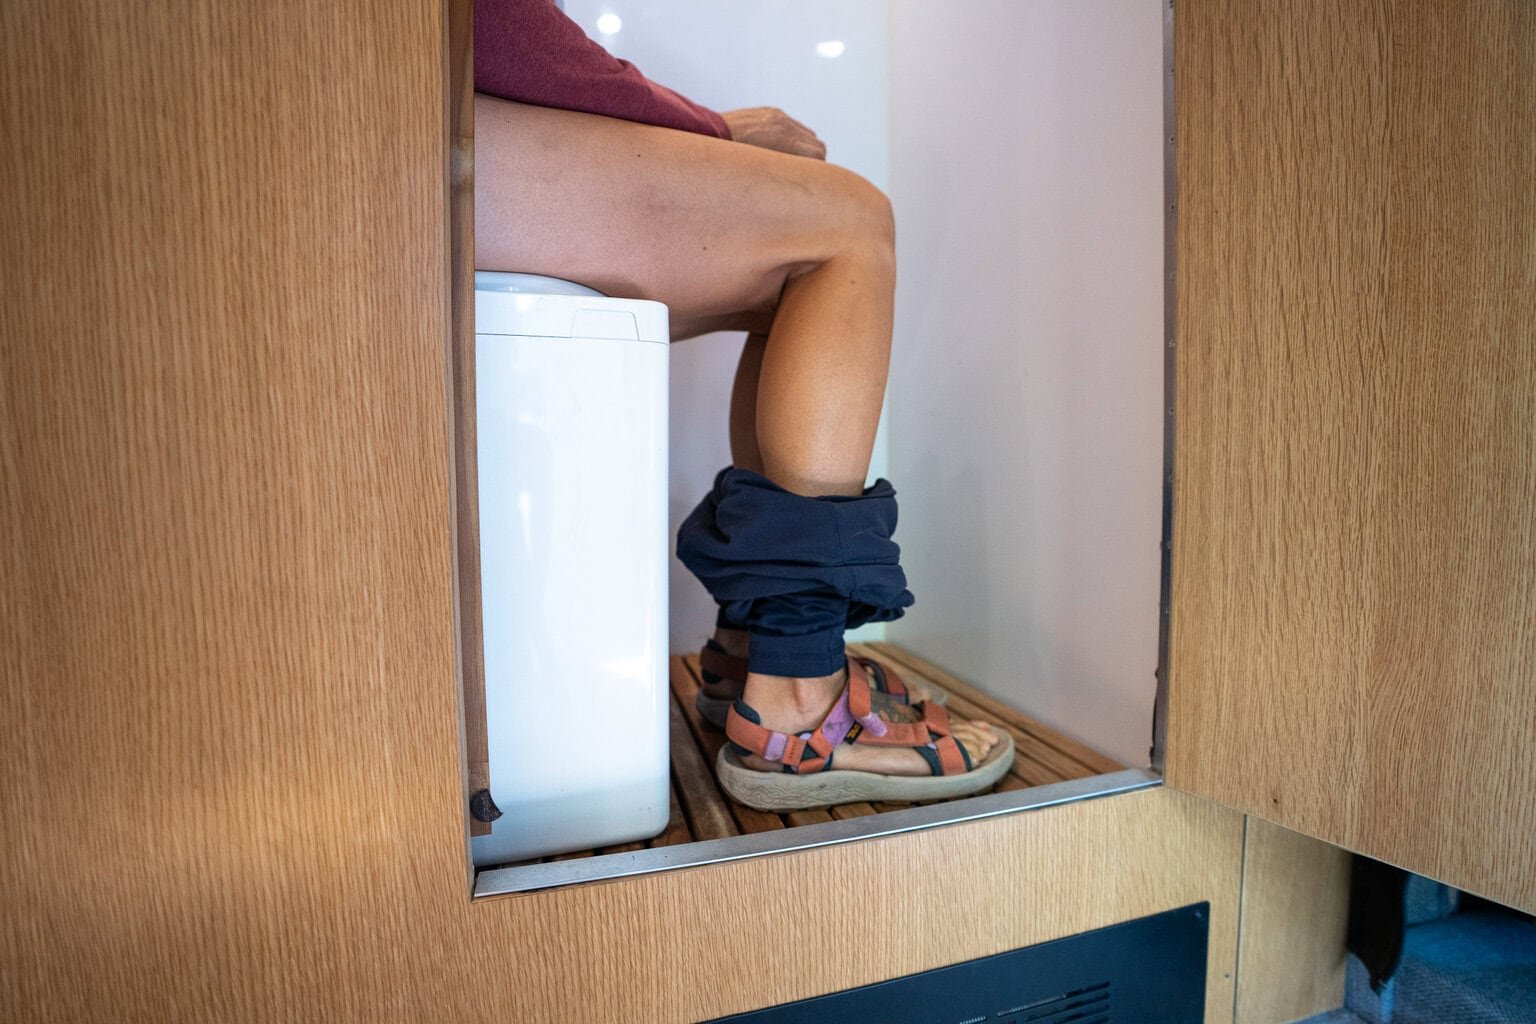
Sitting on the Cuddy Lite feels sturdy and stable. At 19 lbs, it has enough weight that it doesn’t shift around in our camper bathroom that much, unless we are driving on a rough dirt road.

I’ve even sat on it while we were driving (not something I make a habit of, but sometimes road life calls for it), and it never wobbled or felt like it might tip. The seat height feels comfortable and natural, similar to a regular household toilet. This isn’t always the case with compact RV toilets.

closeup of women's legs while sitting on the Cuddy Lite composting toilet

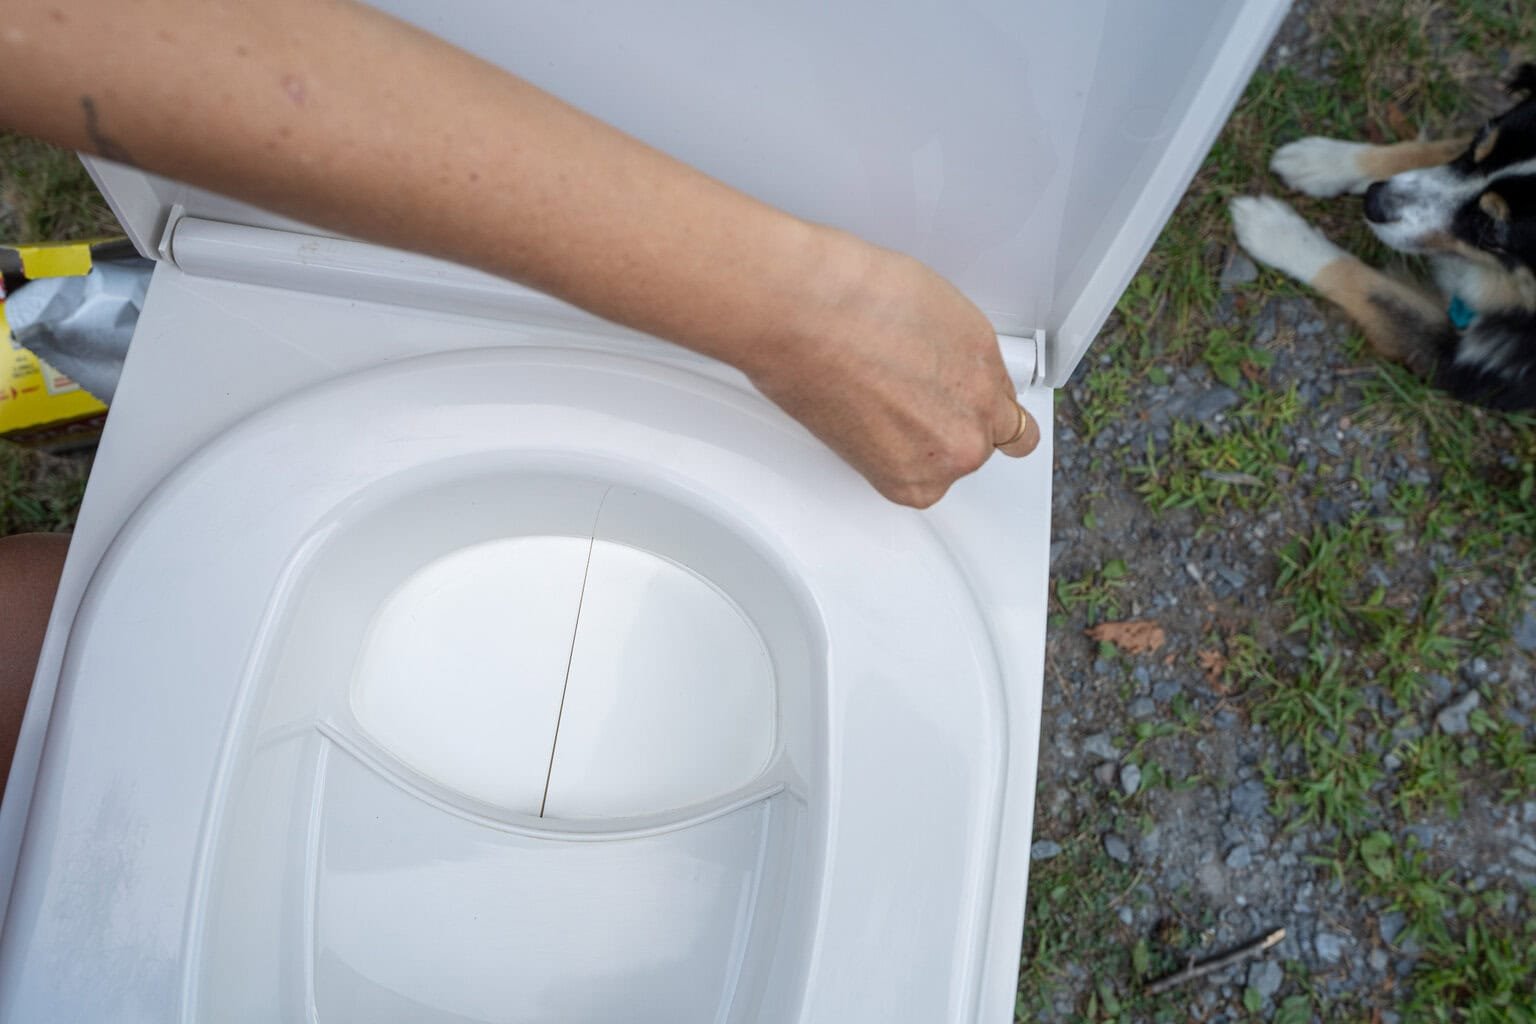
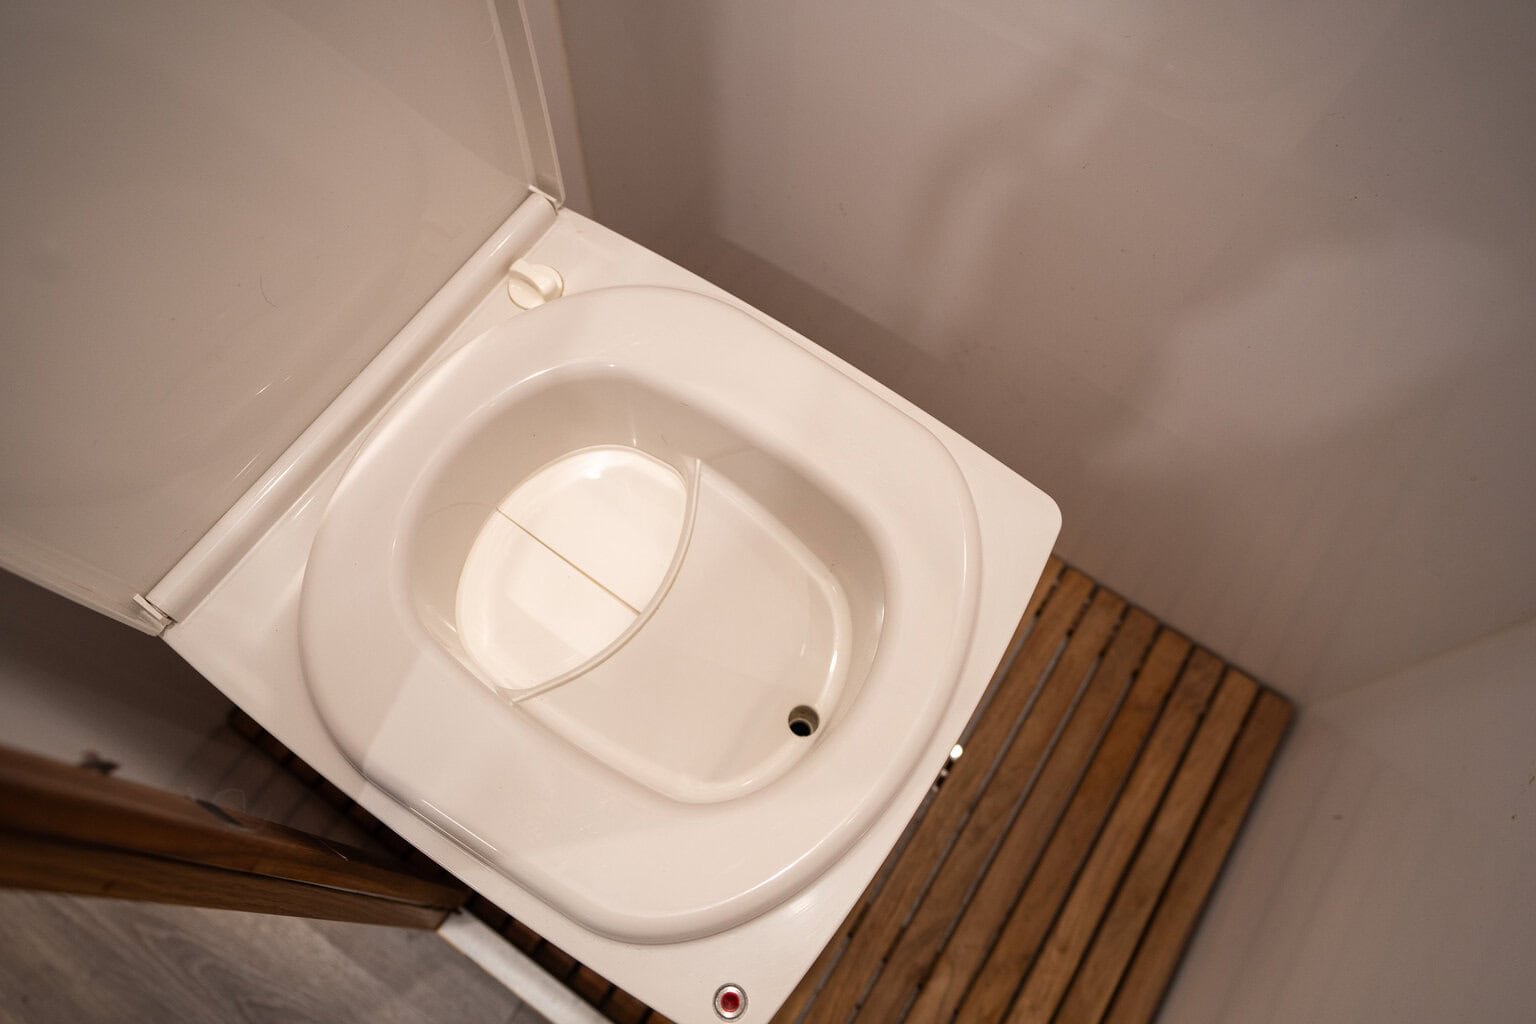
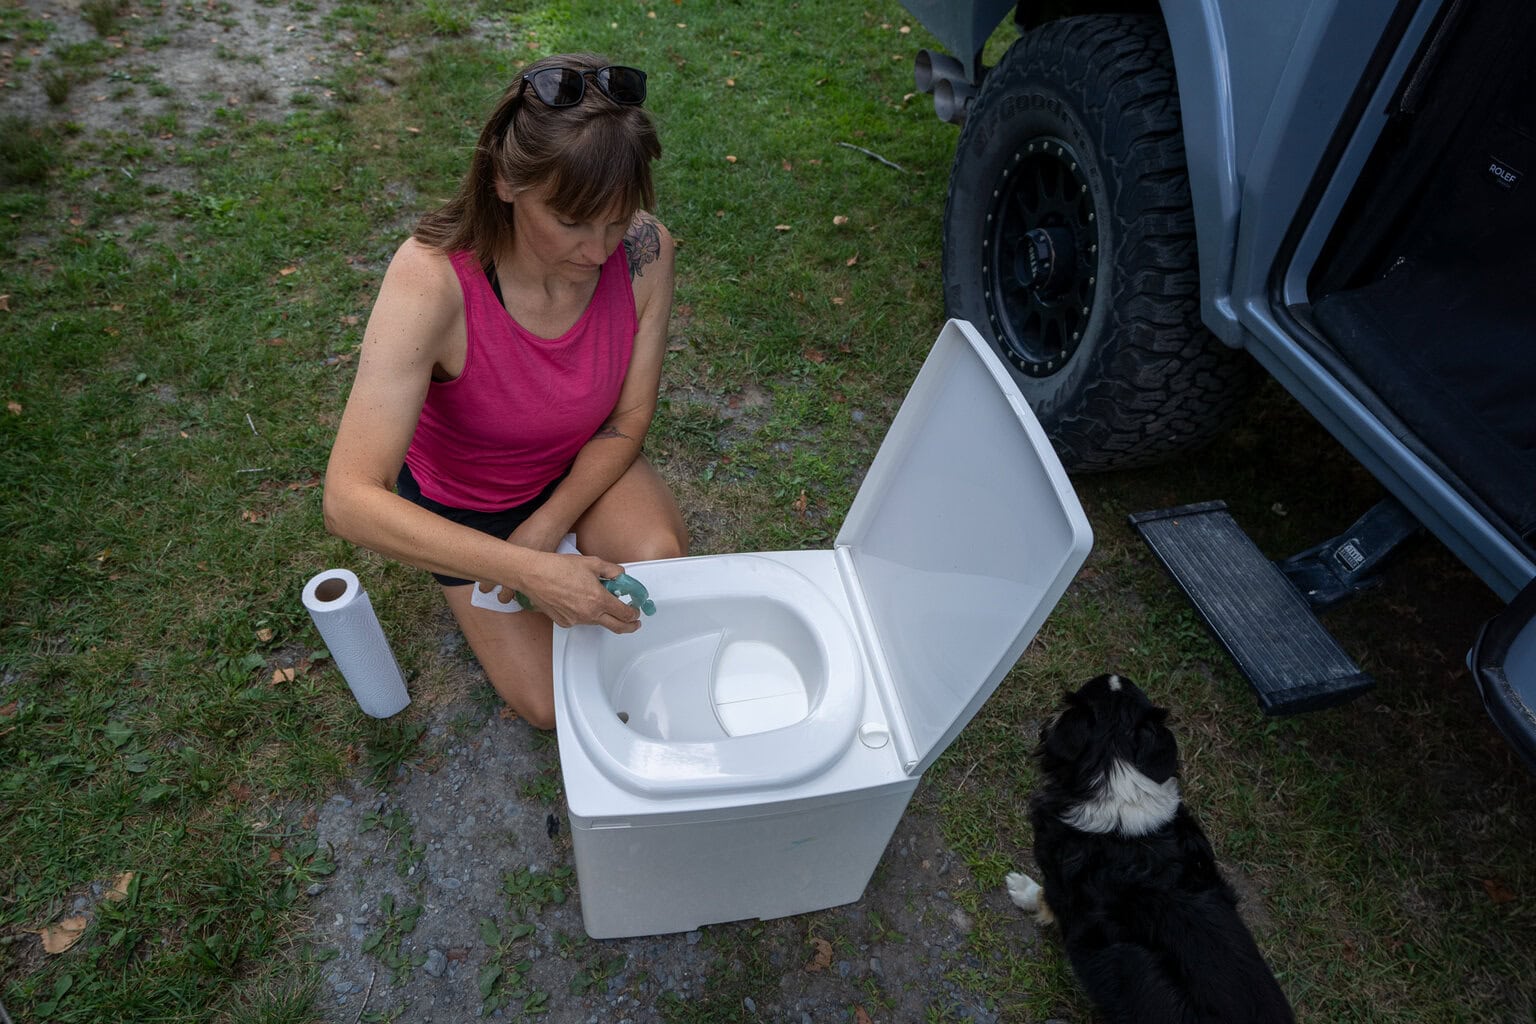
The retractable solids cover is one of the best features and a key difference from the Trelino. It sits over the solids bin and opens and closes with a turn knob.

This cover on the Cuddy Lite solves two major problems:

  • The view — it covers the poop bin so you don’t have to look at your poop when you open the lid to pee.
  • The smell — the cover creates a barrier, so odors stay relatively contained even if there in poop in the solids bin

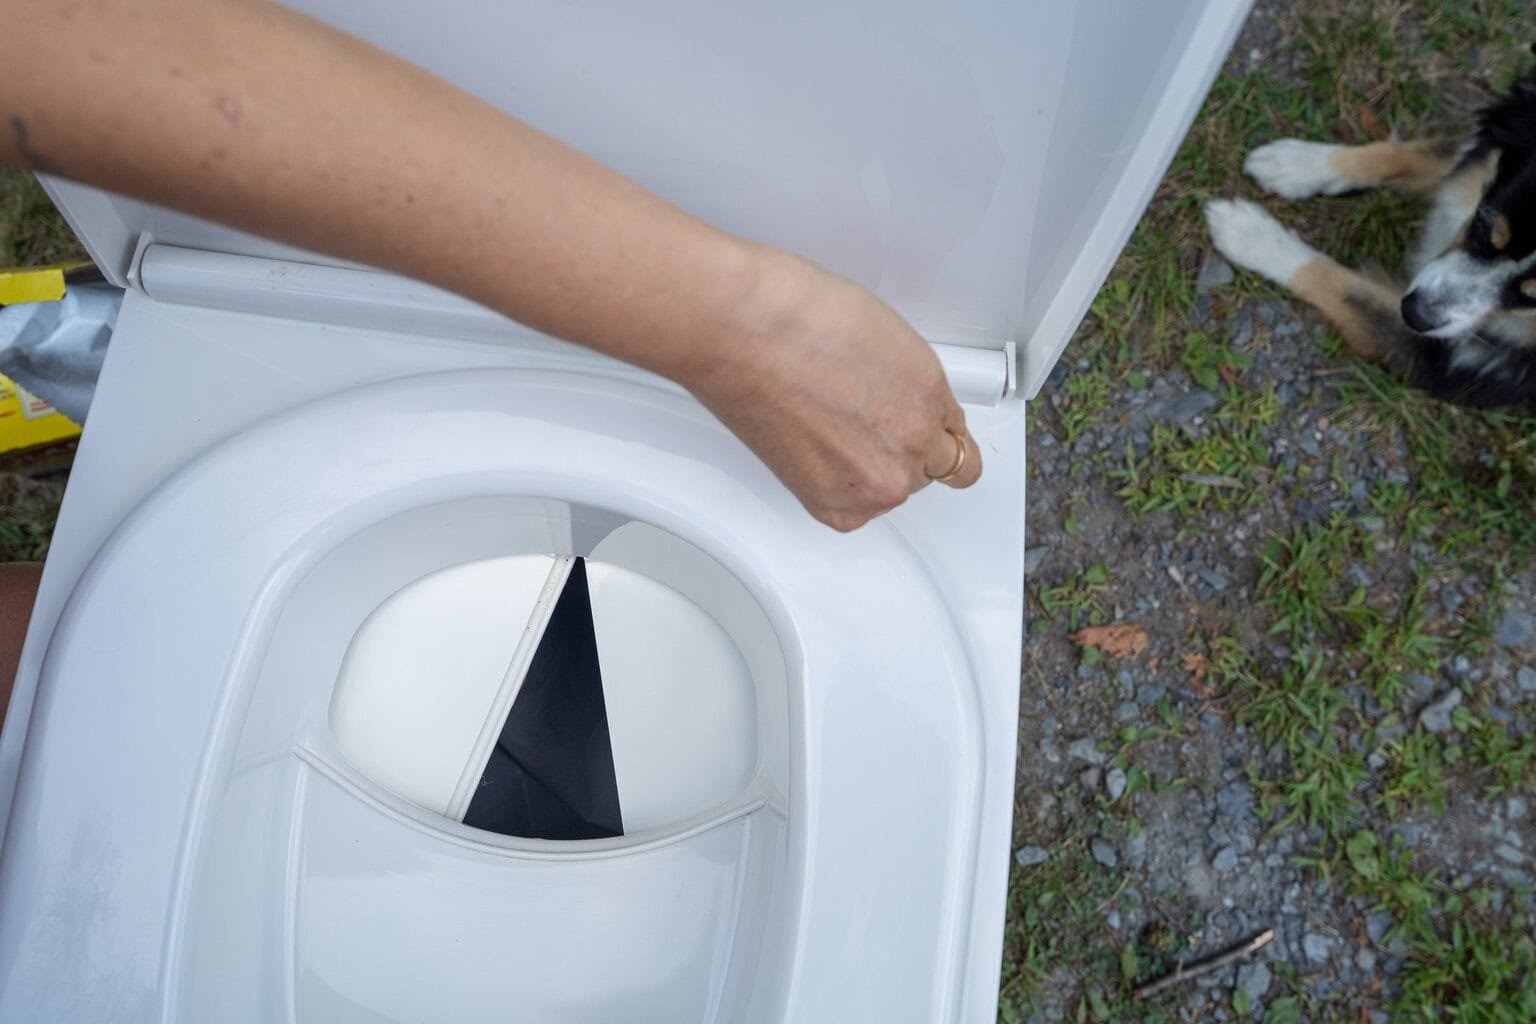
The retractable poop bin cover is designed to be closed when you are peeing and open when you are pooping. If you accidentally sit too far back while peeing and some pee lands on the retractable cover, there is a small hole at the front of the cover that funnels those dribbles into the pee jug instead of letting it pool in the solids bin. This further helps keep odors down and makes the whole system more forgiving to use, especially for women who don’t have the luxury of perfect aim.

For anyone extra sensitive to smell, Compocloset offers an optional fan kit that pulls odors through a carbon filter. In my experience, I haven’t felt the need to install this. The fan does require power, so it’s best to consider this during your build process and not as an afterthought.
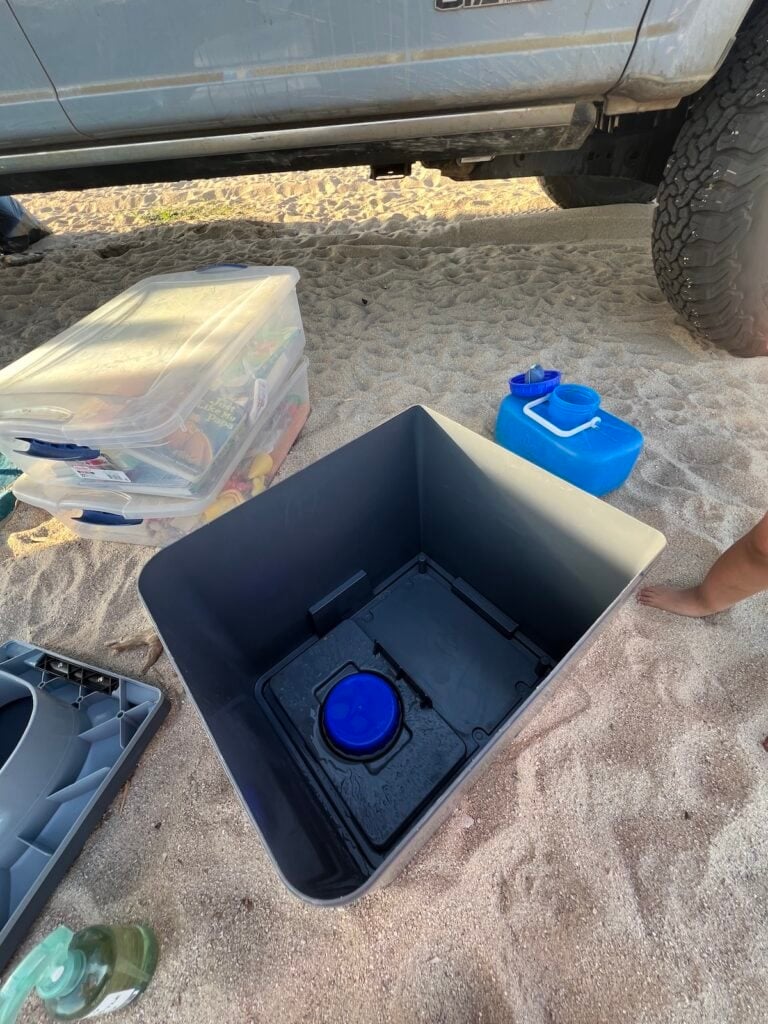
Pee Jug

The pee system on the Cuddy Lite has been a huge upgrade for me compared to any camper van toilet I’ve used.

The pee jug has a capacity of 1.7 gallons. I’m the primary person using the toilet for pee, and I typically need to empty the jug every three days. My partner mostly uses a Nalgene bottle, which helps stretch the capacity.

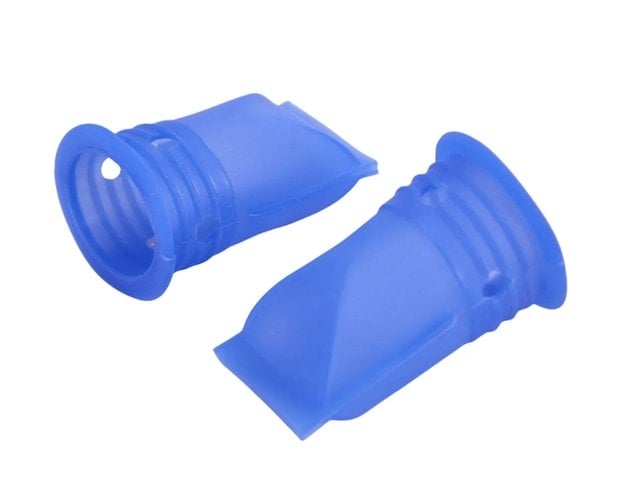
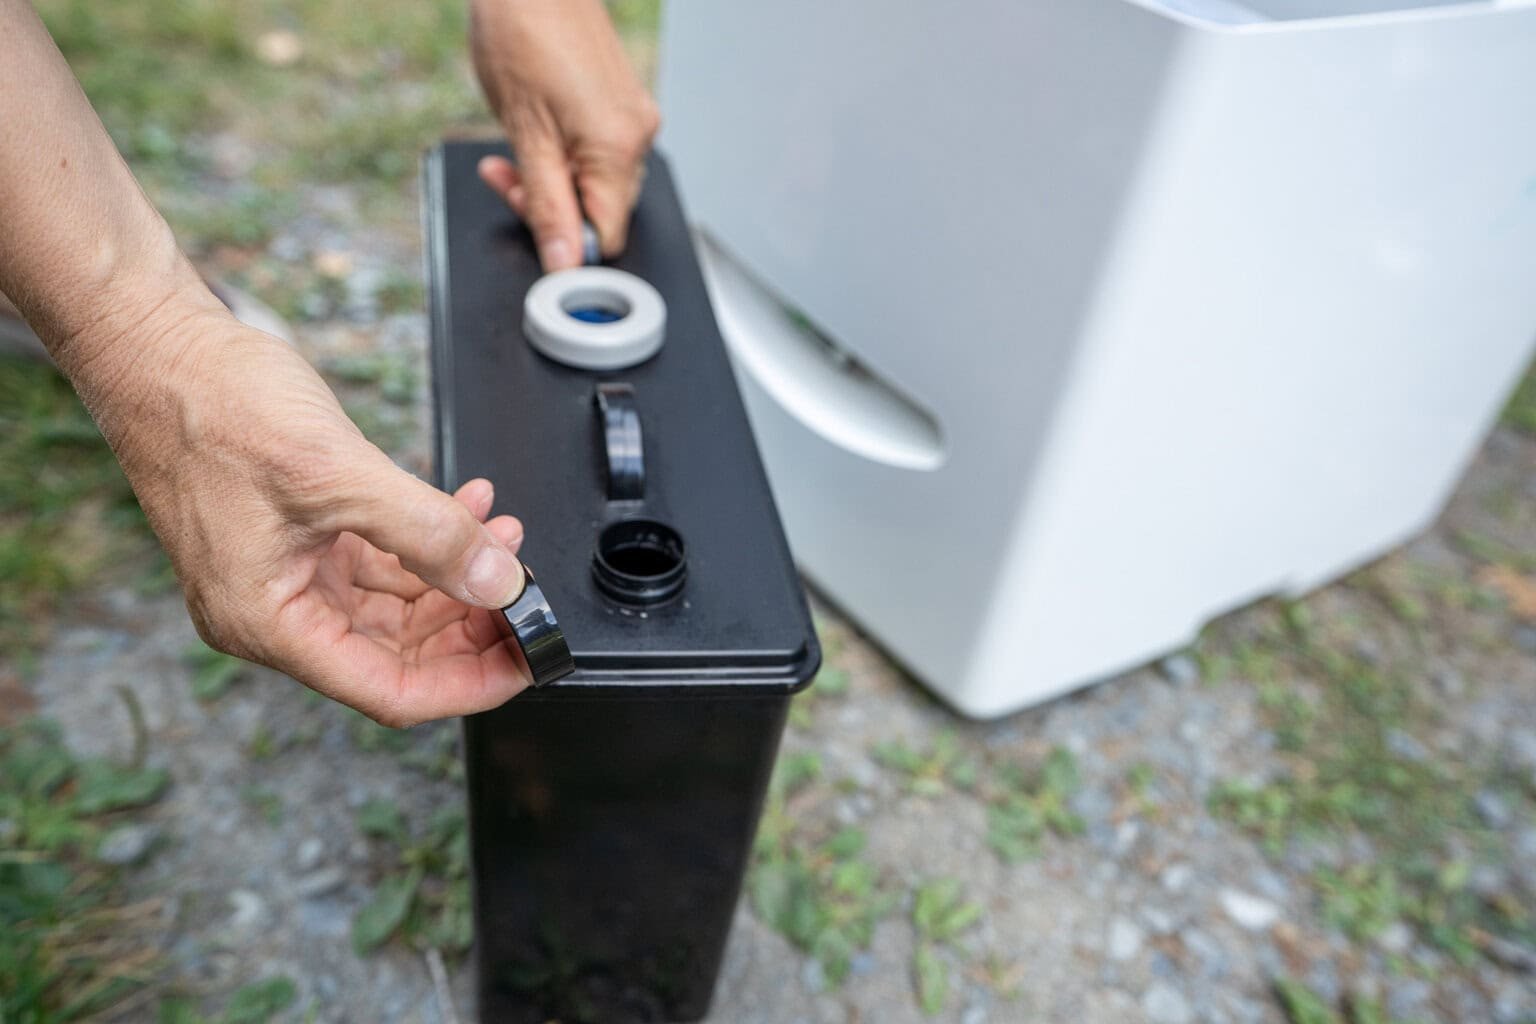
When you pee, the liquid drops through hole, into a one-way silicone valve that funnels the pee into the pee jug. The purpose of the silicone valve is to trap strong ammonia smells inside the pee jug.

Cuddy Lite toilet in a camper

To fully test it, I left urine in the Cuddy Lite for two weeks during a humid East Coast heat wave, and I was surprised by how little it smelled. I could pick up on it – but only when the toilet lid was open, and it never got so pungent that I’d be embarrassed to bring friends into my camper.

Compocloset recommends replacing the valve every 6–12 months (a two-pack runs about $15, and it’s very easy to replace). After four months of full-time use, I haven’t noticed any serious odors creeping up from the jug, which tells me the valve is still doing its job.

Closeup of the 2 way valve

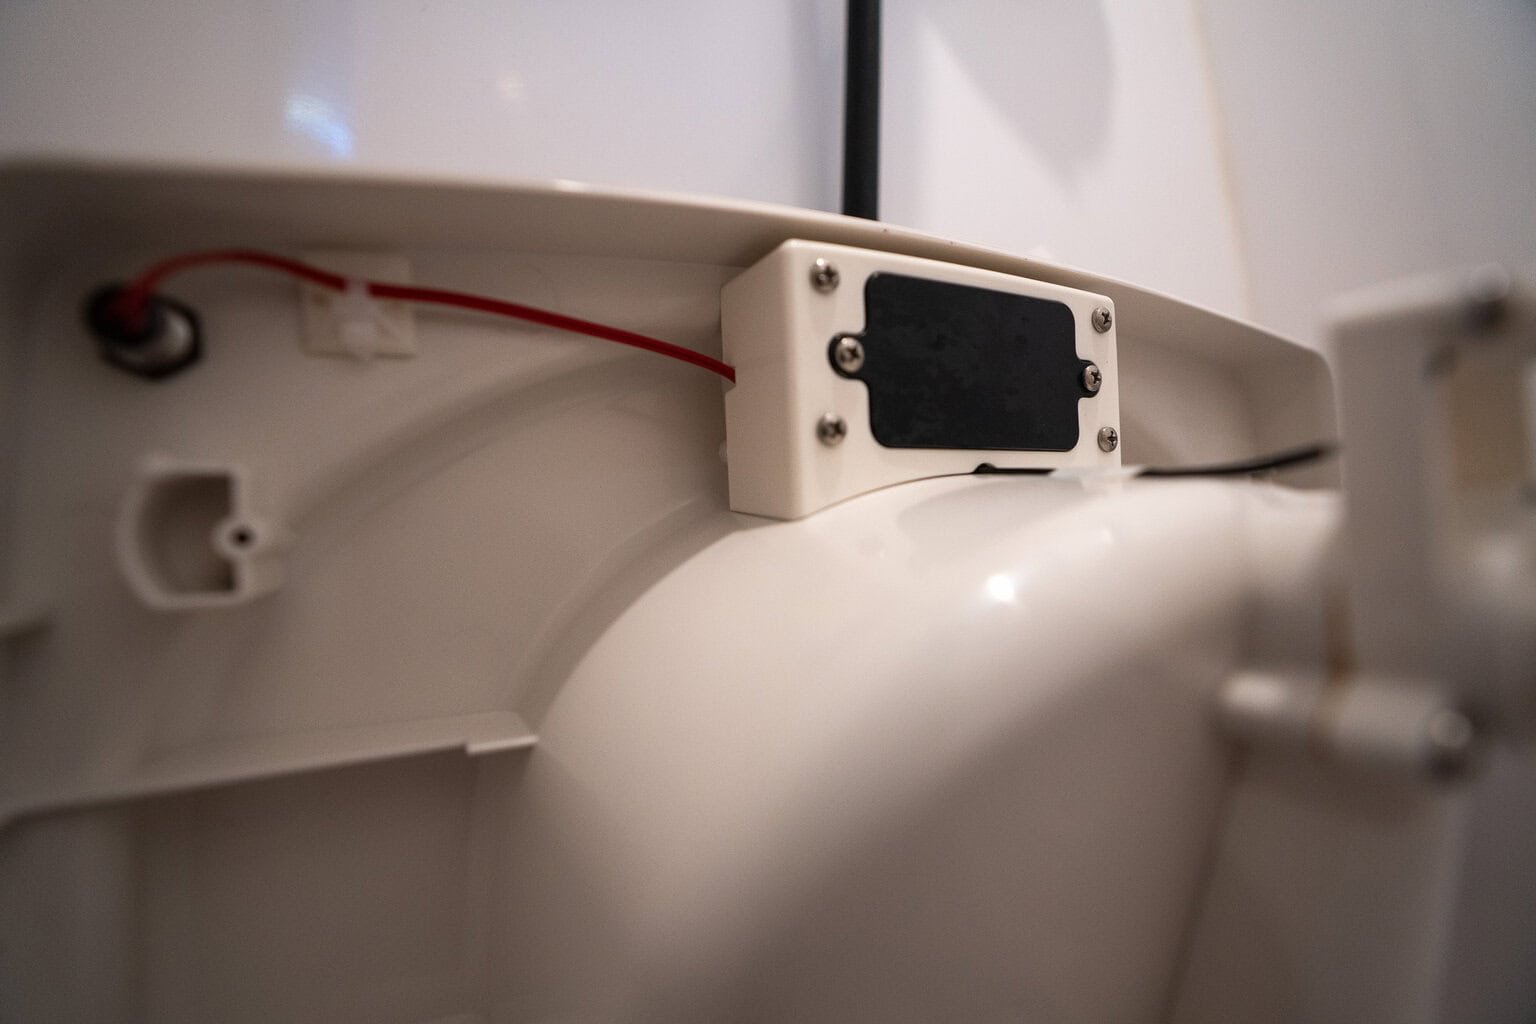
Another feature that sets the Cuddy Lite apart is the full-tank indicator light. It’s a little LED (powered by a 9V battery) right next to the seat that turns bright red when the jug is full. At first, mine didn’t work, but after some trial and error, I realized the squishy side of the cover has to face inward for the sensor to work. Once I fixed that, the light has functioned perfectly, and it’s a great reminder to dump it before it overflows.

battery compartment on the Cuddy lite
Full indicator light on the Cuddy Lite

Unlike a cassette toilet, the Cuddy Lite doesn’t require chemicals in the pee jug. This means you have a lot more flexibility with where you empty the pee. Ideally, you should use a toilet or dump station, especially in high-use areas.

But if you’re off-grid and there is no toilet available, it’s technically ok to dump urine on the ground as long as you’re following Leave No Trace principles. This means you want to walk away from your campsite and disperse the pee widely, away from vegetation and more than 200 feet from a water source.

The pee jug is black, so the contents aren’t visible when you’re emptying it. That may seem like a small detail, but when you’re dumping it at a public restroom or campground toilet, not having everyone see what’s inside makes the whole process feel a lot less awkward.

Kristen Bor demonstrating how to use the Compocloset Cuddy Lite composting toilet standing in front of a truck camper
To empty the pee jug, you screw this cap and pour out the pee

The jug itself is easy to empty, but the first couple of times, I misjudged the pouring angle and ended up spilling it all over the toilet I was emptying it into. That goes to say that the first time you’re emptying it, go slow and aim carefully.

If I could change anything on the pee jug, it would be the handle design. Instead of a proper handle, the jug has two small plastic loops, which means when it’s completely full, you need two hands to carry and pour it. It’s not unmanageable, but a built-in sturdy handle would make a big difference.
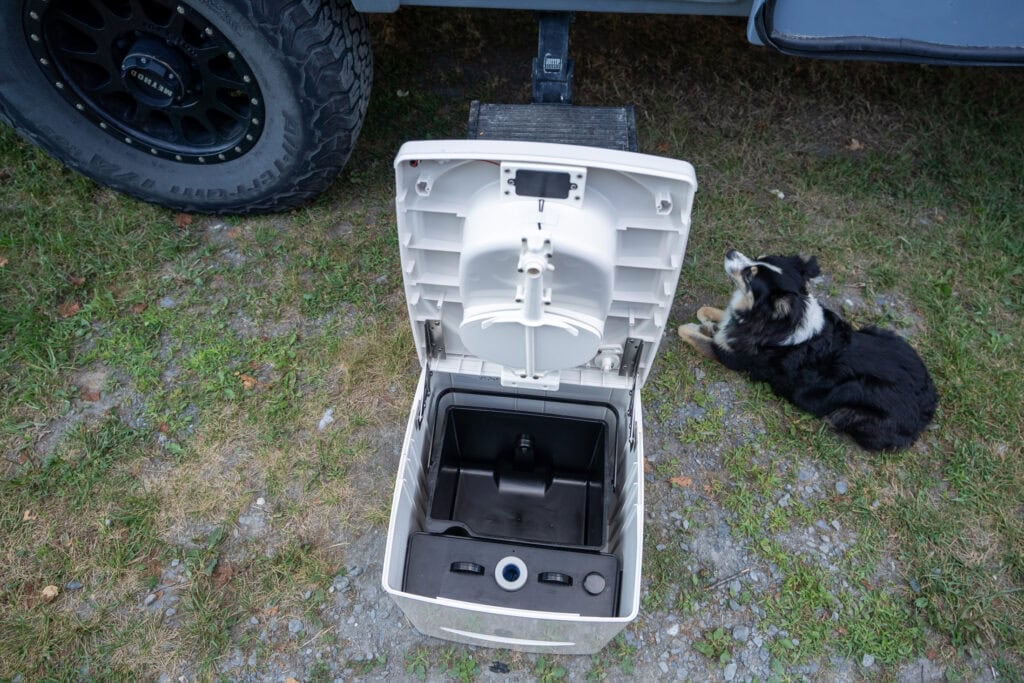
Kristen Bor demonstrating how to use the Compocloset Cuddy Lite composting toilet standing in front of a truck camper

Solids Bin

The solids system on the Cuddy Lite is one of the main reasons I chose this toilet, and after four months of daily use, it’s proven to be a great solution to common van life bathroom woes.

The 3.9-gallon solids bin is lined with a bag, and the bin is surprisingly spacious. It can easily hold up to a week’s worth of waste (for one person), including toilet paper and cover material, without pushing its capacity.

Kristen Bor demonstrating how to use the Compocloset Cuddy Lite composting toilet standing in front of a truck camper

If there is a trash can available, my preference is to toss the poop daily after both my partner and I have used it. However, there have been times when we didn’t have access to a trash can, like when camping off-grid, and we’ve let the bag sit for up to three days. Even then, I never felt like our camper was stinky from it. I also haven’t experienced nearly as much condensation as I did with the Trelino despite spending my entire summer in a humid environment.

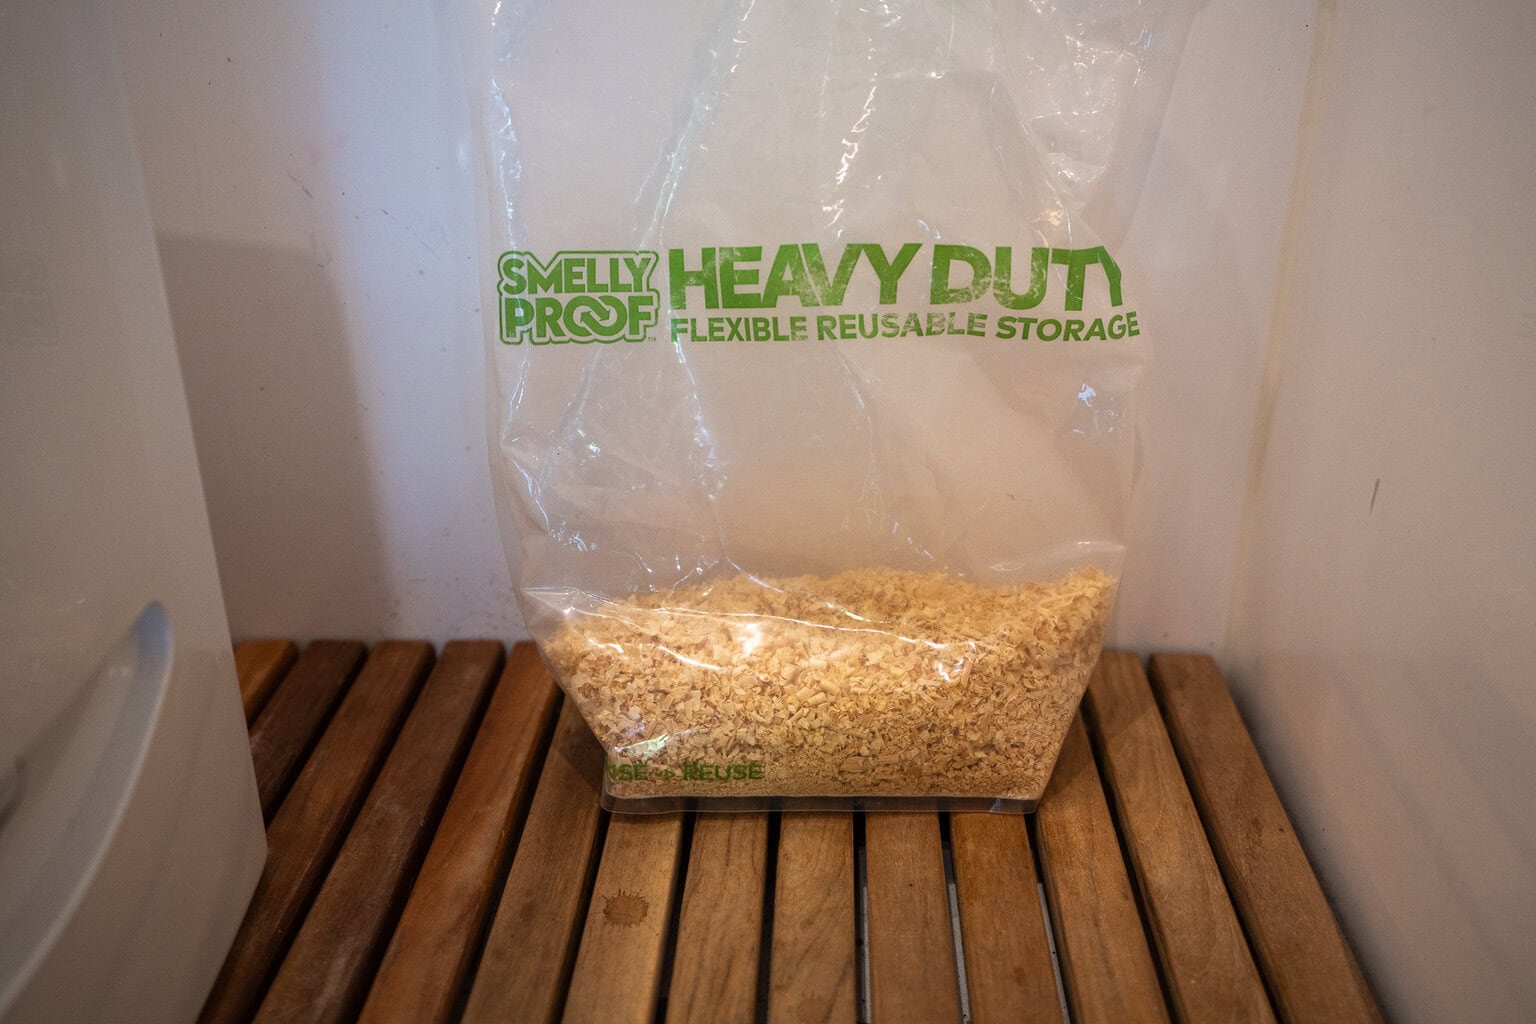
If I plan to reuse a bag for a couple of days, I always add a layer of absorbent material after each use. I’ve tried both coconut coir and wood chips, and I think the wood chips are easier and less messy since you don’t have to rehydrate them first.

a bag of wood shavings next to the Cuddy Lite toilet

The retractable solids cover, which I discussed above, makes an enormous difference when it comes to locking in smells and being able to use a single bag for a few days before throwing it out.

As for bags, I’ve experimented with a few options. The bin fits a 30-liter bag best, which makes it easy to line and tie off. Personally, I prefer using black trash bags since they’re opaque and keep things discreet, especially when tossing them at a campground dumpster. Compocloset also sells compostable liners, which are the most eco-friendly option for minimizing plastic waste. Both work fine, and the Cuddy Lite works with any bag that fits.

Kristen Bor demonstrating how to use the Compocloset Cuddy Lite composting toilet standing in front of a truck camper

Cleaning

One of the biggest perks of the Cuddy Lite is how little cleaning it requires compared to a traditional composting toilet or a cassette toilet. Since the solids go straight into a bag-lined bin, there’s no agitator or compost chamber to scrub out. Once the bag is tied off and tossed, the bin is essentially clean.

For daily upkeep, I spray the urine diverter and seat with a vinegar-and-water mix to prevent any residue, then follow with a pleasant-smelling cleaner to keep it smelling fresh. It takes less than a minute but makes a big difference.

Kristen Bor demonstrating how to use the Compocloset Cuddy Lite composting toilet standing in front of a truck camper

If I could change one thing on the Cuddy Lite, it would be the ability to lock the retractable cover in place. When I’m cleaning the cover, it tends to move around as I wipe it down, and I have to hold the knob in the closed position to keep the cover from sliding from one side to the other. It’s not a dealbreaker, but a locking mechanism would make the whole process easier.

The only real cleaning challenge is the inside of the pee jug. The opening is too small to get in there with a brush, so it’s pretty much impossible to scrub out any buildup that forms over time. All you can really do to clean it is rinse it out with water, and if the jug ever gets too gross, Compocloset does sell replacement pee jugs.

Cuddy Lite vs. Trelino

Since the Trelino is the closest competitor to the Cuddy Lite, I wanted to provide my comparison now that I’ve used both.

Before getting the Cuddy Lite, I was using the Trelino in my truck camper. After a few months using the Trelino down in Baja, I was really disappointed with it — and honestly confused why my experience didn’t match all the glowing reviews I’d read. That frustration is what pushed me to keep searching for a better solution.

While the Cuddy Lite and the Trelino, are designed to do the same thing – separate liquids and solids in a compact, portable toilet – my experience with them couldn’t have been more different.

So how does the Cuddy Lite compare to the Trelino?

Odor Control

  • Trelino – The poop bin does not have a cover. Every time I opened the lid to pee, I had a clear view of the poop, and the smell filled my camper. The silicone valve on the pee jug also wore out quickly. I had to replace it monthly because ammonia smells crept back into the van.
  • Cuddy Lite – A retractable solids cover hides waste from my view and blocks poop odors. A small hole at the front funnels stray dribbles into the pee jug, which also helps reduce smells. I’m on month 4 with my Cuddy Lite, and the silicone valve still hasn’t needed to be replaced.

Design & stability

  • Trelino – The seat and lid are one piece that has to be completely removed from the toilet and set on the floor when emptying the pee or poop. This felt a bit unsanitary. The Trelino comes in a few sizes, but the comparable Evo L weighs 10.8 pounds and is lighter to carry. The Trelino cover has a soft-close mechanism which is a nice touch.
  • Cuddy Lite – The hinged lid and seat stay upright, making it cleaner and easier to empty. The Cuddy Lite is heavier (19 lbs), which it a bit tougher to move…but it also helps keep it from sliding around in the camper. The seat feels a little more like a standard household toilet.

Pee System

  • Trelino – The Pee jug is blue and is more transparent. The Trelino Evo L has a larger pee jug (2.6 gallons), so it has to be dumped less frequently. The Trelino doesn’t have any indicator that lets you know when the pee jug is full, which, in my experience, resulted in it overflowing several times. The handle on the Trelino pee jug makes it easier to carry than the Cuddy Lite.
  • Cuddy Lite – The pee jug is black and completely opaque. The pee jug holds 1.7 gallons. There is red indicator light that signals when the jug is full, letting you know it needs to be emptied. Carrying the Cuddy Lite’s pee jug when it’s completely full requires two hands due to the placement and size of the handles.

Verdict: Cuddy Lite vs Trelino

The Cuddy Lite outperforms the Trelino in every way that matters – smell, usability, and overall design. It does cost a little more, but in my opinion, it’s worth it for something that you rely on every single day and that plays such a big role in keeping your van odor-free.

Where can you buy the Cuddy Lite?

If you’ve made it this far, you’re clearly serious about upgrading your toilet setup. As a thank-you for reading, I’ve got a little bonus for you.

Use the code “BEARFOOTTHEORY30” at checkout on Compocloset’s website to save $30 on your purchase of the Cuddy Lite.

The Cuddy Lite is also available select RV and van-life gear retailers. However, ordering direct is usually the best option since they offer free shipping to the US and Canada and a free 30-day return policy for unused products. This means if you buy it and it doesn’t fit in your van like you thought it would, you can return it without a hassle.

The Compocloset website also has a great resources page that is worth checking out if you have general questions about composting toilets.

Coming Soon: Cuddy Lite S 1 Upgrade

If you’re already loving your Cuddy Lite, there’s exciting news on the horizon! Compocloset is launching the S 1 Sealing Toilet, a dry-flush system that takes what the Cuddy Lite does well (separating liquid and solid waste) and adds an auto‑sealing bag mechanism for the poop.

How will the Compocloset S1 work?

  • You use the toilet just like you do now. The pee will still go into the pee jug and the poop into a bag
  • After you poop, there will be an internal mechanism that uses heat to automatically seal the poop bag closed and drop it into the solids bin. You won’t even have to touch the bag during this process
  • The bin will be able to hold 3–5 sealed bags, so you’ll be able to poop several times without having to empty the bin.

Having each poop sealed is going to be a game-changer, especially when you are dispersed camping and don’t have access to a trash can. This means you’ll be able to leave the sealed poop bags in the solids bin without having to worry about compost material or any smells escaping.

And the best part is if you already own the original Cuddy or the Cuddy Lite, you won’t have to buy a whole new toilet. Compocloset will be offering an S 1 Adapter Kit, complete with the sealing unit, battery, control panel, and a new solids bin. That means you’ll be able to upgrade your current Cuddy into this auto-sealing version when it’s released at the end of 2025.

I’m really excited about this and will most definitely be giving the S1 upgrade a try.

Final Thoughts

After testing toilets in my vans since 2016, the Compocloset Cuddy Lite is the best compact portable toilet I’ve used in 9 years of van life. It outperforms the Trelino and other urine-diverting toilets in odor control, usability, and overall design.

Yes, the Cuddy Lite costs more, but it’s worth it for something that makes dealing with poop and pee so much easier and less stressful on the road.

Frequently Asked Questions

What is the difference between the original Cuddy and the Cuddy Lite?

The original Cuddy is a traditional composting toilet. It does not use a bag and instead has an agitator in the solids bin to mix poop with composting material. It breaks down waste over time and needs to be dumped after ~20 poops.

The Cuddy Lite, on the other hand, uses a bag system with no agitator. It needs to be dumped more frequently, but the bag makes it easier to clean and less messy. It’s also more forgiving if you don’t want to worry about perfectly separating liquids and solids every time.

How often do you have to empty the pee on the Cuddy Lite?

The pee jug has a capacity of 1.7 gallons and needs to be emptied every 3 days for a single person or every 1-2 days when used by 2 people.

How often do you need to empty the poop in the Cuddy Lite?

The solids bin on the Cuddy Lite has a capacity of 3.9 gallons. In my experience, this is enough room for 7 days of poop for a single person. Ideally, you should empty the poop every 3 days to reduce smells.

What kind of bags can you use with the Cuddy Lite?

The Cuddy Lite’s solid bin works best with a 30-liter bag. You can use any type of bag you want, whether that a normal trash bag or a compostable bag. It does not require a special bag purchased from Compocloset.

Is the Cuddy Lite hard to clean?

The Cuddy Lite very easy to clean. Since the poop goes straight into a bag, you just tie off the bag and toss it in any garbage bin. For pee, I just wipe the seat and urine diverter with vinegar and water each day. When the pee jug gets full, you remove it and dump the pee into any toilet or outside following Leave No Trace methods.

Do you need to vent the Cuddy Lite to the outside of your van?

No. Unlike many composting toilets, the Cuddy Lite doesn’t require outside ventilation. It’s completely portable and works without a power hookup.

Does the Cuddy Lite require power?

No, the Cuddy Lite does not require a power source, unless you want to install the optional fan that is sold separately. The full indicator light is powered by a single 9-volt battery.

Is the Cuddy Lite worth the price?

Yes – if you live in a van or RV full-time, a toilet that controls odors and is easy to clean is worth the investment. It’s the best compact, portable toilet I’ve tried in nine years on the road.

Have you tried the Cuddy Lite or another composting-style toilet in your van or RV? I’d love to hear about your experience. Drop your questions or thoughts in the comments below.

The post Compocloset Cuddy Lite Composting Toilet Review appeared first on Bearfoot Theory.

42 Van Life Essentials that Make Life on the Road Easier

This is what I have: When I first hit the road in my first Sprinter Van (nearly a decade ago!), I packed way too much stuff. My kitchen cabinets were overflowing, I packed clothing I never touched, and had a lot of gear that just didn’t hold up to the realities of van life.

Dusty dirt roads, limited storage, and constantly shifting routines quickly showed me what gear was actually useful vs what was just taking up space. Since then, I’ve lived in multiple vans and now travel full-time with my family in a Rossmonster truck camper.

With each setup, I’ve refined my gear list to the essentials—the things that get used regularly, make life easier, and help keep our camper functional and enjoyable.

Now, I’m sharing the gear that’s truly earned its place – so you can skip the clutter, pack smarter, and make the most of your time on the road. For more recommendations, check out my Van Life Clothing List and my favorite Camper Van Kitchen Gear.

Van Kitchen Must-Haves

Cooking Table

GCI Outdoor Slim-Fold Cook Station

These days we mostly cook on our induction stove, but for years, we prepared all of our meals on this GCI Outdoor Slim Fold Cook Station. It takes just a few seconds to set up and provides tons of counter space for your ingredients and cooking gear. When it’s time to drive, it folds down flat and can be squeezed into any open spot in your van.

A woman stands next to the Eureka Ignite Camp Stove sitting on a GCI Outdoor Slim Fold Cook Station table. She is standing next to her Sprinter van.
Using the GCI Outdoor Slim-Fold Cook Station
Coffee Maker

Aeropress Go Travel Coffee Press

After trying bulky French presses and percolators, the AeroPress Go has become my go-to for van life mornings. It’s fast, compact, and doesn’t hog power or take up room like a Keurig. Cleanup is a breeze—you just pop the puck of grounds into the trash, so you don’t end up wasting a bunch of water to rinse out the grounds. Plus, it’s small enough to stash anywhere and tough enough to survive cabinet rattles on bumpy roads. Learn more in my Aeropress review.

A woman using the Aeropress Go Travel Coffee Press in her Sprinter van
Using the Aeropress Go Travel Coffee Press
Durable Dishes

Hydro Flask Camp Plates and Bowls

After dealing with scratched-up plastic dishes and too-small camp bowls, I finally upgraded to these stainless steel bowls and plates from Hydro Flask. They’re lightweight, easy to clean, and way more durable than anything I used before. They are thick enough that they never are too hot to hold, and they’re actually big enough for a hearty bowl of soup or a big pasta dinner.

plates and bowls on the counter in the Rossmosnter Baja Trail truck camper
Travel Mug

Yeti Rambler Tumbler

A solid camp mug is non-negotiable in van life, and I’ve been using the Yeti Rambler Tumbler for years. It keeps morning beverage hot for hours and doubles as my go-to cold drink cup in the afternoons. The lid is super easy to clean – there’s no hidden crevices or weird parts – and it does a great job at preventing spills when we’re bumping our way down dirt roads.

Kristen relaxing in Yeti Camp chair at desert campsite with Sprinter van behind her
Using the Yeti Rambler Tumbler
Food Storage

Stasher Bags

I love using Stasher Bags because they’re reusable, made of durable silicone and hold up to all kinds of van life needs. They’re perfect for packing hiking snacks, storing leftovers, and even reheating since they can be placed in boiling water or in the microwave. Plus, they help cut down on our plastic bag use.

A woman sitting on a rock smiles down at her Stasher Bag with tortilla and tuna packets as a hiking snack inside
Using Stasher Bags on a hike
Water Filter

Stealth Flex Water Filtration System

I have the Guzzle H2O Stealth Flex installed under my sink, and it gives me peace of mind knowing our drinking water is clean and free of harmful toxins. It’s compact, easy to install in tight spaces, and the water tastes great—no matter where we fill up. Guzzle also makes other options like their Stream filter, which I’ve got my eye on for pumping water straight from lakes and rivers into my tanks.

Van Bathroom Essentials

Composting Toilet

CompoCloset Cuddy Lite

I recently upgraded from a foldable toilet to this CompoCloset Cuddy Lite is a compact, portable “composting” toilet that’s about the same size as a cassette toilet, but it’s way easier to clean. It doesn’t require permanent installation or external venting. The toliet separates the pee and poo. You can dump the pee container is easily emptied into any , and the pooptoilet separates the pee and poop and once you dial in the compost setup, it’s low-odor and easy to manage. For other toilet options, see my roundup of the best toilets for van life.

Reusable Pee Cloth

Kula Cloth

The Kula Cloth is one of my go-to hygiene essentials for van life and every outdoor adventure. This reusable pee cloth is super absorbent, antimicrobial, and way more hygienic than drip drying or packing out toilet paper on hikes. Once you try it, you won’t go back. Learn more about the Kula Cloth in my Kula Cloth review.

Kristen Bor hiking with a Kula Cloth pee rag hanging on the outside of a hiking backpack
The Kula Cloth is great for in the van and in the outdoors

Everyday Van Essentials

Durable Blanket

Rumpl Blanket

I’ve used Rumpl blankets in my van since 2016 and they’re an absolute essential, especially if you have dogs. Dog hair doesn’t stick to these blankets (just shake em’ outside the van) and they’re fully machine washable.

Kristen Bor laying on the bed in a Sprinter van with the back doors open. She is laying on a Rumpl blanket and looking out at a view of a red rock formation.
Rumpl blankets make it easier to keep your van bed clean
Multipurpose Towels

Nomadix Quick Dry Towels

Quick-dry towels pack down small, dry fast, and serve so many purposes on the road. I use Nomadix quick dry towels for everything from post-shower drying to wiping down dishes or laying out at the beach. They’re lightweight, versatile, and way more practical than bulky traditional towels.

Privacy

Blackout Window Coverings

Blackout window coverings are a van life essential for creating a cozy, private space at night and for helping control the temperature inside, so you stay comfortable no matter where you’re parked.

Bug Free Air Flow

Bug Screens

I didn’t have bug screens for the first 5 years I did van life. Now that I have them, I realize how crazy that was! Bug screens allow you to keep your doors open for airflow without letting annoying mosquitoes and other insects in.

Greywater Collection

Sea to Summit Folding Bucket

If your van doesn’t have a built-in greywater tank, a collapsible or folding bucket for collecting grey water is an easy, space-saving solution. It catches used sink water from washing dishes or brushing teeth, making it simple to dispose of responsibly and follow Leave No Trace guidelines on the road.

A collapsible bucket collects greywater underneath a sprinter van to follow Leave No Trace principles while campling
Using a collapsible bucket to collect greywater
Backpack

Deuter Trail Series Backpacks

A good backpack is a must-have for hiking, outdoor adventures, and even everyday tasks like errands or grocery runs. I love the Deuter Trail series because it comes in a variety of sizes, so you can pick the one that fits your needs, whether you want something small for quick trips or larger for longer hikes.

Kristen Bor packing a deuter trail backpack in a rossmonster truck camper

Van Patio Gear

Camp Chair

Helinox Sunset Chair

I’ve tried a lot of camp chairs over the years and I keep coming back to the Helinox Sunset Chair. I love the supportive high back and that it’s relatively lightweight at 3lbs 4oz. It’s packable and can be easily stored in the van.

Kristen Bor sitting in camp chair next to camp table at a campsite in Colorado
Using the Helinox Sunset Chair
Camp Table

NEMO Moonlander Table

The NEMO Moonlander is my favorite compact camp table. It’s sturdy, durable, and packs down small, making it easy to store in the van. I love its versatile, dual-height design, perfect for everything from setting up snacks to playing cards or kicking back at camp.

Boy with face blocked out at a campsite on the beach next to a Rossmonster Baja Truck camper. Boy is sitting at NEMO moonlander table
The NEMO Moonlander Table is also great for kiddos since it’s really durable
Outdoor Mat

CGEAR Sand-Free Mat

Having an outdoor mat is essential for keeping dirt, dust, and sand out of your van (or at least creating a buffer). I love the CGEAR mat because it’s more packable than a traditional rug and it filters out fine sand and dirt.

The CGEAR Sand Free Mat helped minimize the amount of sand that made it into my Rossmonster Baja Trail truck camper this winter in Baja, Mexico
Awning

MoonShade Portable Awning

Having an awning is essential if you’re traveling in hot, sunny places. I didn’t have a permanent awning on my second van, so I used the MoonShade as a less expensive and portable solution. It can be set up on your side or back doors, plus it packs down small. I’ve even tested it in windy conditions and the MoonShade holds up!

*Save 10% by using the code BEARFOOTTHEORY at checkout*

String Lights

BioLite Luci Solar String Lights

Create some camp ambiance with these BioLite string lights! These are a great way to brighten up camp and best of all, they’re charged by the sun (or a USB). I especially love having string lights at camp when burn bans mean no campfires.

Sprinter Camper Van parked at a campsite at night with two camp chairs set up next to a campfire with string lights hanging for a nice ambiance
Using BioLite string lights to create night time ambience at camp
Camp Light

BioLite AlpenGlow 500 Lantern

The BioLite AlpenGlow lantern is rechargeable and I love that there are a variety of light settings to match any vibe. My son loves the multicolored one! Whether you’re cooking dinner, hanging out at the picnic table, or just need to spot your campsite after an evening walk, this lantern brings plenty of light and a cozy vibe.

Van Life Clothing Essentials

Hiking Shoe

Oboz Katabatic LT Hiking Shoe

The Oboz Katabatic LT shoes are my go-to for van life because they’re lightweight, supportive, and have great traction. They’re comfortable straight out of the box and easily transition from trail to town—making them a practical, space-saving choice when you live on the road. Read my Oboz Katabatic review for more details!

Sandals

Teva Universal Trail Sandals

Teva Sandals are a great choice for van life because they are versatile and durable enough to handle various outdoor activities, including hiking and water sports. Their comfortable design and adjustable straps also make them easy to slip on and off. I share more thoughts about the Universal Trail Sandals here.

Looking to upgrade your camp cooking gear for car camping or van life? Here is our checklist for the best outdoor camp kitchen essentials.
Wearing the Teva Universal Trail Sandals at camp
Sun Hat

Wallaroo Sedona Hat

Having a hat is great for sun protection when hiking and spending time outdoors, but let’s be real – I also love that wearing a hat can hide how long it’s been since I’ve last washed my hair. I’ve worn the Sedona hat for years and it’s held up well on all my adventures.

*Get 20% off Wallaroo hats with code BEARFOOT20*

Kristen Bor sitting on edge of Sprinter Van in Moab on a hot summer day
Wearing the Wallaroo Sedona Hat at camp
Clothing

Moisture Wicking Clothing

Moisture-wicking clothing is perfect for van life because it keeps you dry, comfortable, and odor-free. It’s also easy to hand-wash and quick to dry, cutting down on laundry stops. A few of my go-to favorites are the Patagonia Capilene Cool Daily Hoody, the REI Sahara Shade Hoody, and the Outdoor Research Echo Hoody.

Van Life Organizational Gear

Packing Cubes

REI Co-op Packing Cube Set

Packing cubes are essential for staying organized in the van. Instead of having to pull out a bunch of clothes looking for a specific item, you can just grab the cube you need. I have one for tops, one for bottoms, one for undies… you get the idea. These are especially useful if you’re living in your van with another person.

Packing cubes in a cabinet in a Sprinter van
Use different color packing cubes than your van companion so you don’t get them mixed up

Van Electronic Essentials

Portable Power Station

EcoFlow RIVER 2 Pro

If you have a robust power system, you won’t need this…but if you find your battery capacity to be lacking, this River 2 PRO portable power station can help keep you functioning. I have one of these for basic car camping, and it’s charges my laptop and other devices so quickly. The power station itself charges from 0-80% in less than 1 hour using an AC outlet too!

WiFi

Starlink Mini

The Starlink Mini has been a complete game-changer for me. I used to have to go into town and sit in the library or a coffee shop when I had zoom meetings. Now I can take care of business wherever we are camping. It’s also great for streaming shows without eating up the data on your phone plan. Mine is mounted to my roof, which is so convenient. My only complaint is that it consumes a lot of battery power, so you got to make sure to turn it off when you don’t need it. If the Starlink isn’t for you, check out your other options for getting wifi in your van.

Must-Have Recovery & Safety Gear

Recovery boards

Maxtrax

Some dispersed camping roads are sandy or become muddy after rain so having a way to self-recover if you get stuck is important. The Maxtrax recovery boards are my #1 must-have recovery accessories! We got stuck in some deep sand in Baja, and if it weren’t for these boards, getting out would have been near impossible.

Rossmonster Baja XL truck camper in the snow with Max Trax recovery gear on the side
Easy access Max Trax storage on my Rossmonster Baja XL truck camper makes it easy to self-recover in more terrains.
Battery Jump Starter

Hulkman Jump Starter

Having a battery jump starter is essential for van life because it allows you to easily jump-start your vehicle without having to rely on external assistance, which is important especially if you plan to camp in remote areas.

Portable Air Compressor

Viair Air Compressor

With the miles we put on our vans, tire pressure is something to monitor closely. Airing down your tires before driving on soft surfaces (like sand) helps you avoid getting stuck, however, you need a way to air back up your tires when you get back to pavement. The Viair Air Compressor is a reliable and fast option.

Satellite Communication Device

Garmin InReach Mini 2

Having a two-way satellite communication device for van life gives ultimate peace of mind, especially if you camp often in places without service. A few years ago, my Sprinter battery died in winter when I was camped somewhere without service, and I was able to message my Dad with my location so he could reach out to AAA for me.

Folding Shovel

Gerber E-Tool Folding Spade

A shovel is a multi-functional van life essential, great for digging catholes, getting unstuck, or putting out campfires. I like this Gerber folding spade because it folds down for easy storage.

Carbon Monoxide Detector

Kidde Carbon Monoxide Detector

When you’re living in a small space with a diesel heater, propane stove monoxide detector is a must. This Kidde detector is a reliable option and updates every 15 seconds for an accurate reading.

Levelers

Lynx Leveling Blocks

The most common argument my partner and I have in our camper is whether or not the van is flat. That ended once we got these Lynx leveling blocks. They are inexpensive, lightweight, and are really easy to drive up onto.

Kristen Bor sitting on the front of the Rossmonster Baja LX Adventure Truck
The leveling blocks can be split up and put under whatever tires are lower
Two Way Radio

Rocky Talkies Mountain Radio

If you plan to caravan with friends, the Rocky Talkies Mountain Radios make communication on the road easy and fun. They’re especially handy to have in areas where cell service is spotty such as in Baja or deep in the mountains.

Best Van Life Cleaning Supplies

Eco-Friendly Cleaners

Attitude Cleaning products

In a small space like a van, what you clean with really matters, both for your health and the environment. I use Attitude’s unscented dishwashing liquid and all-purpose kitchen cleaner because they’re EWG Verified, meaning they’re free of harmful chemicals. That’s especially important when I’m dumping greywater outdoors.

Dish Brush

Oxo Soap Dispensing Brush

I’ve been using the OXO dish soap dispensing brush for years in my van kitchen. It’s super convenient and helps me conserve both soap and water which are two things I’m always trying to stretch on the road. It makes doing dishes in a small sink way easier.

Vacuum

Dyson Car + Boat Handheld Vacuum

Keeping my van clean, especially with dogs, can be a challenge. Between the hair, dirt, and crumbs, it doesn’t take long for things to feel messy. I use a Dyson handheld vacuum because it’s compact and the cordless features means I can use it everywhere in my rig. Make sure to get a flexible hose extension so its easier to use in hard to reach places.

Essential Van Life Memberships

Campsite Finder

iOverlander

iOverlander 2 is one of my favorite tools for finding free campsites, water fill stations, dump spots, and other road trip essentials. The interface is clean and easy to use, and the filters make it simple to find exactly what I need. I recommend the paid membership so you can download maps and campsite info for offline use. It’s a small investment that’s saved me time, stress, and money on the road.

Campsite Finder

Harvest Hosts

If you spend a lot of time driving through states that don’t have a lot of public lands with free camping, Harvest Hosts is a great option for finding places to park overnight. You can “camp” at more than 2,300 unique properties such as wineries, farms, breweries, museums, and more. You can also add on Boondockers Welcome which adds access to 3000+ private properties across the US as well.

A few camper vans are parked spread out in a field at sunset. They are camped at a Harvest Hosts location in Michigan.
Camping at a Harvest Hosts in Michigan
Hiking Trail Finder

AllTrails+

This is my favorite app for finding local trails while traveling. The free version provides basic functions like searching for nearby trails and getting directions to the trailheads, but the paid version (get 30% off when you sign up for AllTrails+ here) has a lot of extra features (like offline maps.

Annual Park Pass

America The Beautiful National Park Pass

Lots of van lifers hit the road to explore America’s National Parks. Save money on entrance fees by buying an annual park pass which allows you unlimited entry for 12 months from your purchase date.

Save this post to Pinterest

Am I missing any van life essentials from my list? Let me know in the comments!

The post 42 Van Life Essentials that Make Life on the Road Easier appeared first on Bearfoot Theory.

My Minimalist Van Life Clothing Packing Checklist (after 9 years on the road)

After nine years of van life, including my first messy attempt at packing back in 2016, I’ve learned exactly what clothes and gear you actually need for van life. I now live full-time in my 100 square foot truck camper with my partner and young son, and my wardrobe is streamlined, functional, and clutter-free.

In this guide, I’ll help you downsize your closet with confidence so you can feel prepared, comfortable, and ready for adventure — without overflowing cabinets and clutter everywhere. By the end, you’ll know how to create a simple, versatile wardrobe that works for an active, outdoor lifestyle on the road.

The Power of Packing Light

When you have too many clothes in a van, a few things start to happen. I promise you, I’ve been there, and none of these make life on the road easier…

  • You lose valuable storage space. Every drawer, bin, or cabinet taken up by clothes you rarely wear means less room for gear, food, or things that actually enhance your time outside.
  • Getting dressed becomes frustrating. It’s harder to find what you need when you’re digging through piles of stuff.
  • Your van feels cluttered. The mess builds up quickly in such a small space, making it harder to relax and enjoy being in your van.
  • Laundry becomes a bigger chore. More clothes often means more to manage, more to wash, and more to keep organized. And spending the day in the laundromat is never much fun.
  • You end up wearing the same few pieces anyway. Most van lifers find they rotate through the same go-to outfits that are comfortable and practical, while everything else just takes up space. I personally wear each outfit until it’s so dirty, I’m embarassed, and then it goes in the laundry bag.

Downsizing your wardrobe isn’t just about saving space, it’s about making life on the road feel more manageable.

Kristen Bor standing next to Rossmonster Baja Trail adventure truck on sandy beach in Baja at sunset

How to Decide What Clothes to Bring

The kind of lifestyle you’re planning will shape what clothing you actually need. If you’re spending a lot of time in cities, you might want a few more stylish pieces. If your focus is more on hiking trails than hitting restaurants, function is going to matter a lot more than fashion. Or maybe you’re working remotely and need a decent top or two for Zoom calls.

The goal is to build a wardrobe around your lifestyle—so as you read these tips, think about what you do most and pack accordingly.

A good rule of thumb? If you don’t wear it much at home, you probably won’t wear it on the road. The clothes you bring should be the ones you reach for again and again—the ones you feel good in, that fit well, and that make sense for your day-to-day activities. Otherwise, they’ll just sit in a bin, taking up space and collecting dust.

And don’t forget to think seasonally. If you’ll be following the sun, your layers will look different than if you’re chasing snow. Know when you might swap out gear, and plan space in your van for that rotation.

Woman standing in door of open converted Sprinter van looking out into snowy landscape
I spend winters skiing, so I plan my winter van life clothing accordingly

Van Life Clothing Tips

When it comes to choosing clothes for van life, simplicity and versatility are key. You want pieces that are comfortable, low-maintenance, and can keep up with your lifestyle—whether you’re hiking a dusty trail, lounging at camp, or grabbing coffee in town.

  • Focus on versatility. The more ways you can wear a single item, the better. Look for clothing that works across different settings — like a pair of pants that you can hike in and still feel comfortable wearing around town.
  • Fabrics matter. Quick-dry, athletic-style materials are a game-changer, especially if you plan to spend time outdoors. They’re easier to hand wash, don’t stink, and dry fast in wet or sweaty environments. I personally avoid anything that needs dry cleaning or can’t handle a spin through a laundromat machine.
  • Stick with colors and patterns that mix and match. I keep my wardrobe simple by choosing mostly solid colors or easy patterns that coordinate well with each other. That way, I can layer pieces for warmth, and everything works together without much thought.
  • Avoid bulky clothing. Storage adds up fast in a van, and thick items like big sweaters, thick flannels or heavy jackets take up a lot of space. You obviously want to be warm, but try to choose layers that are compressible and pack small.
A woman stands in the doorway of a Sprinter camper van and a man sits in a camp chair outside, with a dog and a paddleboard leaned up against the van
You’ll want to make sure your clothing is multi-purpose, especially if you’re traveling with another person and have limited space

How to Organize Your Van Life Clothing

I’ve been using packing cubes for years, and they make van life organization so much easier. I separate my clothes by type—tops in one, bottoms in another, underwear in a third, and one just socks. If you’re sharing your van with a partner, color-coding your cubes is a simple way to keep things separate.

One thing I love about packing cubes is they create a natural limit—once the cube is full, that’s your sign to stop packing. They also make it way easier to find what you’re looking for without tearing apart your whole drawer. In addition to the cubes, I keep a small duffel in my rear storage box with off-season gear, like heavier winter layers, that I can rotate in as the weather shifts.

Cupboards in van 'closet' filled with packing cubes of clothes
Packing cubes make it easy to find and organize your clothing

Van Life Shirts

When it comes to van life clothing, I keep things simple, functional, and low maintenance. I look for breathable, quick-drying materials that don’t wrinkle or hold odor, and I stick to neutral colors that hide dirt and mix easily. For shirts and pants, I gravitate toward looser fits that keep me comfortable both on the trail and around camp, and I’ll often buy multiple colors of the same piece once I find something I love.

Since I live on the road full-time and don’t do laundry more than once or twice a month, I wear each item for a few days before tossing it in the laundry bag. If you’re packing for a shorter trip, you can adjust the numbers based on your needs.

  • Sun Shirts (6x): Sun shirts are a must for van life since they protect your skin without needing constant sunscreen reapplication. They’re lightweight, breathable, and designed to keep you cool even in hot weather. Plus, they’re multifunctional—you can wear them hiking, lounging at camp, or even as a beach cover-up. I rotate between the Patagonia Capilene Cool Daily Hoody, REI Sahara Shade Hoody, and Outdoor Research Echo Hoody—all of which I review in detail in my guide to the best sun protection shirts.
  • Short Sleeve Shirts (6x): I like having a mix of lightweight short-sleeve shirts for warm days at camp or layering under flannels and jackets. I pack a combo of quick-dry shirts like the Patagonia Capilene Cool Daily Tee, a few basic cotton t-shirts, and a tank top or two for lounging and layering.
  • Warmer shirts (2x) – I always pack a couple of warmer long-sleeve layers for the cooler months that I can wear under a jacket on chilly nights. My go-tos are a cozy flannel and my favorite hoody.

Jackets

Weather can shift fast on the road, so I pack a few jackets in different weights to stay comfortable without overpacking.

Van Life Shorts and Pants

For bottoms, you’ll want options that are comfortable enough for long drives, durable enough for outdoor activities, and versatile enough to wear in a variety of scenarios. These are the pants and shorts I pack in my rig.

  • Shorts (6x) – I look for lightweight, multifunctional shorts that that are comfy, quick-drying, and have pockets — like the Free Fly Breeze Shorts, the REI Trail Made shorts, or the REI Swiftland Running tights.
  • Pants (6x) – I pack a mix of leggings and lightweight hiking pants so I’m covered for both active days and lounging in the van. The Mountain Hardwear Dynama Ankle Pants and the Vuori Miles Ankle Pants are some of my go-tos. They are both comfy, have pockets, and the elastic waistband works great with a backpack. I also pack a pair of lounge pants and bring one warmer pair for chilly nights or hiking in colder climates—check out my guide to the best winter hiking pants for a few options I’ve tested.
  • Rain Pants (1x) – I don’t think rain pants are absolutely necessary, but they are nice to have because they give you more options to be outside on rainy days.

A lot of these tops and pants also show up in my What to Wear Hiking blog post. When you live on the road, having van life clothing that works from trail to town is key.

Freebie!

Van Life Packing Checklist

Get this free PDF that will help you pack up your van in a jiffy.

    .formkit-form[data-uid=”1411cbd0a2″] *{box-sizing:border-box;}.formkit-form[data-uid=”1411cbd0a2″]{-webkit-font-smoothing:antialiased;-moz-osx-font-smoothing:grayscale;}.formkit-form[data-uid=”1411cbd0a2″] legend{border:none;font-size:inherit;margin-bottom:10px;padding:0;position:relative;display:table;}.formkit-form[data-uid=”1411cbd0a2″] fieldset{border:0;padding:0.01em 0 0 0;margin:0;min-width:0;}.formkit-form[data-uid=”1411cbd0a2″] body:not(:-moz-handler-blocked) fieldset{display:table-cell;}.formkit-form[data-uid=”1411cbd0a2″] h1,.formkit-form[data-uid=”1411cbd0a2″] h2,.formkit-form[data-uid=”1411cbd0a2″] h3,.formkit-form[data-uid=”1411cbd0a2″] h4,.formkit-form[data-uid=”1411cbd0a2″] h5,.formkit-form[data-uid=”1411cbd0a2″] h6{color:inherit;font-size:inherit;font-weight:inherit;}.formkit-form[data-uid=”1411cbd0a2″] h2{font-size:1.5em;margin:1em 0;}.formkit-form[data-uid=”1411cbd0a2″] h3{font-size:1.17em;margin:1em 0;}.formkit-form[data-uid=”1411cbd0a2″] p{color:inherit;font-size:inherit;font-weight:inherit;}.formkit-form[data-uid=”1411cbd0a2″] ol:not([template-default]),.formkit-form[data-uid=”1411cbd0a2″] ul:not([template-default]),.formkit-form[data-uid=”1411cbd0a2″] blockquote:not([template-default]){text-align:left;}.formkit-form[data-uid=”1411cbd0a2″] p:not([template-default]),.formkit-form[data-uid=”1411cbd0a2″] hr:not([template-default]),.formkit-form[data-uid=”1411cbd0a2″] blockquote:not([template-default]),.formkit-form[data-uid=”1411cbd0a2″] ol:not([template-default]),.formkit-form[data-uid=”1411cbd0a2″] ul:not([template-default]){color:inherit;font-style:initial;}.formkit-form[data-uid=”1411cbd0a2″] .ordered-list,.formkit-form[data-uid=”1411cbd0a2″] .unordered-list{list-style-position:outside !important;padding-left:1em;}.formkit-form[data-uid=”1411cbd0a2″] .list-item{padding-left:0;}.formkit-form[data-uid=”1411cbd0a2″][data-format=”modal”]{display:none;}.formkit-form[data-uid=”1411cbd0a2″][data-format=”slide in”]{display:none;}.formkit-form[data-uid=”1411cbd0a2″][data-format=”sticky bar”]{display:none;}.formkit-sticky-bar .formkit-form[data-uid=”1411cbd0a2″][data-format=”sticky bar”]{display:block;}.formkit-form[data-uid=”1411cbd0a2″] .formkit-input,.formkit-form[data-uid=”1411cbd0a2″] .formkit-select,.formkit-form[data-uid=”1411cbd0a2″] .formkit-checkboxes{width:100%;}.formkit-form[data-uid=”1411cbd0a2″] .formkit-button,.formkit-form[data-uid=”1411cbd0a2″] .formkit-submit{border:0;border-radius:5px;color:#ffffff;cursor:pointer;display:inline-block;text-align:center;font-size:15px;font-weight:500;cursor:pointer;margin-bottom:15px;overflow:hidden;padding:0;position:relative;vertical-align:middle;}.formkit-form[data-uid=”1411cbd0a2″] .formkit-button:hover,.formkit-form[data-uid=”1411cbd0a2″] .formkit-submit:hover,.formkit-form[data-uid=”1411cbd0a2″] .formkit-button:focus,.formkit-form[data-uid=”1411cbd0a2″] .formkit-submit:focus{outline:none;}.formkit-form[data-uid=”1411cbd0a2″] .formkit-button:hover > span,.formkit-form[data-uid=”1411cbd0a2″] .formkit-submit:hover > span,.formkit-form[data-uid=”1411cbd0a2″] .formkit-button:focus > span,.formkit-form[data-uid=”1411cbd0a2″] .formkit-submit:focus > span{background-color:rgba(0,0,0,0.1);}.formkit-form[data-uid=”1411cbd0a2″] .formkit-button > span,.formkit-form[data-uid=”1411cbd0a2″] .formkit-submit > span{display:block;-webkit-transition:all 300ms ease-in-out;transition:all 300ms ease-in-out;padding:12px 24px;}.formkit-form[data-uid=”1411cbd0a2″] .formkit-input{background:#ffffff;font-size:15px;padding:12px;border:1px solid #e3e3e3;-webkit-flex:1 0 auto;-ms-flex:1 0 auto;flex:1 0 auto;line-height:1.4;margin:0;-webkit-transition:border-color ease-out 300ms;transition:border-color ease-out 300ms;}.formkit-form[data-uid=”1411cbd0a2″] .formkit-input:focus{outline:none;border-color:#1677be;-webkit-transition:border-color ease 300ms;transition:border-color ease 300ms;}.formkit-form[data-uid=”1411cbd0a2″] .formkit-input::-webkit-input-placeholder{color:inherit;opacity:0.8;}.formkit-form[data-uid=”1411cbd0a2″] .formkit-input::-moz-placeholder{color:inherit;opacity:0.8;}.formkit-form[data-uid=”1411cbd0a2″] .formkit-input:-ms-input-placeholder{color:inherit;opacity:0.8;}.formkit-form[data-uid=”1411cbd0a2″] .formkit-input::placeholder{color:inherit;opacity:0.8;}.formkit-form[data-uid=”1411cbd0a2″] [data-group=”dropdown”]{position:relative;display:inline-block;width:100%;}.formkit-form[data-uid=”1411cbd0a2″] [data-group=”dropdown”]::before{content:””;top:calc(50% – 2.5px);right:10px;position:absolute;pointer-events:none;border-color:#4f4f4f transparent transparent transparent;border-style:solid;border-width:6px 6px 0 6px;height:0;width:0;z-index:999;}.formkit-form[data-uid=”1411cbd0a2″] [data-group=”dropdown”] select{height:auto;width:100%;cursor:pointer;color:#333333;line-height:1.4;margin-bottom:0;padding:0 6px;-webkit-appearance:none;-moz-appearance:none;appearance:none;font-size:15px;padding:12px;padding-right:25px;border:1px solid #e3e3e3;background:#ffffff;}.formkit-form[data-uid=”1411cbd0a2″] [data-group=”dropdown”] select:focus{outline:none;}.formkit-form[data-uid=”1411cbd0a2″] [data-group=”checkboxes”]{text-align:left;margin:0;}.formkit-form[data-uid=”1411cbd0a2″] [data-group=”checkboxes”] [data-group=”checkbox”]{margin-bottom:10px;}.formkit-form[data-uid=”1411cbd0a2″] [data-group=”checkboxes”] [data-group=”checkbox”] *{cursor:pointer;}.formkit-form[data-uid=”1411cbd0a2″] [data-group=”checkboxes”] [data-group=”checkbox”]:last-of-type{margin-bottom:0;}.formkit-form[data-uid=”1411cbd0a2″] [data-group=”checkboxes”] [data-group=”checkbox”] input[type=”checkbox”]{display:none;}.formkit-form[data-uid=”1411cbd0a2″] [data-group=”checkboxes”] [data-group=”checkbox”] input[type=”checkbox”] + label::after{content:none;}.formkit-form[data-uid=”1411cbd0a2″] [data-group=”checkboxes”] [data-group=”checkbox”] input[type=”checkbox”]:checked + label::after{border-color:#ffffff;content:””;}.formkit-form[data-uid=”1411cbd0a2″] [data-group=”checkboxes”] [data-group=”checkbox”] input[type=”checkbox”]:checked + label::before{background:#10bf7a;border-color:#10bf7a;}.formkit-form[data-uid=”1411cbd0a2″] [data-group=”checkboxes”] [data-group=”checkbox”] label{position:relative;display:inline-block;padding-left:28px;}.formkit-form[data-uid=”1411cbd0a2″] [data-group=”checkboxes”] [data-group=”checkbox”] label::before,.formkit-form[data-uid=”1411cbd0a2″] [data-group=”checkboxes”] [data-group=”checkbox”] label::after{position:absolute;content:””;display:inline-block;}.formkit-form[data-uid=”1411cbd0a2″] [data-group=”checkboxes”] [data-group=”checkbox”] label::before{height:16px;width:16px;border:1px solid #e3e3e3;background:#ffffff;left:0px;top:3px;}.formkit-form[data-uid=”1411cbd0a2″] [data-group=”checkboxes”] [data-group=”checkbox”] label::after{height:4px;width:8px;border-left:2px solid #4d4d4d;border-bottom:2px solid #4d4d4d;-webkit-transform:rotate(-45deg);-ms-transform:rotate(-45deg);transform:rotate(-45deg);left:4px;top:8px;}.formkit-form[data-uid=”1411cbd0a2″] .formkit-alert{background:#f9fafb;border:1px solid #e3e3e3;border-radius:5px;-webkit-flex:1 0 auto;-ms-flex:1 0 auto;flex:1 0 auto;list-style:none;margin:25px auto;padding:12px;text-align:center;width:100%;}.formkit-form[data-uid=”1411cbd0a2″] .formkit-alert:empty{display:none;}.formkit-form[data-uid=”1411cbd0a2″] .formkit-alert-success{background:#d3fbeb;border-color:#10bf7a;color:#0c905c;}.formkit-form[data-uid=”1411cbd0a2″] .formkit-alert-error{background:#fde8e2;border-color:#f2643b;color:#ea4110;}.formkit-form[data-uid=”1411cbd0a2″] .formkit-spinner{display:-webkit-box;display:-webkit-flex;display:-ms-flexbox;display:flex;height:0px;width:0px;margin:0 auto;position:absolute;top:0;left:0;right:0;width:0px;overflow:hidden;text-align:center;-webkit-transition:all 300ms ease-in-out;transition:all 300ms ease-in-out;}.formkit-form[data-uid=”1411cbd0a2″] .formkit-spinner > div{margin:auto;width:12px;height:12px;background-color:#fff;opacity:0.3;border-radius:100%;display:inline-block;-webkit-animation:formkit-bouncedelay-formkit-form-data-uid-1411cbd0a2- 1.4s infinite ease-in-out both;animation:formkit-bouncedelay-formkit-form-data-uid-1411cbd0a2- 1.4s infinite ease-in-out both;}.formkit-form[data-uid=”1411cbd0a2″] .formkit-spinner > div:nth-child(1){-webkit-animation-delay:-0.32s;animation-delay:-0.32s;}.formkit-form[data-uid=”1411cbd0a2″] .formkit-spinner > div:nth-child(2){-webkit-animation-delay:-0.16s;animation-delay:-0.16s;}.formkit-form[data-uid=”1411cbd0a2″] .formkit-submit[data-active] .formkit-spinner{opacity:1;height:100%;width:50px;}.formkit-form[data-uid=”1411cbd0a2″] .formkit-submit[data-active] .formkit-spinner ~ span{opacity:0;}.formkit-form[data-uid=”1411cbd0a2″] .formkit-powered-by[data-active=”false”]{opacity:0.35;}.formkit-form[data-uid=”1411cbd0a2″] .formkit-powered-by-convertkit-container{display:-webkit-box;display:-webkit-flex;display:-ms-flexbox;display:flex;width:100%;z-index:5;margin:10px 0;position:relative;}.formkit-form[data-uid=”1411cbd0a2″] .formkit-powered-by-convertkit-container[data-active=”false”]{opacity:0.35;}.formkit-form[data-uid=”1411cbd0a2″] .formkit-powered-by-convertkit{-webkit-align-items:center;-webkit-box-align:center;-ms-flex-align:center;align-items:center;background-color:#ffffff;border:1px solid #dde2e7;border-radius:4px;color:#373f45;cursor:pointer;display:block;height:36px;margin:0 auto;opacity:0.95;padding:0;-webkit-text-decoration:none;text-decoration:none;text-indent:100%;-webkit-transition:ease-in-out all 200ms;transition:ease-in-out all 200ms;white-space:nowrap;overflow:hidden;-webkit-user-select:none;-moz-user-select:none;-ms-user-select:none;user-select:none;width:190px;background-repeat:no-repeat;background-position:center;background-image:url(“data:image/svg+xml;charset=utf8,%3Csvg width=’162′ height=’20’ viewBox=’0 0 162 20′ fill=’none’ xmlns=’http://www.w3.org/2000/svg’%3E%3Cpath d=’M83.0561 15.2457C86.675 15.2457 89.4722 12.5154 89.4722 9.14749C89.4722 5.99211 86.8443 4.06563 85.1038 4.06563C82.6801 4.06563 80.7373 5.76407 80.4605 8.28551C80.4092 8.75244 80.0387 9.14403 79.5686 9.14069C78.7871 9.13509 77.6507 9.12841 76.9314 9.13092C76.6217 9.13199 76.3658 8.88106 76.381 8.57196C76.4895 6.38513 77.2218 4.3404 78.618 2.76974C80.1695 1.02445 82.4289 0 85.1038 0C89.5979 0 93.8406 4.07791 93.8406 9.14749C93.8406 14.7608 89.1832 19.3113 83.1517 19.3113C78.8502 19.3113 74.5179 16.5041 73.0053 12.5795C72.9999 12.565 72.9986 12.5492 73.0015 12.534C73.0218 12.4179 73.0617 12.3118 73.1011 12.2074C73.1583 12.0555 73.2143 11.907 73.2062 11.7359L73.18 11.1892C73.174 11.0569 73.2075 10.9258 73.2764 10.8127C73.3452 10.6995 73.4463 10.6094 73.5666 10.554L73.7852 10.4523C73.9077 10.3957 74.0148 10.3105 74.0976 10.204C74.1803 10.0974 74.2363 9.97252 74.2608 9.83983C74.3341 9.43894 74.6865 9.14749 75.0979 9.14749C75.7404 9.14749 76.299 9.57412 76.5088 10.1806C77.5188 13.1 79.1245 15.2457 83.0561 15.2457Z’ fill=’%23373F45’/%3E%3Cpath d=’M155.758 6.91365C155.028 6.91365 154.804 6.47916 154.804 5.98857C154.804 5.46997 154.986 5.06348 155.758 5.06348C156.53 5.06348 156.712 5.46997 156.712 5.98857C156.712 6.47905 156.516 6.91365 155.758 6.91365ZM142.441 12.9304V9.32833L141.415 9.32323V8.90392C141.415 8.44719 141.786 8.07758 142.244 8.07986L142.441 8.08095V6.55306L144.082 6.09057V8.08073H145.569V8.50416C145.569 8.61242 145.548 8.71961 145.506 8.81961C145.465 8.91961 145.404 9.01047 145.328 9.08699C145.251 9.16351 145.16 9.2242 145.06 9.26559C144.96 9.30698 144.853 9.32826 144.745 9.32822H144.082V12.7201C144.082 13.2423 144.378 13.4256 144.76 13.4887C145.209 13.5629 145.583 13.888 145.583 14.343V14.9626C144.029 14.9626 142.441 14.8942 142.441 12.9304Z’ fill=’%23373F45’/%3E%3Cpath d=’M110.058 7.92554C108.417 7.88344 106.396 8.92062 106.396 11.5137C106.396 14.0646 108.417 15.0738 110.058 15.0318C111.742 15.0738 113.748 14.0646 113.748 11.5137C113.748 8.92062 111.742 7.88344 110.058 7.92554ZM110.07 13.7586C108.878 13.7586 108.032 12.8905 108.032 11.461C108.032 10.1013 108.878 9.20569 110.071 9.20569C111.263 9.20569 112.101 10.0995 112.101 11.459C112.101 12.8887 111.263 13.7586 110.07 13.7586Z’ fill=’%23373F45’/%3E%3Cpath d=’M118.06 7.94098C119.491 7.94098 120.978 8.33337 120.978 11.1366V14.893H120.063C119.608 14.893 119.238 14.524 119.238 14.0689V10.9965C119.238 9.66506 118.747 9.16047 117.891 9.16047C117.414 9.16047 116.797 9.52486 116.502 9.81915V14.069C116.502 14.1773 116.481 14.2845 116.44 14.3845C116.398 14.4845 116.337 14.5753 116.261 14.6519C116.184 14.7284 116.093 14.7891 115.993 14.8305C115.893 14.8719 115.786 14.8931 115.678 14.8931H114.847V8.10918H115.773C115.932 8.10914 116.087 8.16315 116.212 8.26242C116.337 8.36168 116.424 8.50033 116.46 8.65577C116.881 8.19328 117.428 7.94098 118.06 7.94098ZM122.854 8.09713C123.024 8.09708 123.19 8.1496 123.329 8.2475C123.468 8.34541 123.574 8.48391 123.631 8.64405L125.133 12.8486L126.635 8.64415C126.692 8.48402 126.798 8.34551 126.937 8.2476C127.076 8.1497 127.242 8.09718 127.412 8.09724H128.598L126.152 14.3567C126.091 14.5112 125.986 14.6439 125.849 14.7374C125.711 14.831 125.549 14.881 125.383 14.8809H124.333L121.668 8.09713H122.854Z’ fill=’%23373F45’/%3E%3Cpath d=’M135.085 14.5514C134.566 14.7616 133.513 15.0416 132.418 15.0416C130.496 15.0416 129.024 13.9345 129.024 11.4396C129.024 9.19701 130.451 7.99792 132.191 7.99792C134.338 7.99792 135.254 9.4378 135.158 11.3979C135.139 11.8029 134.786 12.0983 134.38 12.0983H130.679C130.763 13.1916 131.562 13.7662 132.615 13.7662C133.028 13.7662 133.462 13.7452 133.983 13.6481C134.535 13.545 135.085 13.9375 135.085 14.4985V14.5514ZM133.673 10.949C133.785 9.87621 133.061 9.28752 132.191 9.28752C131.321 9.28752 130.734 9.93979 130.679 10.9489L133.673 10.949Z’ fill=’%23373F45’/%3E%3Cpath d=’M137.345 8.11122C137.497 8.11118 137.645 8.16229 137.765 8.25635C137.884 8.35041 137.969 8.48197 138.005 8.62993C138.566 8.20932 139.268 7.94303 139.759 7.94303C139.801 7.94303 140.068 7.94303 140.489 7.99913V8.7265C140.489 9.11748 140.15 9.4147 139.759 9.4147C139.31 9.4147 138.651 9.5829 138.131 9.8773V14.8951H136.462V8.11112L137.345 8.11122ZM156.6 14.0508V8.09104H155.769C155.314 8.09104 154.944 8.45999 154.944 8.9151V14.8748H155.775C156.23 14.8748 156.6 14.5058 156.6 14.0508ZM158.857 12.9447V9.34254H157.749V8.91912C157.749 8.46401 158.118 8.09506 158.574 8.09506H158.857V6.56739L160.499 6.10479V8.09506H161.986V8.51848C161.986 8.97359 161.617 9.34254 161.161 9.34254H160.499V12.7345C160.499 13.2566 160.795 13.44 161.177 13.503C161.626 13.5774 162 13.9024 162 14.3574V14.977C160.446 14.977 158.857 14.9086 158.857 12.9447ZM98.1929 10.1124C98.2033 6.94046 100.598 5.16809 102.895 5.16809C104.171 5.16809 105.342 5.44285 106.304 6.12953L105.914 6.6631C105.654 7.02011 105.16 7.16194 104.749 6.99949C104.169 6.7702 103.622 6.7218 103.215 6.7218C101.335 6.7218 99.9169 7.92849 99.9068 10.1123C99.9169 12.2959 101.335 13.5201 103.215 13.5201C103.622 13.5201 104.169 13.4717 104.749 13.2424C105.16 13.0799 105.654 13.2046 105.914 13.5615L106.304 14.0952C105.342 14.7819 104.171 15.0566 102.895 15.0566C100.598 15.0566 98.2033 13.2842 98.1929 10.1124ZM147.619 5.21768C148.074 5.21768 148.444 5.58663 148.444 6.04174V9.81968L151.82 5.58131C151.897 5.47733 151.997 5.39282 152.112 5.3346C152.227 5.27638 152.355 5.24607 152.484 5.24611H153.984L150.166 10.0615L153.984 14.8749H152.484C152.355 14.8749 152.227 14.8446 152.112 14.7864C151.997 14.7281 151.897 14.6436 151.82 14.5397L148.444 10.3025V14.0508C148.444 14.5059 148.074 14.8749 147.619 14.8749H146.746V5.21768H147.619Z’ fill=’%23373F45’/%3E%3Cpath d=’M0.773438 6.5752H2.68066C3.56543 6.5752 4.2041 6.7041 4.59668 6.96191C4.99219 7.21973 5.18994 7.62695 5.18994 8.18359C5.18994 8.55859 5.09326 8.87061 4.8999 9.11963C4.70654 9.36865 4.42822 9.52539 4.06494 9.58984V9.63379C4.51611 9.71875 4.84717 9.88721 5.05811 10.1392C5.27197 10.3882 5.37891 10.7266 5.37891 11.1543C5.37891 11.7314 5.17676 12.1841 4.77246 12.5122C4.37109 12.8374 3.81152 13 3.09375 13H0.773438V6.5752ZM1.82373 9.22949H2.83447C3.27393 9.22949 3.59473 9.16064 3.79688 9.02295C3.99902 8.88232 4.1001 8.64502 4.1001 8.31104C4.1001 8.00928 3.99023 7.79102 3.77051 7.65625C3.55371 7.52148 3.20801 7.4541 2.7334 7.4541H1.82373V9.22949ZM1.82373 10.082V12.1167H2.93994C3.37939 12.1167 3.71045 12.0332 3.93311 11.8662C4.15869 11.6963 4.27148 11.4297 4.27148 11.0664C4.27148 10.7324 4.15723 10.4849 3.92871 10.3237C3.7002 10.1626 3.35303 10.082 2.88721 10.082H1.82373Z’ fill=’%23373F45’/%3E%3Cpath d=’M13.011 6.5752V10.7324C13.011 11.207 12.9084 11.623 12.7034 11.9805C12.5012 12.335 12.2068 12.6089 11.8201 12.8022C11.4363 12.9927 10.9763 13.0879 10.4402 13.0879C9.6433 13.0879 9.02368 12.877 8.5813 12.4551C8.13892 12.0332 7.91772 11.4531 7.91772 10.7148V6.5752H8.9724V10.6401C8.9724 11.1704 9.09546 11.5615 9.34155 11.8135C9.58765 12.0654 9.96557 12.1914 10.4753 12.1914C11.4656 12.1914 11.9607 11.6714 11.9607 10.6313V6.5752H13.011Z’ fill=’%23373F45’/%3E%3Cpath d=’M15.9146 13V6.5752H16.9649V13H15.9146Z’ fill=’%23373F45’/%3E%3Cpath d=’M19.9255 13V6.5752H20.9758V12.0991H23.696V13H19.9255Z’ fill=’%23373F45’/%3E%3Cpath d=’M28.2828 13H27.2325V7.47607H25.3428V6.5752H30.1724V7.47607H28.2828V13Z’ fill=’%23373F45’/%3E%3Cpath d=’M41.9472 13H40.8046L39.7148 9.16796C39.6679 9.00097 39.6093 8.76074 39.539 8.44727C39.4687 8.13086 39.4262 7.91113 39.4116 7.78809C39.3823 7.97559 39.3339 8.21875 39.2665 8.51758C39.2021 8.81641 39.1479 9.03905 39.1039 9.18554L38.0405 13H36.8979L36.0673 9.7832L35.2236 6.5752H36.2958L37.2143 10.3193C37.3578 10.9199 37.4604 11.4502 37.5219 11.9102C37.5541 11.6611 37.6025 11.3828 37.6669 11.0752C37.7314 10.7676 37.79 10.5186 37.8427 10.3281L38.8886 6.5752H39.9301L41.0024 10.3457C41.1049 10.6943 41.2133 11.2158 41.3276 11.9102C41.3715 11.4912 41.477 10.958 41.644 10.3105L42.558 6.5752H43.6215L41.9472 13Z’ fill=’%23373F45’/%3E%3Cpath d=’M45.7957 13V6.5752H46.846V13H45.7957Z’ fill=’%23373F45’/%3E%3Cpath d=’M52.0258 13H50.9755V7.47607H49.0859V6.5752H53.9155V7.47607H52.0258V13Z’ fill=’%23373F45’/%3E%3Cpath d=’M61.2312 13H60.1765V10.104H57.2146V13H56.1643V6.5752H57.2146V9.20312H60.1765V6.5752H61.2312V13Z’ fill=’%23373F45’/%3E%3C/svg%3E”);}.formkit-form[data-uid=”1411cbd0a2″] .formkit-powered-by-convertkit:hover,.formkit-form[data-uid=”1411cbd0a2″] .formkit-powered-by-convertkit:focus{background-color:#ffffff;-webkit-transform:scale(1.025) perspective(1px);-ms-transform:scale(1.025) perspective(1px);transform:scale(1.025) perspective(1px);opacity:1;}.formkit-form[data-uid=”1411cbd0a2″] .formkit-powered-by-convertkit[data-variant=”dark”],.formkit-form[data-uid=”1411cbd0a2″] .formkit-powered-by-convertkit[data-variant=”light”]{background-color:transparent;border-color:transparent;width:166px;}.formkit-form[data-uid=”1411cbd0a2″] .formkit-powered-by-convertkit[data-variant=”light”]{color:#ffffff;background-image:url(“data:image/svg+xml;charset=utf8,%3Csvg width=’162′ height=’20’ viewBox=’0 0 162 20′ fill=’none’ xmlns=’http://www.w3.org/2000/svg’%3E%3Cpath d=’M83.0561 15.2457C86.675 15.2457 89.4722 12.5154 89.4722 9.14749C89.4722 5.99211 86.8443 4.06563 85.1038 4.06563C82.6801 4.06563 80.7373 5.76407 80.4605 8.28551C80.4092 8.75244 80.0387 9.14403 79.5686 9.14069C78.7871 9.13509 77.6507 9.12841 76.9314 9.13092C76.6217 9.13199 76.3658 8.88106 76.381 8.57196C76.4895 6.38513 77.2218 4.3404 78.618 2.76974C80.1695 1.02445 82.4289 0 85.1038 0C89.5979 0 93.8406 4.07791 93.8406 9.14749C93.8406 14.7608 89.1832 19.3113 83.1517 19.3113C78.8502 19.3113 74.5179 16.5041 73.0053 12.5795C72.9999 12.565 72.9986 12.5492 73.0015 12.534C73.0218 12.4179 73.0617 12.3118 73.1011 12.2074C73.1583 12.0555 73.2143 11.907 73.2062 11.7359L73.18 11.1892C73.174 11.0569 73.2075 10.9258 73.2764 10.8127C73.3452 10.6995 73.4463 10.6094 73.5666 10.554L73.7852 10.4523C73.9077 10.3957 74.0148 10.3105 74.0976 10.204C74.1803 10.0974 74.2363 9.97252 74.2608 9.83983C74.3341 9.43894 74.6865 9.14749 75.0979 9.14749C75.7404 9.14749 76.299 9.57412 76.5088 10.1806C77.5188 13.1 79.1245 15.2457 83.0561 15.2457Z’ fill=’white’/%3E%3Cpath d=’M155.758 6.91365C155.028 6.91365 154.804 6.47916 154.804 5.98857C154.804 5.46997 154.986 5.06348 155.758 5.06348C156.53 5.06348 156.712 5.46997 156.712 5.98857C156.712 6.47905 156.516 6.91365 155.758 6.91365ZM142.441 12.9304V9.32833L141.415 9.32323V8.90392C141.415 8.44719 141.786 8.07758 142.244 8.07986L142.441 8.08095V6.55306L144.082 6.09057V8.08073H145.569V8.50416C145.569 8.61242 145.548 8.71961 145.506 8.81961C145.465 8.91961 145.404 9.01047 145.328 9.08699C145.251 9.16351 145.16 9.2242 145.06 9.26559C144.96 9.30698 144.853 9.32826 144.745 9.32822H144.082V12.7201C144.082 13.2423 144.378 13.4256 144.76 13.4887C145.209 13.5629 145.583 13.888 145.583 14.343V14.9626C144.029 14.9626 142.441 14.8942 142.441 12.9304Z’ fill=’white’/%3E%3Cpath d=’M110.058 7.92554C108.417 7.88344 106.396 8.92062 106.396 11.5137C106.396 14.0646 108.417 15.0738 110.058 15.0318C111.742 15.0738 113.748 14.0646 113.748 11.5137C113.748 8.92062 111.742 7.88344 110.058 7.92554ZM110.07 13.7586C108.878 13.7586 108.032 12.8905 108.032 11.461C108.032 10.1013 108.878 9.20569 110.071 9.20569C111.263 9.20569 112.101 10.0995 112.101 11.459C112.101 12.8887 111.263 13.7586 110.07 13.7586Z’ fill=’white’/%3E%3Cpath d=’M118.06 7.94098C119.491 7.94098 120.978 8.33337 120.978 11.1366V14.893H120.063C119.608 14.893 119.238 14.524 119.238 14.0689V10.9965C119.238 9.66506 118.747 9.16047 117.891 9.16047C117.414 9.16047 116.797 9.52486 116.502 9.81915V14.069C116.502 14.1773 116.481 14.2845 116.44 14.3845C116.398 14.4845 116.337 14.5753 116.261 14.6519C116.184 14.7284 116.093 14.7891 115.993 14.8305C115.893 14.8719 115.786 14.8931 115.678 14.8931H114.847V8.10918H115.773C115.932 8.10914 116.087 8.16315 116.212 8.26242C116.337 8.36168 116.424 8.50033 116.46 8.65577C116.881 8.19328 117.428 7.94098 118.06 7.94098ZM122.854 8.09713C123.024 8.09708 123.19 8.1496 123.329 8.2475C123.468 8.34541 123.574 8.48391 123.631 8.64405L125.133 12.8486L126.635 8.64415C126.692 8.48402 126.798 8.34551 126.937 8.2476C127.076 8.1497 127.242 8.09718 127.412 8.09724H128.598L126.152 14.3567C126.091 14.5112 125.986 14.6439 125.849 14.7374C125.711 14.831 125.549 14.881 125.383 14.8809H124.333L121.668 8.09713H122.854Z’ fill=’white’/%3E%3Cpath d=’M135.085 14.5514C134.566 14.7616 133.513 15.0416 132.418 15.0416C130.496 15.0416 129.024 13.9345 129.024 11.4396C129.024 9.19701 130.451 7.99792 132.191 7.99792C134.338 7.99792 135.254 9.4378 135.158 11.3979C135.139 11.8029 134.786 12.0983 134.38 12.0983H130.679C130.763 13.1916 131.562 13.7662 132.615 13.7662C133.028 13.7662 133.462 13.7452 133.983 13.6481C134.535 13.545 135.085 13.9375 135.085 14.4985V14.5514ZM133.673 10.949C133.785 9.87621 133.061 9.28752 132.191 9.28752C131.321 9.28752 130.734 9.93979 130.679 10.9489L133.673 10.949Z’ fill=’white’/%3E%3Cpath d=’M137.345 8.11122C137.497 8.11118 137.645 8.16229 137.765 8.25635C137.884 8.35041 137.969 8.48197 138.005 8.62993C138.566 8.20932 139.268 7.94303 139.759 7.94303C139.801 7.94303 140.068 7.94303 140.489 7.99913V8.7265C140.489 9.11748 140.15 9.4147 139.759 9.4147C139.31 9.4147 138.651 9.5829 138.131 9.8773V14.8951H136.462V8.11112L137.345 8.11122ZM156.6 14.0508V8.09104H155.769C155.314 8.09104 154.944 8.45999 154.944 8.9151V14.8748H155.775C156.23 14.8748 156.6 14.5058 156.6 14.0508ZM158.857 12.9447V9.34254H157.749V8.91912C157.749 8.46401 158.118 8.09506 158.574 8.09506H158.857V6.56739L160.499 6.10479V8.09506H161.986V8.51848C161.986 8.97359 161.617 9.34254 161.161 9.34254H160.499V12.7345C160.499 13.2566 160.795 13.44 161.177 13.503C161.626 13.5774 162 13.9024 162 14.3574V14.977C160.446 14.977 158.857 14.9086 158.857 12.9447ZM98.1929 10.1124C98.2033 6.94046 100.598 5.16809 102.895 5.16809C104.171 5.16809 105.342 5.44285 106.304 6.12953L105.914 6.6631C105.654 7.02011 105.16 7.16194 104.749 6.99949C104.169 6.7702 103.622 6.7218 103.215 6.7218C101.335 6.7218 99.9169 7.92849 99.9068 10.1123C99.9169 12.2959 101.335 13.5201 103.215 13.5201C103.622 13.5201 104.169 13.4717 104.749 13.2424C105.16 13.0799 105.654 13.2046 105.914 13.5615L106.304 14.0952C105.342 14.7819 104.171 15.0566 102.895 15.0566C100.598 15.0566 98.2033 13.2842 98.1929 10.1124ZM147.619 5.21768C148.074 5.21768 148.444 5.58663 148.444 6.04174V9.81968L151.82 5.58131C151.897 5.47733 151.997 5.39282 152.112 5.3346C152.227 5.27638 152.355 5.24607 152.484 5.24611H153.984L150.166 10.0615L153.984 14.8749H152.484C152.355 14.8749 152.227 14.8446 152.112 14.7864C151.997 14.7281 151.897 14.6436 151.82 14.5397L148.444 10.3025V14.0508C148.444 14.5059 148.074 14.8749 147.619 14.8749H146.746V5.21768H147.619Z’ fill=’white’/%3E%3Cpath d=’M0.773438 6.5752H2.68066C3.56543 6.5752 4.2041 6.7041 4.59668 6.96191C4.99219 7.21973 5.18994 7.62695 5.18994 8.18359C5.18994 8.55859 5.09326 8.87061 4.8999 9.11963C4.70654 9.36865 4.42822 9.52539 4.06494 9.58984V9.63379C4.51611 9.71875 4.84717 9.88721 5.05811 10.1392C5.27197 10.3882 5.37891 10.7266 5.37891 11.1543C5.37891 11.7314 5.17676 12.1841 4.77246 12.5122C4.37109 12.8374 3.81152 13 3.09375 13H0.773438V6.5752ZM1.82373 9.22949H2.83447C3.27393 9.22949 3.59473 9.16064 3.79688 9.02295C3.99902 8.88232 4.1001 8.64502 4.1001 8.31104C4.1001 8.00928 3.99023 7.79102 3.77051 7.65625C3.55371 7.52148 3.20801 7.4541 2.7334 7.4541H1.82373V9.22949ZM1.82373 10.082V12.1167H2.93994C3.37939 12.1167 3.71045 12.0332 3.93311 11.8662C4.15869 11.6963 4.27148 11.4297 4.27148 11.0664C4.27148 10.7324 4.15723 10.4849 3.92871 10.3237C3.7002 10.1626 3.35303 10.082 2.88721 10.082H1.82373Z’ fill=’white’/%3E%3Cpath d=’M13.011 6.5752V10.7324C13.011 11.207 12.9084 11.623 12.7034 11.9805C12.5012 12.335 12.2068 12.6089 11.8201 12.8022C11.4363 12.9927 10.9763 13.0879 10.4402 13.0879C9.6433 13.0879 9.02368 12.877 8.5813 12.4551C8.13892 12.0332 7.91772 11.4531 7.91772 10.7148V6.5752H8.9724V10.6401C8.9724 11.1704 9.09546 11.5615 9.34155 11.8135C9.58765 12.0654 9.96557 12.1914 10.4753 12.1914C11.4656 12.1914 11.9607 11.6714 11.9607 10.6313V6.5752H13.011Z’ fill=’white’/%3E%3Cpath d=’M15.9146 13V6.5752H16.9649V13H15.9146Z’ fill=’white’/%3E%3Cpath d=’M19.9255 13V6.5752H20.9758V12.0991H23.696V13H19.9255Z’ fill=’white’/%3E%3Cpath d=’M28.2828 13H27.2325V7.47607H25.3428V6.5752H30.1724V7.47607H28.2828V13Z’ fill=’white’/%3E%3Cpath d=’M41.9472 13H40.8046L39.7148 9.16796C39.6679 9.00097 39.6093 8.76074 39.539 8.44727C39.4687 8.13086 39.4262 7.91113 39.4116 7.78809C39.3823 7.97559 39.3339 8.21875 39.2665 8.51758C39.2021 8.81641 39.1479 9.03905 39.1039 9.18554L38.0405 13H36.8979L36.0673 9.7832L35.2236 6.5752H36.2958L37.2143 10.3193C37.3578 10.9199 37.4604 11.4502 37.5219 11.9102C37.5541 11.6611 37.6025 11.3828 37.6669 11.0752C37.7314 10.7676 37.79 10.5186 37.8427 10.3281L38.8886 6.5752H39.9301L41.0024 10.3457C41.1049 10.6943 41.2133 11.2158 41.3276 11.9102C41.3715 11.4912 41.477 10.958 41.644 10.3105L42.558 6.5752H43.6215L41.9472 13Z’ fill=’white’/%3E%3Cpath d=’M45.7957 13V6.5752H46.846V13H45.7957Z’ fill=’white’/%3E%3Cpath d=’M52.0258 13H50.9755V7.47607H49.0859V6.5752H53.9155V7.47607H52.0258V13Z’ fill=’white’/%3E%3Cpath d=’M61.2312 13H60.1765V10.104H57.2146V13H56.1643V6.5752H57.2146V9.20312H60.1765V6.5752H61.2312V13Z’ fill=’white’/%3E%3C/svg%3E”);}@-webkit-keyframes formkit-bouncedelay-formkit-form-data-uid-1411cbd0a2-{0%,80%,100%{-webkit-transform:scale(0);-ms-transform:scale(0);transform:scale(0);}40%{-webkit-transform:scale(1);-ms-transform:scale(1);transform:scale(1);}}@keyframes formkit-bouncedelay-formkit-form-data-uid-1411cbd0a2-{0%,80%,100%{-webkit-transform:scale(0);-ms-transform:scale(0);transform:scale(0);}40%{-webkit-transform:scale(1);-ms-transform:scale(1);transform:scale(1);}}.formkit-form[data-uid=”1411cbd0a2″] blockquote{padding:10px 20px;margin:0 0 20px;border-left:5px solid #e1e1e1;}.formkit-form[data-uid=”1411cbd0a2″] .seva-custom-content{padding:15px;font-size:16px;color:#fff;mix-blend-mode:difference;}.formkit-form[data-uid=”1411cbd0a2″] .formkit-modal.guard{max-width:420px;width:100%;} .formkit-form[data-uid=”1411cbd0a2″]{max-width:700px;}.formkit-form[data-uid=”1411cbd0a2″] [data-style=”clean”]{width:100%;}.formkit-form[data-uid=”1411cbd0a2″] .formkit-fields{display:-webkit-box;display:-webkit-flex;display:-ms-flexbox;display:flex;-webkit-flex-wrap:wrap;-ms-flex-wrap:wrap;flex-wrap:wrap;margin:0 auto;}.formkit-form[data-uid=”1411cbd0a2″] .formkit-field,.formkit-form[data-uid=”1411cbd0a2″] .formkit-submit{margin:0 0 15px 0;-webkit-flex:1 0 100%;-ms-flex:1 0 100%;flex:1 0 100%;}.formkit-form[data-uid=”1411cbd0a2″] .formkit-powered-by-convertkit-container{margin:0;}.formkit-form[data-uid=”1411cbd0a2″] .formkit-submit{position:static;}.formkit-form[data-uid=”1411cbd0a2″][min-width~=”700″] [data-style=”clean”],.formkit-form[data-uid=”1411cbd0a2″][min-width~=”800″] [data-style=”clean”]{padding:10px;}.formkit-form[data-uid=”1411cbd0a2″][min-width~=”700″] .formkit-fields[data-stacked=”false”],.formkit-form[data-uid=”1411cbd0a2″][min-width~=”800″] .formkit-fields[data-stacked=”false”]{margin-left:-5px;margin-right:-5px;}.formkit-form[data-uid=”1411cbd0a2″][min-width~=”700″] .formkit-fields[data-stacked=”false”] .formkit-field,.formkit-form[data-uid=”1411cbd0a2″][min-width~=”800″] .formkit-fields[data-stacked=”false”] .formkit-field,.formkit-form[data-uid=”1411cbd0a2″][min-width~=”700″] .formkit-fields[data-stacked=”false”] .formkit-submit,.formkit-form[data-uid=”1411cbd0a2″][min-width~=”800″] .formkit-fields[data-stacked=”false”] .formkit-submit{margin:0 5px 15px 5px;}.formkit-form[data-uid=”1411cbd0a2″][min-width~=”700″] .formkit-fields[data-stacked=”false”] .formkit-field,.formkit-form[data-uid=”1411cbd0a2″][min-width~=”800″] .formkit-fields[data-stacked=”false”] .formkit-field{-webkit-flex:100 1 auto;-ms-flex:100 1 auto;flex:100 1 auto;}.formkit-form[data-uid=”1411cbd0a2″][min-width~=”700″] .formkit-fields[data-stacked=”false”] .formkit-submit,.formkit-form[data-uid=”1411cbd0a2″][min-width~=”800″] .formkit-fields[data-stacked=”false”] .formkit-submit{-webkit-flex:1 1 auto;-ms-flex:1 1 auto;flex:1 1 auto;} .formkit-form[data-uid=”1411cbd0a2″] .formkit-header{margin-top:-20px !important;margin-bottom:80px !important;}

    Undergarments

    These don’t take up much space, so I like to pack enough so that running out of clean underwear isn’t what sends me to the laundromat. I stick to moisture-wicking, quick-dry fabrics so I can rinse a pair in the sink if needed, and they’ll be ready to go the next day. Comfort is key—especially when you’re moving, sweating, and sitting for long drives.

    Here are the undergarments I pack in my van:

    • Sports bras (5x) – I wear a sports bra pretty much every day on the road, whether I’m hiking, driving, or just hanging around camp. I like the Nike Swoosh bras because they’re supportive, comfortable, and hold up well after lots of wear.
    • Underwear (15x) – I pack enough to go a couple of weeks without doing laundry, but I’ll hand wash a pair or two in the sink if needed. I like the Lululemon InvisiWear Boyshorts because they’re quick-drying and seamless so I can wear them with leggings without having panty lines.
    • Socks (12x) – I pack a mix of ankle and crew-height hiking socks, mostly synthetic or wool blends that can go a couple of days between washes. Darn Tough socks are my favorite—they’re durable, super comfy, and come with a lifetime warranty (they’ll send you a new pair if you get a hole!).
    Close up of women's feet hiking wearing Oboz hiking boots and Darn Tough Socks
    Darn Tough Socks are great for van life and outdoor activities and I love their lifetime warranty

    For additional underwear recommendations, check out our guide to the best women’s underwear for outdoor adventures.

    Hats

    Hats are an important part of your van life wardrobe. They help cover up your hair when it gets greasy and protect your face when you’re in the sun all day.

    • Lightweight Hiking Hat (1x): For hiking and hot weather, I love the Cotopaxi Tech 5-Panel Hat. It’s super lightweight, doesn’t make my head overheat, and fits comfortably with sunglasses.
    • Beanie (1x): A cozy beanie for chilly mornings and evenings is a van life necessity, especially if you’re traveling in the mountains or during the shoulder seasons.
    • Sun Hat (1x): The Wallaroo Sedona Sun Hat has been my go-to for over six years—it’s cute, has great sun protection with its wide brim, and folds down easily without getting crushed, which makes it perfect for travel. *Use the code BEARFOOT20 to get 20% off your Wallaroo purchase*

    Swimwear

    • Rashguard (1x): Rashguards aren’t just for surfers. They’re great for protecting your skin from the sun when you’re swimming, paddleboarding, kayaking, or just hanging out on a sandy beach. I love my Carve Designs Cruz rashguard and pack it for any summer van trip.
    • Swimsuits (2x): I pack two swimsuits for van life, and my go-to is the Nani Swimwear Cut Back Crop Top with the matching ruched bottoms. They’re supportive and stay put during high-movement activities. Nani suits are made from recycled materials and are designed by a women-run company, which makes me love them even more.
    Kristen Bor wearing a Nani swimsuit in baja

    Footwear

    Shoes take up more space in your van than you’d think, so it’s important to stick to the pairs you’ll actually wear. Most days, I’m in sandals or low-ankle hiking shoes, but I also keep a pair of sturdy boots in my Rossmonster Baja Trail truck camper for longer hikes and backpacking trips. I store my family’s shoes in a large hamper in the truck—and it still fills up fast—so choose carefully and keep it minimal.

    Here are my favorite shoes for van life:

    • Oboz Katabatic LT Low – These are my go-to everyday shoes for van life. They’re lightweight, breathable, and supportive—perfect for walking around camp, running errands, or hitting mellow trails. I wear the non-waterproof, low-ankle version for better airflow, and they’re comfortable straight out of the box with great traction for uneven ground.
    • Oboz Katabatic LT Mid (Waterproof) – I keep these in the truck for bigger hikes or when I need extra support and protection on rougher terrain. The mid-ankle design gives me more stability, and the waterproofing is great for wet or unpredictable conditions. They’re still surprisingly lightweight, so I don’t feel weighed down on longer days.
    • Teva Universal Trail Sandals – These are my favorite camp and travel sandals—they’ve come everywhere with me since 2020. With just the right amount of cushion, grippy soles, and soft, adjustable straps, they’re perfect for everything from beach days to outdoor concerts. I’m on my second pair now, and still think they’re the best sandals I’ve owned. Read my full Teva Sandal review here.
    • Blundstone Chelsea Boots – It’s nice to have a closed-toe boot you can slip on for walking around town or heading out to eat. I’ve been wearing this boot for a while now, and I love how comfortable and versatile they are—they look great and hold up well for everyday wear off the trail.

    To get more shoe recommendations, check out my roundup of the best women’s hiking shoes.

    “Going-Out Clothes”

    We don’t go out often, but I like having a few pieces in the truck for those unexpected nights out—a concert, a nice dinner, or meeting up with friends. I keep a couple of nicer tops, a cozy sweater for cooler evenings, and one sundress that’s easy to throw on but still feels put-together. I try to choose pieces from sustainable outdoor brands so they last and align with my values on the road.

    Here are the “going out” clothes I pack for van life:

    • Jeans (1x): Pack your absolute favorite pair of jeans.
    • Nice tops (1–2x) – I keep a couple of nicer tops in the truck for dinners out or casual gatherings. The Carve Designs Dylan Gauze Shirt is one of my favorites—it’s lightweight, packs down small, and can be dressed up or down depending on the vibe.
    • Sweater (1x) – I always pack a cozy, go-to sweater to throw on when the temps drop. Look for something warm, comfortable, and in a neutral color that pairs easily with the rest of your wardrobe.
    • Sundress (1x): I don’t wear dresses often, but I like keeping one for when I want to feel a little more put together. A wrinkle-free option is perfect for summer nights at camp or casual van life potlucks.

    Packing for van life doesn’t have to be overwhelming. With a little intention and a focus on comfort and versatility, you can build a wardrobe that makes life on the road easier. Stick to what you actually wear, keep it simple, and you’ll be ready for whatever adventures come your way.

    Am I missing anything from my van life clothing packing list? Let me know in the comments, and be sure to sign up for my weekly van life newsletter!

    More Van Life Tips

    Still figuring out your van set-up and daily van life? Check out these helpful van life 101 posts:

    Save this post to Pinterest

    The post My Minimalist Van Life Clothing Packing Checklist (after 9 years on the road) appeared first on Bearfoot Theory.

    My Exact Process for Finding Free Dispersed Campsites Away from Crowds

    I’ve been doing van life for the last 9 years, and during this time I’ve tested just about every method and app out there for finding free campsites on public lands — also known as dispersed camping or boondocking.

    In this post, I’m sharing exactly how I find quiet, beautiful, free places to camp, even in popular areas. I’ll break down which apps and websites I rely on (and which I don’t), plus how I go beyond the top search results to find campsites away from the crowds.

    Whether you’re a new van lifer, an overlander, weekend road tripper, or just trying to stretch your travel budget, this guide will help you confidently find free campsites across the U.S.—and enjoy the kind of solitude and starry skies that make life on the road worth it.

    Some Helpful Terms

    • Dispersed Camping: This is the official free camping term used by the National Forest Service (USFS) and Bureau of Land Management (BLM), the two agencies that oversee the majority of free camping lands in the US. This is camping anywhere legally on public lands outside of an established campground. Typically there are no amenities – no bathrooms, trash facilities, water, electrical hookups, or picnic tables, so you need to come prepared with everything you need, and always pack out what you pack in.
    • Boondocking: Boondocking is a blanket term for all free camping. This is commonly used by RVers and can be used interchangeably with any other term for free camping.
    • Dry Camping: Dry camping refers to camping without potable water access or electrical hookups. Most free dispersed campsites are dry camping.
    • Stealth Camping: Stealth camping is “camping” in urban areas and requires sleeping inside your vehicle. It involves parking on a street, often in a residential neighborhood, and keeping a low profile so you don’t draw attention to yourself or your vehicle. This means no setting up chairs outside, no visible lights at night, and ideally arriving late and leaving early to avoid raising suspicion. It’s more like “free overnight parking” than true dispersed camping, but if you’re new to van life, it’s helpful to know how to do it in a pinch (more on that later).
    Kristen Bor and dog at a free dispersed campsite at sunset
    I love camping at free dispersed campsites because my dogs get more freedom than in paid campgrounds

    Types of Public Lands Where You Can Camp for Free

    Understanding different public land designations will help you find free campsites. For example, BLM (Bureau of Land Management) lands with dispersed camping are very common out west, but are non-existent in the midwest and along the entire east coast.

    In those regions, National Forests, State Forests, and Wildlife Management Areas will be your best bet.

    As a starting point, here’s a breakdown of the most common types of public lands that allow for free dispersed camping. After, I’ll get into the apps and tools I use to find actual campsites in these areas.

    • Bureau of Land Management (BLM): Dispersed camping is allowed on a large amount of BLM land for up to 14 days, but always check the signs for limits and regulations. The BLM doesn’t have a comprehensive map on their website showing where all of the free BLM campsites are, but you can get a feel for what’s available by browsing their regional maps found here.
    • Forest Service (USFS) Lands: Similar to BLM lands, dispersed camping is allowed in over 175 national forests and grasslands in the United States, including the East Coast and Midwest. You can usually stay up to 14 days in one spot, but rules can vary.
    • State Forests: These can be a great (and often overlooked) option for free dispersed camping, especially in the Midwest and along the East Coast. We camped for free in State Forests while visiting Vermont and New Hampshire. The rules vary a lot by state—some allow dispersed camping almost anywhere within the forest, others restrict it to designated zones or require a free permit.
    • Wildlife Management Areas (WMA): These are state-managed lands that are set aside for hunting, but sometimes they also allow free dispersed camping.

    Note that the Forest Service and BLM also operate a ton of paid campgrounds, so not all camping on these lands is free.

    A man sits outside of a Sprinter van while free camping near Grand Lake in Colorado
    Can’t beat the views at this dispersed forest service campsite near Grand Lake in Colorado

    My Step-by-Step Process for Finding Dispersed Campsites

    After nearly a decade of van life, I’ve figured out a reliable system for finding free campsites—without spending hours scrolling through apps or ending up at a crowded pull-off. There are so many tools out there now, and it’s easy to get overwhelmed thinking you need to download them all. You don’t.

    In this section, I’m breaking down the exact step-by-step process I use, including which apps and tools are actually worth your time (and money) and which ones you can skip.

    1. iOverlander app

    iOverlander is an app that’s long been a favorite among van lifers—and it just got a major update with the release of iOverlander 2. The platform relies on user-submitted info about campsites, making it one of the most comprehensive crowdsourced databases of free camping across North and South America.

    ioverlander screenshot on iphone

    I’ve used iOverlander throughout my years of full-time travel, and it’s still the first app I open whenever I roll into a new area. While it doesn’t list every free campsite, it gives me a solid starting point. In my experience, if there’s one site on iOverlander, there are usually a few more unlisted spots nearby worth checking out—you just have to explore a bit (which leads to Step 2 down below).

    iOverlander has a free and paid version ($5.99/month). I think the paid version is 100% worth it, primarily because it allows you to download regions for offline access so you can search for campsites on the go. This is valuable because sometimes you arrive at a site, only to find it’s already occupied by someone else already. In this case, I can open the app (even when I don’t have service) and see what else is nearby. It also allows you to download multiple regions to your phone at once, with access to different map layers.

    Most recently, I used iOverlander extensively while traveling full-time in my Rossmonster adventure truck through Baja. It helped us find incredible beachfront campsites, along with places to fill water, do laundry and more —making it a go-to resource for full-time travelers.

    Rossmonster adventure truck parked at a free beach campsite in Baja during sunset
    One of my favorite free campsites in Baja that I found on iOverlander

    One of the app’s best features are the user reviews and real-time updates. You’ll often find recent comments with road conditions, closures, safety notes, and tips that can save you from pulling into a site that’s no longer accessible. I also love how you can favorite campsites in the app, making it easy to return to places you love or bookmark spots that look promising as you’re planning.

    One of the biggest downsides of iOverlander is that its most popular campsites can be, well…too popular. As more people rely on the app, many of the easily accessible or scenic spots—especially near national parks or along major road trip routes—see heavy traffic.

    My advice? Use iOverlander as a starting point, but don’t stop there. If you find a marked site that looks crowded or worn down, drive a little farther down the road. Often, you’ll find lesser-used sites that offer more privacy and a better overall experience. The best campsites I’ve found rarely show up at the top of anyone’s list—they’re the ones I discovered by taking a detour or digging a little deeper.

    2. Google Maps app

    Once I’ve narrowed down the general area I want to camp — usually using iOverlander — I switch over to Google Maps in satellite view. This is one of the most useful and underrated steps in my process for finding free campsites that aren’t already listed in every app.

    google satellite map screenshot on iphone

    In Google Maps, I zoom in and look for pullouts, clearings, or flat areas along forest roads or inside BLM land boundaries. You can usually tell the difference between a true campsite and just a random clearing by zooming in and looking for signs of use, like a fire ring, a vehicle-sized bare patch, or a short spur off a main road. Sometimes you can even see RVs and trailers, which is a pretty sure bet that camping is allowed there.

    Satellite view is especially helpful in areas where crowdsourced apps might only list one or two spots—but there are likely several more nearby. In case you didn’t know, you can also download Google Maps to your phone for offline use.

    Sprinter Van parked at free lakeside campsite
    I spotted this free campsite using the satellite view in Google maps

    3. OnX Offroad app

    After checking iOverlander and scouting with Google Maps, I’ll open onX Offroad. This is one of the most powerful tools I use to discover dirt roads so we can explore beyond the well-known campspots that are pinned in the popular apps.

    onx offroad screenshot on iphone

    What makes onX so helpful is its detailed trail and land use overlays. You can view dirt roads and trails color-coded by difficulty level, which helps me decide if I can safely access a spot with my rig. I can quickly tell whether a road is mellow and 2WD-friendly or if it’s going to require 4×4 and high clearance.

    But what really sets it apart is the land ownership overlay. I can see exactly where the boundaries are between public and private land, so I’m not accidentally pulling onto someone’s property. It shows federal land like BLM, National Forests, and state-owned parcels—and there’s a layer that shows (in yellow on the map above) where dispersed camping is allowed.

    Kristen Bor popping through the skylight on the roof of the Rossmonster Baja Trail adventure truck at a free desert campsite with an incredible view
    I found this free campsite in by navigating some dirt roads using onX Offroad in my Rossmonster Baja Trail

    onX also lets you save maps offline, drop custom pins, and track your route in real time even when you don’t have service. This means you don’t have to worry about accidentally turning down the wrong road and ending up lost…which I have done in the past, and it’s not fun!

    I don’t rely on onX alone for finding campsites, but when I want to be 100% sure I’m on legal ground, or I’m trying to get away from crowds and find something more remote, it’s one of my favorite tools. Memberships start at $34.99/year.

    4. Benchmark Road Atlases

    Since I now have Starlink on my roof of my truck camper and can always access the internet, I don’t rely on paper maps as much as I used to. Before I had a constant connection however, I was happy to have an old-school paper map to navigate with.

    Benchmark Road Atlases are my go-to paper maps that are very handy for discovering free campsites sans technology. I own one of these atlases for every state I’ve spent an extended amount of time in. They generally run about $20 each, and the maps show recreation activities, established campgrounds, and public land ownership lines so you know if you’re on public or private land.

    A woman uses a road atlas to find a free campsite
    I use paper maps to find cool dirt roads with free camping

    These maps also show dirt roads categorized by 2wd or 4×4, and in my experience, these indicators have been pretty accurate. When it says 4×4, the road really is rough. Just having a sense of the terrain and accessibility is a good place to start.

    The way you can use these maps to find free dispersed camping is by looking for nearby dirt roads on public lands that your van or camper can handle, and then driving down them to explore. You won’t always find campsites this way, but when you do, it’s extremely satisfying.

    Other Tools I use

    While iOverlander, Google Maps, and onX Offroad are my core tools, I also use a handful of other apps and resources depending on where I’m traveling. These aren’t always essential, but they’ve helped me find last-minute spots, check land boundaries, or confirm whether overnight parking is allowed. Here are a few other tools I keep on my phone or bookmark for trip planning.

    The Dyrt

    I actually prefer using The Dyrt when I’m looking for paid campgrounds—especially if I want to book ahead or know exactly what I’m getting. The app has a huge database of campgrounds across the U.S., and what sets it apart is the volume of user reviews and photos.

    Many reviewers even include specific site numbers, which makes it easier to avoid bad spots or snag one with shade, privacy, or a good view. You can also search by required amenities. Let’s say you need Wifi to get some work done or need a location with showers or even a pet-friendly location, you can narrow your search down using all types of parameters.

    The Dyrt does include information on dispersed camping, but you’ll need a Pro membership to access those listings. The Pro version also gives you offline access, map overlays for BLM and National Forest land, and a few discount perks at select campgrounds. But honestly, I find that other tools—like onX or iOverlander—do a better job for free camping.

    That said, if you’re planning a route that includes a mix of paid and free camping and you don’t want to go too remote, The Dyrt is definitely a solid planning tool. Check out my full Dyrt review for more thoughts.

    *The Dyrt is currently offering a FREE 30-day membership to The Dyrt PRO to Bearfoot Theory readers (use the code “Bearfoot” if signing up on mobile!). Try it out and see how you like it!*

    Dyrt Pro

    FreeCampsites.net

    If you don’t want to download a paid app or prefer to search on a computer or browser, Freecampsites.net is a desktop tool that allows you to zoom in on a map to locate campsites wherever you’re going. Additionally, it also has a trip planning option that will allow you to create a route using free dispersed camping options. You can even search by the type of access road to the sites.

    When you select a site, you’ll be given the GPS coordinates, elevation, and the local weather so you can pack accordingly. This isn’t my go-to, but I’ve found that freecampsites.net sometimes has free dispersed sites that aren’t found on iOverlander or other apps.

    Kristen Bor and another woman sitting in the back of a Sprinter Van in Moab Utah. Shot is taken with a drone
    A free campsite just outside Moab

    Harvest Hosts & Boondockers Welcome

    Another great option is Harvest Hosts and Boondockers Welcome. Memberships start at $99/year, and as a Member, you get to park overnight for free at a variety of wineries, breweries, farms, museums, golf courses, and other attractions. We’ve even “camped” at ski areas and church parking lots. It’s not true camping, but it’s a much better option than stealth camping when you need a safe, legal place to park overnight.

    Harvest Hosts is only for fully self-contained campers with a toilet, so if you are tent camping or sleeping in the back of your Subaru, you won’t be able to stay at Harvest Hosts sites. Use this link to get 30% off your first year with the code FRIENDS30.

    Boondocker’s Welcome, their sister website, connects you with private property owners who welcome overnight campers. These are often in driveways, fields, or backyards and some allow multiple-night stays. You can add Boondockers Welcome to your Harvest Hosts plan for 30% off the first year as well. (Note: You also must be self-contained to use Boondocker’s Welcome).

    Multiple vans and RVs are parked in a field at a Harvest Host location at sunset
    A Harvest Host campground at a ski area in Michigan we stayed at

    Helpful Tips for Finding Free Campsites

    When you’re first starting out, finding free campsites might feel intimidating (I know it was for me). Here are some ways to ease into your first free camping trip:

    • Finding a campsite is much easier when you are still in service. So, if you know the general region you want to stay in, do your research before you get out of cell range and make sure you download offline maps in whatever apps you’re using.
    • Searching for campsites is easier and less stressful during daylight. If at all possible, try to be settled before it gets dark.
    • Ranger stations can be a great resource for information. If you are unsure about where you are allowed to camp, swing into the local ranger station for maps and advice.

    Remember, it’s ok if you don’t have to have an Instagram-worthy campsite every night. Adopting this mindset will reduce the pressure to find the perfect free campsite. Some nights you might be in the forest with no view or you might be parked in a big open area near a lot of other campers.

    Kristen Bor lying in the back of a Sprinter van on the bed with red rocks background
    Free campsites won’t always look like this, but that’s ok

    When you end up staying at free campsites that are less than stellar, just remember that you can always pack up in the morning and move on to somewhere better. All you really need is a flat spot with enough space, and the biggest thing is that you feel safe at your dispersed campsite and you aren’t blatantly breaking the law.

    Things to Know Before Camping at Dispersed Sites

    One of the reasons I love dispersed camping is that it’s so much more peaceful and private than paid campgrounds. Plus, many free sites have even better views.

    The sad thing is that many public lands that are at risk of being shut down due to overuse and because campers are trashing campsites, pooping and leaving toilet paper all over the place, and driving over vegetation to create new campsites. Basically there’s too may campers that have no respect for the environment that we are all out here to enjoy.

    If you want free campsites to remain free, please follow Leave No Trace principles and keep the following in mind:

    • Fire Regulations: Fire bans are becoming more common at dispersed campsites due to increased fire risk. It’s up to you to know the current fire restrictions and come prepared with basic backcountry fire safety skills. This means drenching the fire completely until it’s cold to the touch before you go to bed. You should also use existing fire rings rather than building new ones.
    • Pack it in, pack it out: You need to take EVERYTHING with you when you leave a dispersed campsite, including your camping gear, trash, and personal items. Bonus if you pick up any trash that was left behind from previous campers. I keep one of these handy trash pickers in my rig.
    • Road Conditions: Before heading out, you’ll want to find out what the road conditions are like, whether you need 4-wheel drive, and whether there are any road closures. Be sure to check the weather in advance too, which can change road conditions.
    • Water Availability: Dispersed sites typically don’t have any potable water available. This means you’ll need to pack enough for your trip or bring a water filter if you’ll be camping near a river or lake.
    • Dump facilities: Unlike established campgrounds, dispersed campgrounds won’t have a dump station on-site. Be prepared to drive to a dump station if your black water tank gets full and certainly don’t drain it at the campsite.
    • Campsite Amenities: Generally there are no amenities such as picnic tables, trash receptacles, sinks, electrical hookups, camp hosts, or restrooms at free dispersed campsites.
    • Going to the bathroom: These days I recommend all van lifers and frequent campers travel with a camp toilet in order to keep dispersed campsites as clea as possible. However, if you plan to go the bathroom outside, know how to Leave No Trace and always pack out your toilet paper.
    • Cell Service: A lot of dispersed free campsites are in remote areas where you may not have cell service to access maps on your phone. If you don’t have Starlink, you should bring a paper map, and tell someone where you are going beforehand .
    • Only camp on bare dirt: Don’t create new campsites by driving over or setting up camp on top of vegetation. Try to choose obvious campsites on hard-packed bare dirt at least 100 feet from water sources in order to reduce your impact.
    • Wildlife: Make sure to respect the local wildlife. Give them space and don’t leave trash or food out unattended.
    A drone shot of a Sprinter van driving down a dirt road near Buena Vista, Colorado
    Most roads leading to dispersed campsites are not paved (looking for free campsite near Buena Vista, Colorado)
    A Sprinter van boondocking near Twin Lakes in Colorado
    Free camping at a dispersed campsite near Leadville, Colorado

    Is Dispersed Camping Safe?

    Taking extra safety precautions when you’re camping is an important consideration, especially when free camping when you may be far away from other people and without cell signal. With that said, in my 9 years of van life, I’ve never encountered any issues while dispersed camping. However, here are a few ways to keep safety top of mind:

    • Trust your gut: If you have a bad feeling about a campsite or other nearby campers, leave. Never second guess your instincts – you can always find another campsite.
    • Be aware of your surroundings: Pay attention to who and what are around you.
    • Download offline maps: Don’t put yourself in a position to get lost or stranded. Download maps ahead of time or grab a paper map as backup.
    • Tell someone your plans: Let someone know where you plan to camp and when you expect to return. Check in often, especially if your plans change.
    • Have an exit plan: Always keep the driver’s seat clear and have a designated spot for your keys. If possible, park where you can’t be blocked in and don’t need to reverse to get out of a spot.
    • Keep your doors locked if you’re sleeping inside your vehicle
    • Travel with a satellite communicator so you can call for help even if you don’t have service.
    • Consider whether you want some sort of self-defense tool and if you are comfortable using it.
    A Sprinter van dispersed camping for free near Moab, Utah
    Dispersed camping in Moab

    Options for Stealth Camping

    I mentioned stealth camping at the beginning of this post, so I want to briefly touch on where you can stealth camp and sleep inside your vehicle. For more info, check out my post on how to stealth camp.

    Here are some places you can stealth camp if you find yourself caught in town refueling on supplies and need a place to sleep for the night. Each location will have different rules, so your best bet is to look for signs or go inside and talk to the manager.

    • Walmart
    • Cabela’s
    • Cracker Barrel (most have dedicated overnight parking spots in the back)
    • Camping World (sometimes have free water, dump stations, and electrical hook-ups)
    • Planet Fitness/Anytime Fitness/24-Hour Fitness
    • Lowe’s/Home Depot/Menards
    • Costco/Sam’s Club
    • Casinos
    • Rest Stops
    • Truck Stops
    Two Sprinter vans are parked outside of a Walmart in North Carolina
    Free overnight parking at Walmart in North Carolina

    What questions do you have about how to find free campsites? Do you have favorite tools to find dispersed camping that I didn’t mention? Share your experiences and tips with boondocking below in the comments!

    Save this post to Pinterest

    The post My Exact Process for Finding Free Dispersed Campsites Away from Crowds appeared first on Bearfoot Theory.

    Best Sun Protection Shirts for Women in 2025 (Reviewed)

    Long gone are my days of wearing tank tops on the trail. With all of the time I spend outside, all of that sun exposure really adds up. Between painful sunburns, visible aging, and my concern over skin cancer, protecting my skin when I’m outdoors has become a much bigger priority as I’ve gotten older.

    Rather than constantly needing to lather up with sunscreen, which gets expensive and can be loaded with chemicals, I’ve opted to simply cover up. Over the years, I’ve tried a number of long-sleeved sun protection shirts that are designed to be lightweight and breathable, making them a great option for hiking and other outdoor activities even when it’s warm and sunny.

    Here is a round-up of the best sun protection shirts for women to help you minimize your sun exposure when you’re outside on those sunny days.

    Overview of Best Sun Protection Shirts for Women

    1. Patagonia Capilene Cool Daily Hoody

    Key Features

    • Weight: 5.2 oz.
    • Fabric: 50-100% recycled polyester
    • UPF protection: 17-45 (not certified)

    Where to shop

    Pros and Cons

    • Pros: quick-drying and breathable, super comfortable, holds up for years of wear without piling or loose threads
    • Cons: I’ve noticed discoloration of the sleeves due to dirt build-up over time, not UPF certified
    • Great for: daily wear, hot summer days, people who don’t want to wash it every time its worn

    My Review

    The Patagonia Capilene Cool Daily Hoody is my all-time favorite sun protection shirt for women. I own several colors and bring all of them with me on the road as part of my van life wardrobe. This shirt is a go-to for me no matter the climate, especially when I hike.

    Made of recycled polyester and spandex, it is quick-drying and extremely breathable. With the soft, lightweight fabric, I find it extremely comfortable for hiking and hanging out at camp or even sleeping in at night if I’m backpacking.

    The hood is a nice feature as it provides added sun protection on your neck and ears without making you hotter, but it also comes in a non-hooded version if you prefer.

    This shirt doesn’t have an official UPF rating, but Patagonia’s tests found this shirt has a UPF rating that ranges from 17-45. While not certified, this is the shirt I wear the most on my adventures, and my skin has never shown any signs of the sun penetrating through.

    While this shirt has odor control, I do find that it can develop a stink, but usually only after several days of wear, and that’s really the case for any of the shirts with odor control listed here.

    Kristen Bor dressed in hiking gear and holding trekking poles on trail in Kodachrome Basin in Utah with red rock landscape behind her
    I weigh 140 pounds and wear a size Medium in the Patagonia Capilene Cool sun protection shirts

    As far as durability, these shirts last a long time. I’ve had mine for years and haven’t experienced any piling or loose strands, although I typically wash my clothes on the delicate cycle and run the dryer on low.

    Like other Patagonia products, this shirt is made of 50-100% recycled material, fabrics are bluesign approved, and the shirt is sewn in factories where workers are paid fair wages.

    2. REI Co-op Sahara Shade Hoodie

    Key Features

    • Weight: 7 oz.
    • Fabric: 92% polyester/8% spandex
    • UPF rating: 50+

    Where to buy

    Pros and Cons

    • Pros: affordable, super comfortable for hiking and everyday wear, longer tunic-length, sleeves have thumbholes
    • Cons: the material is on the thicker side so I wouldn’t recommend for hot-weather activities, light colors show dirt
    • Great for: daily wear, travel, covering up your hands

    My Review

    The REI Co-op Sahara Shade Hoodie is another one of my favorite sun protection shirts. I especially like the price, as it’s more budget-friendly than the other shirts on this list. It’s buttery soft and comfortable with a loose yet flattering fit.

    The shaped hem is longer in the front and the back (kind of like a tunic) so it looks stylish enough to wear out in normal life. I also love the crossover style opening on the neck that provides a little extra cover.

    This shirt also has thumb holes and covers your hands really well (the fabric goes all the way to my knuckles). This is a huge plus since I often forget to put sunscreen on my hands, or it just rinses off as soon as I wash my hands.

    Woman hiking in front of the ocean in Maui wearing hiking shorts, REI Sahara Shade long sleeve shirt for sun protection, a hat, and a hiking daypack
    Here I am 140 lbs (5’5″ tall) and wearing a size Medium

    This sun protection shirt is slightly warmer and thicker than Patagonia’s Cool Capilene daily hoody so I don’t recommend it for hiking in extremely hot or humid temperatures.

    It’s perfect for milder, sunny days on the trail and for lounging at camp. It’s so comfy that I like wearing it on road trips and for travel. I will say that the sleeves on mine are almost permanently dirty. It comes in several colors, and I’d recommend darker shades if your concerned about keeping it looking clean.

    3. Outdoor Research Astroman Long Sleeve Sun Shirt

    Key Features

    • Weight: 5.6 oz.
    • Fabric: 85% nylon, 15% spandex
    • UPF rating: 30 (light colors), 50+ (dark colors)

    Where to buy

    Pros and Cons

    • Pros: super lightweight and breathable, hidden zip-up pocket on the right hip, can be classed up
    • Cons: wrinkles easily
    • Great for: hiking with a baby, going from trail to town

    My Review

    When my little guy was born, I started wearing more button-up shirts because they were easier to breastfeed in. The Outdoor Research Astroman Sun Shirt is one of my favorite sun protection shirts with buttons that I still wear today.

    It’s one of the most lightweight sun protection shirts on this list (after the Outdoor Research Echo below), so if you run hot, this shirt would be a great choice for ultimate breathability.

    A woman stands outside of her Sprinter van with the side door open wearing Outdoor Research Astroman Long Sleeve Sun Shirt
    I’m wearing a size Medium in this photo

    Lighter colors provide UPF 30, while darker colors are rated to UPF 50+, so it will protect your skin during long days in the sun. It has a pocket on the chest as well as a hidden zip-up pocket on the right hip, perfect for storing money or a credit card.

    Made of a nylon blend, it has a soft, stretchy feel and fits true to size. Out of all of the shirts on this list, this one can most easily be classed up if you want to go from the trail straight to town. My only wish is that it came in different colors. It also wrinkles quite easily if you are planning to travel with it in luggage or a backpack.

    4. Carve Designs Cruz Rashguard

    Key Features

    • Weight: 7.2 oz.
    • Fabric: 85% nylon, 15% spandex
    • UPF rating: 50+

    Where to buy

    Pros and Cons

    • Pros: keeps you cool when it’s wet, high-neckline and quarter zip for additional coverage, flattering cut
    • Cons: material is thicker so you wouldn’t want to wear this hiking or during strenuous land-based activities
    • Great for: the beach, snorkeling, and stand-up paddleboarding

    My Review

    When I’m at the beach, I always wear a sun protection shirt because it gives me much longer protection than sunscreen, which tends to quickly wash off and can have harmful impacts on aquatic and marine life.

    The Carve Designs Cruz Rashguard is one of the best sun protection shirts for women who want to stand up paddle board, surf, and snorkel. I own this shirt in two different colors and any time I’m going on a beach vacation, I throw both of them in my suitcase. It was a staple on my last trip to Hawaii and also down in Baja.

    A woman holds fins while wearing the Carve Designs Cruz rashguard on a beach in Maui
    I’m wearing a size large in this photo

    With the cinching on the sides, I find this shirt to be super flattering. It’s also got a high neckline (with a zipper) which provides a little extra skin coverage compared to some of the other shirts on this list. I wear a large in this shirt and I’d recommend sizing up if you want a more relaxed fit.

    My favorite thing about this rashguard is that after I get out of the water, it continues to keep me cool as it dries, which is great for hanging out in the hot sand. If I get hot, I just hop back in the water and get it wet again. Once it dries, however, it’s a little thicker than the other sun protection shirts on this list, so I wouldn’t recommend hiking in it, unless there is water to jump into at your destination.

    5. Free Fly Women’s Bamboo Shade II

    Key Features

    • Weight: 5.3 oz.
    • Fabric: 68% viscose from bamboo/29% polyester/3% spandex
    • UPF rating: 50+

    Where to buy

    Pros and Cons

    • Pros: soft material is great for lounging around camp, made of eco-friendly bamboo, sleeves have thumbholes
    • Cons: doesn’t wick moisture well, can’t go in the dryer and needs to be hung to dry
    • Great for: everyday wear, camping, travel

    My Review

    The Free Fly Bamboo Shade II is one of my favorite sun protection shirts for daily wear and lounging around camp. Made primarily of bamboo, it’s ultra soft and one of the more environmentally friendly sun protection shirts on this list. I love the neutral colors this shirt comes in and find they go well with almost anything.

    The shirt runs long and fits fairly loose which is nice for those who don’t prefer form-fitting clothing. I typically tuck it in since I have a short torso. One of the best features is the thumbholes which help keep your hands covered – an area that I often forget to put sunscreen on.

    I’m wearing a size Medium in this photo

    I don’t find this shirt to wick moisture all that well so it’s not the best choice for activities where you really work up a sweat. I once hiked to the top of Alta Ski Area wearing this, and it was pretty soggy at the top. Another downside is you are supposed to hang it to dry in order to prevent shrinking and piling, which I find to be a bit of a hassle.

    6. Outdoor Research Echo Hoodie

    Key Features

    • Weight: 3.95 oz.
    • Fabric: Bluesign-approved 100% recycled polyester
    • UPF rating: 15-20

    Where to buy

    Pros and Cons

    • Pros: most lightweight shirt on my list, performs well in hot weather, ponytail hole in the hood, sleeves have thumbholes, flattering cut, fun bright colors
    • Cons: holds stink a bit more than the other shirts on this list, lower UPF
    • Great for: more technical, sweaty activities on hot days

    Review

    The Outdoor Research Echo Hoodie is the most lightweight sun protection shirt on for women on this list at less than 4 oz making it suitable for hot temps (like the Patagonia Cool Capilene). It’s also sweat-wicking and quick drying making it a great fit for hiking, climbing, and other high-exertion outdoor activities in the sun.

    Like all good sun protection shirts, this one has thumb holes, and a good amount of stretch that allows for plenty of movement. And the women’s version has a ponytail port in the hood – a unique feature I don’t often see.

    Kristen Bor hiking at the top of Snowbird Ski Area with mountains and Salt Lake Valley in the background. She is wearing the Outdoor Research Echo Hoody sun protection shirt
    I’m wearing a size Large in this photo

    This shirt is a bit more technical looking than some of the others on this list, so you might not wear it out on the town. I do love the bright colors though, and it’s super functional for any sunny day outdoor adventure. Plus, this sun protection top is made from 100% recycled materials which I’m all about.

    I will say that after wearing this for a couple of weeks, I’ve noticed the odor control isn’t quite as good as the Patagonia cool capilene. I wore it to Phish concert once, and was slightly embarrassed whenever I lifted my arms to cheer (lol). This one definitely needs to go through the washer more frequently.

    Also, because this shirt is so lightweight, the UPF isn’t quite as high as the other shirts on this list. I’ve never gotten sunburnt through it though.

    Frequently Asked Questions

    What does UPF mean for clothing?

    UPF stands for Ultraviolet Protection Factor and is a rating that tells you how much radiation gets through your clothing. A UPF 50 means that 1/50th or 2%. of the radiation gets through the fabric. A UPF 25 means that 1/25th or 4% of the radiation gets through. So the higher the UPF the more effective the shirt is at providing sun protection.

    Don’t all clothes provide sun protection?

    Well yes. Any clothing that you wear is going to provide more sun protection than having exposed skin, but certain colors and fabrics do a better job at preventing UV rays from reaching your skin. To be certain, it’s best to wear clothing that has an official UPF rating.

    Save this post to Pinterest

    Do you have a favorite sun protection shirt for women? Any questions about these products? Let me know in the comments!

    The post Best Sun Protection Shirts for Women in 2025 (Reviewed) appeared first on Bearfoot Theory.

    2025 REI Anniversary Sale: 35 Amazing Outdoor Gear Deals

    My favorite sale of the year – REI’s Anniversary Sale – is here! Taking place May 16-26th, 2025, this is the REI Co-op’s biggest sale, and I’ll be honest that – in my opinion – it’s one of the best Anniversary Sales in years.

    There are so many brands on sale that rarely get discounted, and you can save up to 30% in this year’s REI Anniversary Sale.

    To save you time scouring the REI website, I’ve handpicked my favorite deals on apparel, hiking, camping, backpacking, and van life gear. You’ll see in the photos below, I actually own and use this gear that I’m recommending here. These are items that my team and I love and think you will too!

    Sponsored by REI Co-op

    REI Co-op is my favorite outdoor gear retailer and a long-time supporter of my work here at Bearfoot Theory. Their 1-year return policy for Members is hands-down the best in the industry, and Members also get 10% back on their purchases every year.

    REI Sale Highlights

    First – here are some of the top deals that really grabbed my attention in this year’s REI Anniversary Sale.

    REI Member Exclusive Offers

    During the Sale, REI members also get 20% off one full-price item, plus an extra 20% off one outlet item using the code ANNIV2025.

    If you’re not a Member already, here are 12 reasons why you should join the REI Co-op).

    Best Car Camping & Van Life Deals

    NEMO Roamer Sleeping Pad – 25% OFF

    Roamer Double sleeping pad

    Gone are the days of uncomfortable sleep on car camping trips. The NEMO Roamer Sleeping Pad is 4 inches thick, which means I never feel the ground, and it’s very easy for me to blow up with a self-inflation mechanism that actually works.

    At 5 lbs 8 oz, I like how it’s lighter and less bulky than other comparable car camping sleeping pads or a traditional blow-up mattress. Trust me – once you try the NEMO Roamer, it’ll be on your “must-have” list for camping forever.

    Looking for a 2-person sleeping pad? The NEMO Roamer Sleeping Pad – Double is also on sale. Read more about the pros and cons and my personal experience in my NEMO Roamer Double Sleeping Pad Review.

    Bearfoot Theory founder Kristen Bor in a tent holding the NEMO Double Roamer Sleeping pad and showing it's thickness
    The Nemo Roamer (this is the 2-person) is so plush

    ENO DoubleNest Hammock – 25% OFF

    ENO DoubleNest Hammock

    What’s better than lounging in a hammock after a nice long hike or setting up camp? ENO helped pioneer basecamp relaxation, and I love using their DoubleNest Hammock on trips because it has ample room for two but packs down super small. I can easily toss it in my daypack to string up for a mid-hike nap!

    All ENO hammocks are currently on sale, so you can take your pick of single or double and find just the right color or pattern.

    feet in a hammock with a man cooking on a camp stove and a sprinter van in the background

    Nomadix Quick Dry Towel – 25% OFF

    Nomadix towel

    Quick dry towels are a must for any trip, whether I’m car camping, backpacking, or traveling on a plane. From showering, drying my dishes, or lounging in the sun, I appreciate how these Nomadix Towels pack small and dry much quicker than traditional towels. I find that quick dry towels always come in handy, so pick up a few right now for 25% off.

    Kristen Bor standing on a towel on the beach in Maui with a snorkel on her head

    Nomadix Festival Blanket – 25% OFF

    Nomadix Festival Blanket

    I always keep the Nomadix Festival Blanket in the van because it comes in handy for just about everything. Whether I’m heading to an outdoor concert, a beach day, or a picnic by the lake, this blanket is my go-to. Now that I have a toddler, it’s even more of a staple. It gives us a clean, comfy spot to sit, snack, or play wherever we are.

    It’s lightweight, easy to pack, machine washable, and comes in tons of fun patterns. Plus, the material dries quickly and doesn’t collect a bunch of sand or dirt, which makes cleanup a breeze.

    Veer basecamp beach tent set up on Cox Bay in Tofino with a baby inside

    Rumpl Blankets – 25% OFF

    Rumpl blanket

    Rumpl blankets are my go-to for camping and van life—I’ve used the 2-person Original Puffy as my comforter in the van since 2017. They’re soft, cozy, and surprisingly durable (even with a toddler and two dogs).

    I love that they’re water-resistant, shake off dirt easily, and can be tossed in the washing machine when they need a refresh. Rumpl offers a few different insulation options, including recycled synthetic, NanoLoft, and down, depending on how warm you want to go.

    Kristen Bor lying on a Rumpl blanket in the bed of her Sprinter Van with Mt St Helens in the background

    Hydro Flask 32oz. Wide-Mouth Water Bottle – 25% OFF

    Hydro Flask 32oz. Wide-Mouth Water Bottle

    With all the great options for reusable water bottles nowadays, there’s really no need (or excuse) to buy single-use plastic ones. The Hydro Flask Wide Mouth Vacuum Water Bottle W/ Flex Straw Cap is one of my personal favorites. It’s a good size for all-day hydration, keeps my drinks hot or cold, has a straw for easier drinking on the go, and it’s easy to clean and carry. If you’re looking for something smaller or a bottle without a straw, Hydro Flask has lots of different styles and options, and many are on sale right now during REI’s Anniversary Sale.

    Kristen Bor standing next to a creek surrounding by forested mountains holding a Hydroflask water bottle
    My Hydro Flask keeps my water cold on hot summer days like this

    Hydro Flask Camp Bowl and Camp Plate – 25% OFF

    Hydro Flask Camp Bowl

    I’ve been trying to phase out plastic out of my camper van kitchen essentials, so recently invested in a set of Hydro Flask Camp Bowls and matching Camp Plates. They are made of food grade stainless steel, are lightweight, super durable, and just the right size for everything from a big bowl of soup, my toddler’s meals, or a full camp breakfast. I love that they don’t get too hot or cold to the touch, which makes them perfect for eating outdoors or straight from the camp stove.

    Fried plantains on the Hydroflask camp plate with a beach in the background
    The Hydro Flask Camp Bowls and Plates have been a great addition to my new rig

    Ruffwear Float Coat Dog Life Jacket – 25% OFF

    Ruffwear Float Coat Dog Life Jacket

    I love to bring my dogs with me on my adventures, whether that’s on land or water. The Ruffwear Float Coat Dog Life Jacket features a strong handle that allows me to easily lift my dogs in and out of the water. I like how the life jacket is designed with clips, making it quick and easy to take on and off of my dogs. It also features a reflective trim so I can spot my dogs in the water right away.

    border collie on a canoe wearing a ruffwear lifevest
    My dog Charlie on a canoe trip through Utah’s Labyrinth canyon

    REI Co-op Big Haul 40 Recycled Duffel – 30% OFF

    REI Big Haul Duffel

    Duffel bags are incredibly versatile, serving purposes from organizing van life essentials to preparing for extensive travels. For quick getaways, my top pick is the REI Co-op Big Haul 40 Recycled Duffel. I love how I can just toss it in the back of my van during road trips.

    During winter, I rely on my duffel daily to keep all my ski gear neatly stowed and easily accessible in my car, including my helmet, goggles, mittens, boot heaters, and midlayers. Something special that sets this duffel apart from others is its convenient stowable backpack straps and accompanying storage sack, allowing me to store it compactly when I’m not using it.

    For those requiring smaller or larger capacities, it is also available in 28, 60, and 90, and 120-liter versions, as well as a rolling duffel equipped with wheels that would be perfect for overseas trips. All these styles are 30% off during the sale.

    Kristen Bor on the edge of a Sprinter Van holding an REI Big Haul Duffel
    Stepping out of my old Sprinter van with the REI Co-op Big Haul Recycled Duffel

    REI Co-op Expandable Packing Cube Set – 30% OFF

    REI Expandable Packing Cubes in three sizes

    In my van, packing cubes are essential for organization. I use the REI Co-op Expandable Packing Cube Set to sort my clothes (and make finding them much quicker and easier). This set includes three different sizes, making it convenient for me to know at a glance which one holds which items. I keep my tops in one, bottoms in another, and undergarments in the smallest cube.

    Packing cubes with clothing in a camper van
    My REI packing cubes are the perfect storage solution for my wardrobe when I’m living in my van

    Nemo Moonlander Dual Height Table – 25% OFF

    NEMO Moonlander camp table

    This NEMO Moonlander Table is hands down my favorite compact camp table. It’s small enough to store in the gear box on the back of our rig, but sturdy enough to handle my toddler’s rough-and-tumble mealtimes. Herbie loves eating on it, and honestly, he’s gotten so good at setting it up he can do it himself in about 90 seconds (it takes me less than 30).

    It has two different heights – standard camp chair height and a mode that’s low to the ground.

    Boy with face blocked out at a campsite on the beach next to a Rossmonster Baja Truck camper. Boy is sitting at NEMO moonlander table

    Helinox Sunset Chair – 25% OFF

    Helinox Sunset Chair

    I travel with two Helinox Sunset Chairs in our van, and they’re my favorite for kicking back after a long day. The high back is super supportive, and the built-in headrest adds comfort, especially if you stuff it with a jacket or towel.

    They’re lightweight (under 3.5 lbs), pack down small, and we can even store them fully set up in the van, which makes campsite setup a breeze. The only downside I can think of is that there is no cup holder. They’re definitely a splurge, so the Anniversary Sale is a great time to grab one and save on the comfort and quality.

    Kristen Bor sitting in camp chair next to camp table at a campsite in Colorado

    NEMO Stargazer Chair – 25% OFF

    Helinox Stargazer Chair

    I don’t own the NEMO Stargazer Chair yet, but my partner Ryan has been begging for one for years. After lounging in a friend’s on our winter trip to Baja this year, I finally see what all the hype is about.

    It really does feel like a hammock with the easy setup of a camp chair—perfect for kicking back, stargazing, or hanging around the fire. This is what I’ll personally be picking up during REI’s Anniversary Sale this year.

    REI Co-op Base Camp 4 Tent – 30% OFF

    REI Co-op Base Camp 4 Tent

    The REI Base Camp 4 tent has been through it all with me—desert downpours, freezing mountain nights in Utah, even a dusty music festival—and it’s held up every time. It’s incredibly sturdy and does a great job in wind and weather. I love how much airflow it offers with all the windows, and you still get plenty of privacy when you need it.

    At 5’5″, I can almost stand up inside, which makes changing clothes and moving around way more comfortable than your average tent. It’s roomy, reliable, and one of my favorite picks for car camping trips with the family. Check out my detailed REI Base Camp 4 tent review for more thoughts.

    Kristen Bor sitting inside the REI Base Camp 4 Tent
    Admiring how much space is in the REI Base Camp 4 Tent

    Best Deals on Hiking & Backpacking Gear

    Garmin fenix 8 AMOLED Sapphire Multisport GPS Watch – $200 OFF

    Fenix 8 AMOLED Sapphire multisport GPS watch

    If you’re in the market for a GPS watch, you can snag the Garmin fenix 8 AMOLED GPS Watch for $200 off during REI’s Anniversary Sale! This watch is a pretty big investment, so it’s best for people who are serious about tracking their activities or upping their fitness game.

    With its built-in GPS and topo maps, it provides accurate tracking of my route and location, so I don’t have to constantly pull out my phone.

    Garmin watch on a woman's wrist

    Garmin inReach Mini 2 – $100 OFF

    Garmin inReach Mini 2 emergency satellite GPS

    I think a Garmin inReach Mini 2 is a must-have item for all outdoor enthusiasts. This little handheld device keeps me safe in the backcountry where there is no cell service by tracking my location, providing 2-way texting, and sending out SOS signals should things go wrong.

    I’ve also used it in my van. One time our battery died outside of Sun Valley Idaho in winter in sub-zero temps. I was able to text my dad with our GPS coordinates, and he then contacted a tow company to come help us. Without the Garmin inReach, we would have been waiting there for a very long time.

    A close up of a hand holding a Garmin InReach Mini emergency communication device
    I always bring my Garmin inReach Mini with me on my off-grid adventures

    NEMO Tensor All-Season Ultralight Insulated Sleeping Pad – 25% OFF

    NEMO Tensor All-Season Ultralight Insulated Sleeping Pad

    The NEMO Tensor All-Season Ultralight Insulated Sleeping Pad is lightweight with insulated layers to keep you warm all night in the backcountry. The 3.5-inch thickness makes it a great option for side sleepers. I like how this sleeping pad packs down small in my pack, and once I get to camp, it’s quick to inflate with the inflation sack.

    The NEMO Tensor comes in regular, wide, and long sizes, so you can find the perfect fit for your body! I personally prefer the wide, so I don’t roll off it in the middle of the night. You can find this sleeping pad in my collection of the best sleeping pads for backpacking.

    Tensor All-Season Ultralight Insulated Sleeping Pad on Kristen Bor's camping trip in Paria Canyon Utah
    The Nemo Tensor Sleeping All-Season Pad was perfect for our backpacking trip in Paria Canyon, Utah

    REI Co-op Magma 15 Sleeping Bag – 30% OFF

    REI Magma 15 sleeping bag

    Coming in nine different unisex sizes, the newly updated REI Co-op Magma 15 Sleeping Bag allows you to find your ideal fit for better sleep based on your measurements. BFT Contributor Kaylin Zittergruen tested this sleeping bag while backpacking in Havasu Falls and says, “I love how this sleeping bag is lightweight, warm, and soft. The 15-degree bag kept me really warm even when the temps dipped below freezing.”

    Kaylin also said, “The design of the zipper makes it easy to unzip and rezip without snagging on the material, and the stash pocket fits my phone perfectly. I got some of the best nights of sleep I’ve ever had while sleeping in this bag!” To read more of Kaylin’s experience, check out her review of the REI Magma 15 Sleeping Bag.

    Woman setting up the REI Magma sleeping bag inside of a tent
    BFT Contributor Kaylin setting up the REI Co-op Magma 15 Sleeping Bag on a camping trip

    Jetboil Flash Cooking System – 25% OFF

    Jetboil Flash backpacking stove

    I’ve been a committed Jetboil fan for nearly 20 years. I got my first one right when they first launched back in 2004. I love the Jetboil Flash Cooking System because it heats water in ~90 seconds, and it’s just so easy to use. You don’t have to worry about knocking the pot off the burner, and the stove fits inside the pot along with a small fuel canister, so it takes up very little room in your pack.

    The only issue I have with the Jetboil is the push igniter is sometimes unreliable. But you can quickly light it with a lighter or matches, which you should always carry with you on a backpacking trip anyways.

    Kristen Bor sitting on ground next to backpacking stove and bear canister on backpacking trip
    Using my Jetboil Flash to boil some water for some dehydrated backpacking meals

    Black Diamond Distance Carbon FLZ Trekking Poles – 25% OFF

    Black Diamond Carbon FLZ Trekking Poles

    I love my Black Diamond Distance Carbon FLZ Trekking Poles because they’re super lightweight and fold down smaller than other trekking poles, which makes them easy to pack for any trip (including air travel). They’re fully adjustable so you can change the length depending on whether you are going up or down, and they help me feel sturdier on steep, rocky trails. The foam grips are comfortable for long days, and the total weight of the pair is extremely light at ~1 pound.

    Kristen Bor hiking with Black Diamond FLZ trekking poles at Deer Valley on a summer day

    Counter Assault Bear Deterrent Spray – 25% off

    Counter Assault bear spray

    If you’re hiking or camping in grizzly country—like parts of Canada, Alaska, Montana, or Wyoming—carrying bear spray is a must. I always bring Counter Assault Bear Spray when I’m in these areas. It’s one of those things you hope you’ll never need to use, but having it on hand gives me peace of mind and an added layer of safety. It’s easy to carry, has a strong spray range, and is one of the most trusted brands out there for a reason.

    Just make sure you know how to use it before hitting the trail—this post on wildlife safety tips walks you through how to carry and use bear spray properly.

    Man with backpack next to a river
    My partner Ryan with his bear spray easily accessible at the hip

    Best Deals on Apparel

    REI Co-op Sahara Shade Hoodie – 30% OFF

    REI-Coop Sahara Shade Hoodie

    You’ll hardly ever catch me outside in summer without a sun shirt on, and the REI Co-op Sahara Shade Hoodie (the men’s version is here) is one of my favs. I wore it for a week straight in Maui without washing it and found that it didn’t stink, and the loose fit keeps me surprisingly cool even in warm weather. It’s one of my staples in my truck camper too. I especially love how much coverage the hood provides.

    Check out my full sun protection for hiking guide for more product recommendations and tips.

    Kristen Bor hiking in the Uintas. She's wearing a sun hoody and there is a mountain lake in the background
    I’m 5’6″, 140lbs, and wear the REI Sahara Shade Hoodie in size Large

    REI Co-op Sahara T-Shirt – 30% OFF

    REI Co-op Sahara T-Shirt

    The REI Co-op Sahara T-Shirt (the men’s version is here) is a BFT Team favorite. The fabric offers UPF 50+ sun protection, plus it’s breathable and quick drying, making it ideal for sunny days and extended outdoor adventures when you don’t want to wear long sleeves (like in high humidity).

    Woman smiles at the camera standing on a hiking trail. She is wearing a white REI Co-op Sahara T Shirt
    BFT Contributor Linda is 5’3″, 120lbs, and wears the REI Sahara T-Shirt in size Small

    REI Co-op Trailmade Pullover – 30% OFF

    REI Co-op Trailmade Pullover

    The REI Co-op Trailmade Pullover is a great lightweight, quick-dry shirt that is perfect for both outdoor and everyday wear. The buttons and loose fit provide for great airflow. This shirt has a boxy fit and runs short, so it may not work for people with long torsos. It also wrinkles easily, so that’s something to keep in mind if you plan to travel with it. But, for an outdoor shirt that can pass as dressy, I’m sold on the design!

    Kristen Bor hiking on a dirt trail with green trees and bushes around her.
    Here, I’m 5’6″, 140 lbs and am wearing the REI Trailmade Pullover in size Medium

    Carve Designs Dylan Gauze Shirt – 25% OFF

    Carve Designs Dylan Gauze Shirt

    I always pack one of these Carve Designs Dylan Gauze shirts in my truck camper for those moments when I want to wear something other than hiking clothes. The fabric is light and breathable—perfect for hot days—and it comes in a bunch of cute colors and patterns. It’s easy to dress up with jeans or toss over a swimsuit, and it hardly takes up any space. Just a solid, comfy staple that helps me feel a little more pulled together on the road.

    I should add that the lighter colors can be a bit see-through so you’ll want to wear a light tank underneath or choose a darker color.

    Kristen Bor of Bearfoot Theory and her family at Snowbird on the tram deck

    Mountain Hardwear Dynama Ankle Pants – 25% OFF

    Mountain Hardwear Dynama/2 Ankle Pants

    The Mountain Hardwear Dynama Ankle Pants have been one of my staples for hiking and backpacking trips for several years now (in fact, I’m wearing them right now as I type this). The elastic waistband is super comfortable, and because there is no button, drawstring, or zipper, they work really well when I’m wearing a backpack with a hip belt since there is nothing that will cause rubbing or discomfort.

    You can find the Dynama pants on my list of best women’s hiking pants.

    Kristen Bor smiles wearing a red backpacking pack on top of a rocky ridge wearing Mountain Hardwear Dynama Ankle Pants in Sequoia National Park
    I’m 5’6″, 140lbs, and wear a size Medium in the Mountain Hardwear Dynama Pants

    REI Co-op Trailmade Shorts – 30% OFF

    REI Co-op Trailmade Shorts

    The REI Co-op Trailmade Shorts (the men’s version is here) have become a go-to in my adventure wardrobe. I wear them often on hikes and around camp, and I love the high-waist fit and lightweight feel. The elastic waistband is super comfortable, and the quick-drying fabric makes them perfect for active days on the trail. Plus, the pockets are actually functional—with plenty of room for snacks or small essentials.

    Woman wearing REI Co-Op Trailmade Shorts in green and Oboz Katabatic Trail Runners. She is smiling not looking at the camera.
    BFT Contributor Courtney is 5’7″, 150lbs, and wears the REI Trailmade Shorts in size Medium

    REI Co-op Trailmade Fleece Jacket – 30% OFF

    The REI Co-op Trailmade Fleece Jacket (the men’s version is here) is a budget-friendly piece made for all body types. The material is super soft, warm, and cozy yet breathable and quick drying.

    The fit is loose and comfortable with room to move and has a high neckline for added warmth. I appreciate how the jacket is versatile, making it perfect for camping trips, outdoor adventures, and everyday wear. Plus, it’s cute to boot. Snag this jacket for 30% off during REI’s Anniversary Sale!

    Outdoor Research Helium Down Hoodie – 25% OFF

    Outdoor Research Helium Down Hoodie

    I absolutely love the Outdoor Research Helium Down Hoodie (the men’s version is here) because it is incredibly warm, lightweight, and packs down small, making it perfect for everything from chilly morning hikes to multi-day backpacking trips.

    The 800-fill down feels like you’re wrapped in a cloud, and the waterproof shoulders add extra protection if you get caught in light rain or snow. It’s one of those pieces I always have in my pack because it delivers serious warmth without taking up much space.

    Kristen Bor on a winter hike in her Outdoor Research Helium Down Hoodie
    The Outdoor Research Helium Down Hoodie is perfect for a winter hike

    Nani Swimwear Cut Back Crop Swimsuit Top – 25% OFF

    Nani Swimwear Cut Back Crop Swimsuit Top

    I’ve been loving the Nani Swimwear Cut Back Crop Swimsuit Top and matching ruched bottoms. The swimsuit top is very supportive for large-chested women like myself, and the bottoms are full coverage and very flattering. This swimsuit stays put when I’m active, so I don’t have to worry about it shifting around. When I was in Maui, I would wear this on hikes instead of a bra, that way I was always ready to jump in a waterfall.

    Nani Swimwear makes their swimsuits out of recycled plastic water bottles and are an all-women ran company. All of their swimwear is 25% off during REI’s Anniversary Sale if you want to check out their other swim styles.

    Kristen Bor wearing the Nani Swimwear Bikini top and ruched bottoms in the sea in Italy
    I’m 5’6″, 158lbs (at 5 months pregnant), and wear a Nani Swimwear top in size L (I’m a 36D) and size M bottoms

    Nani Swimwear Hybrid Uinta Shorts – 25% OFF

    Nani Swimwear Hybrid Uinta Shorts

    Not only do the Nani Swimwear Hybrid Uinta Shorts make excellent swim shorts – they’re also perfect for hiking! I wore a pair of Nani hybrid shorts while adventuring in Maui and liked how I could wear them for walks on the beach and waterfall hikes. The quick-drying, stretchy material makes them comfortable to wear while working up a sweat on the trail or chilling on the beach.

    Kristen Bor smiles on Maui on the Kapalua Coastal Trail. She's wearing REI Sahara Shade Hoodie and Nani Swimwear Explorer Shorts
    Here I’m 5’6 and 140 lbs, wearing a size Medium in the Nani Swimwear Hybrid Shorts

    Cotopaxi Tech 5-Panel Hat – 25% OFF

    Cotopaxi Tech 5-Panel Hat

    If you’re looking for a lightweight hat that will keep your head cool in warm weather, check out the Cotopaxi Tech 5-Panel Hat. This adjustable hat has a nylon strap and a clip closure, so you can get the perfect fit.

    I like to wear it while hiking because it protects my scalp from the sun without making my head feel hot or itchy. It’s so light I can barely tell I’m wearing it, and it doesn’t push down on my sunglasses – so it’s really comfortable for hiking. It’s even cute to wear around town and to concerts.

    Kristen Bor on the top of Angel's Landing in Zion National Park wearing the Cotopaxi Tech 5 panel hat
    My Christmas Day hike to the top of Angel’s Landing. The Cotoxpaxi Tech 5-Panel Hat was the perfect choice and didn’t impact my vision as I was hiking up the chains.

    REI Co-op All REI Co-op Brand Socks – 30% OFF

    REI Co-op Coolmax Crew Socks

    If you need new hiking socks, you’re in luck – all REI Co-op brand socks are 30% off in the Anniversary Sale! REI sock are lightweight, comfy, breathable, and sweat-wicking. If you’re between sizes, I recommend sizing down.

    Oboz Footwear Bridger Mid Waterproof Hiking Boots – 25% OFF

    Oboz Bridger Hiking Boots

    I love my Oboz Bridger Mid Waterproof Hiking Boots (the men’s version is here), especially when I’m hiking in the rain or on wet trails. The mid-ankle design offers ankle support as I hike and keeps water out.

    When backpacking with a heavier load, they’re my go-to boots thanks to their sturdiness, waterproofness, and grippyness from the lugs on the soles. Even better? No painful break-in period is required – the soft leather uppers make them ready for you to slip on straight out of the box.

    Close up of woman wearing waterproof hiking boots walking across a shallow stream
    Crossing a river wearing my Oboz Bridger BDry Hiking Boots while backpacking the Mineral King Loop in Sequoia National Park

    Oboz Footwear Katabatic Low Hiking Shoes – 25% OFF

    Oboz Katabatic LT low women's hiking shoe

    Unless I’m on a hearty backpacking trip, these days you’ll find me wearing lightweight hiking shoes instead of bulkier boots. The Oboz Katabatic Low Hiking Shoe (the men’s version is here) has become my go-to choice. They’re lightweight, supportive, and comfortable right out of the box, and they provide great traction too. I feel very nimble in these.

    I opt for the low ankle, non-waterproof (more breathable) version for more mellow hikes, but they also come in a mid-ankle GORE-TEX version as well.

    I’ve worn them on everything from mellow neighborhood walks to local hikes and even errands around town. At under 1 lb, 4 oz per pair, they’re one of the lightest hiking shoes I’ve tried, but still feel sturdy enough to handle uneven terrain. If you’re looking for a do-it-all shoe that can transition from trail to town, this is a solid pick.

    How To Use Your Member Coupon

    In addition to the sale deals, REI Members also get 20% off one full-price item, plus an extra 20% off one outlet item using the code ANNIV2025.

    Here’s a few items I recommend using your 20% coupon on:

    Rossmonster Baja Trail parked at a beach campsite with the CGear Sand Mat creating a patio in front of it
    My CGear Sand Mat has been so clutch in Baja.
    Save this post to Pinterest

    What’s on your wishlist for the REI Anniversary Sale? Have you tried any of these items? Let me know in the comments below!

    The post 2025 REI Anniversary Sale: 35 Amazing Outdoor Gear Deals appeared first on Bearfoot Theory.

    Camper Van Cooking Equipment I Swear By (a complete checklist)

    I’ve been doing van life since 2016, and cooking awesome meals in my camper van (or now my adventure truck) is one of my favorite parts of van life. But now that I’m traveling full-time with my son, I’ve had to prioritize meals that are quick, convenient, and easy to clean up. With limited storage space in our rig, I can’t pack everything I’d like, so I’ve pared down our campervan cooking equipment to the essentials we use the most.

    In this post, I’m sharing my favorite tried-and-true van life kitchen equipment essentials — the cookware, utensils, and gear that make cooking on the road simple and stress-free. Whether you’re outfitting a new build or upgrading your current setup, these van life cooking essentials will help you eat well without cluttering up your space.

    For more van life meal planning tips, see my guide to cooking delicious food in a tiny space.

    Major Kitchen Appliances

    Over the years, I’ve figured out what camper van cooking equipment is actually worth the space — and what we can live without. These are the major appliances I use the most in our van. Some people love having things like a toaster oven or an Omnia stovetop oven (if they cook with gas), but for our setup, this list covers everything we use to make cooking on the road easier.

    • Induction stove: While gas stoves are great for outdoor cooking, an induction stove makes cooking inside your camper van so much easier. There’s no setup required, no hauling ingredients outside, and cleanup is a breeze. Just note that you’ll need a powerful battery system and inverter to run it. I highly recommend avoiding a built-in propane stove — I had one in my first van, and it took up a lot of space, wasn’t the safest option, and was a huge hassle to clean.
    • Small air fryer: Apart from our stove, our air fryer is the appliance we use most. We have the Instant Pot Vortex Mini (2-quart capacity), and it’s the perfect size for a pack of tofu, which we eat regularly. I also use it for making sweet potato fries, roasting veggies, heating up leftovers, and even toasting bread.
    • Small Instant Pot pressure cooker: I bring the smallest size Instant Pot in our camper, and it’s a game-changer for quick, hands-off meals. It’s perfect for cooking rice, quinoa, beans, soups, lentils, and one-pot pasta. I love that I can set it and forget it — freeing me up to clean up, play outside with my son, or get some work done while dinner cooks.
    • Cookware: I use the Magma Nesting Induction Stainless Steel Cookware Set, and it’s been amazing. While this set is heavy, the handles are removable and the pots nest together to save space, and they’re super high quality (unlike most camp cookware). In my experience, the stainless steel holds up better than nonstick. I used to have the nonstick version and the coating got scratched on some bumpy roads.
    • Microwave: A microwave is definitely a luxury item, but now that we have one in our Rossmonster Baja Trail truck camper, I use it daily. It makes heating up leftovers, milk for my morning matcha, or late-night popcorn quick and easy. I survived eight years of van life without one, but if you have the space and power capacity, it’s a nice convenience to have.
    • Blender: We brought our big Vitamix, but honestly, it’s too bulky, heavy, and annoying to clean for van life. While I love it for smoothies and homemade hummus, a personal Ninja blender is a more practical choice. It’s compact, easier to clean, and you can eat or drink right out of the blender cup.
    Instapot, air fryer, nesting cookware and a vitamix on the counter in the rossmonster baja trail adventure truck
    kitchen cooking equipment inside a cabinet in the Rossmonster Baja Trail LX
    Most of my cooking appliances fit in a cabinet below the counter in my Rossmonster Baja Trail truck camper

    Cooking Utensils

    Below is a list of the cooking utensils I use most frequently in my camper. I recommend searching for a cooking utensil set that includes most of these items so you don’t have to buy everything separately. Look for food-grade silicone tools — they’re safe, heat-resistant, and easy to clean.

    I keep things organized in my drawer with dividers so everything is always easy to find.

    Get My Free Van Life Meal Guide

    Want to make cooking on the road even easier? Download my free list of easy van life meals and must-have pantry staples. It’s packed with simple ideas and ingredients that make grocery shopping and meal planning a breeze — perfect for keeping your camper van kitchen stocked and stress-free.

    Dinnerware

    When it comes to dinnerware in our camper van, I like to avoid plastic as much as possible. Since we put effort into making good meals, it’s nice to enjoy them on normal-sized plates and bowls instead of tiny, flimsy camping dishes. Here are my recommendations:

    • 4 plates: Even if you’re only traveling with two people, it’s helpful to have four plates so you’re not forced to wash dishes immediately — and you’ll be ready if you have guests. I like the heavy duty RTIC Anywhere Plate Set and lighterweight Hydro Flask stainless steel plates.
    • 4 bowls: These Hydro Flask camp bowls are lightweight, durable, and big enough for a hearty bowl of soup, salad, or cereal.
    • Insulated mugs: Bring one per person. I use the Yeti Rambler mug — it keeps coffee and tea hot for hours and the lid is really easy to clean.
    • Extra cups: It’s nice to have a 1 or 2 extra lightweight cups on hand for drinking electrolytes, cold beverages after a hike, or a glass of wine by the campfire.
    • Silverware: I prefer using regular silverware over camping-specific utensils. It’s heavier, but it’s much nicer to eat with and makes meals feel a little more homey.
    plates and bowls on the counter in the Rossmosnter Baja Trail truck camper

    Coffee/Tea

    Coffee and matcha are on our morning menu in our van. Here’s the van-friendly kitchen equipment we use to get our fix.

    • Kettle: A small electric kettle is perfect for quickly boiling water for coffee, tea, or instant meals.
    • Coffee maker (Aeropress): The Aeropress is small, compact, and makes a delicious cup of coffee. It’s also super easy to clean — once you’re done, you just plunge the grounds into the trash and give it a quick rinse. No messy wet grounds going down the drain.
    • Compact coffee grinder: We typically buy ground coffee since it’s easier, but if you prefer using whole beans, you’ll want a small hand-crank or electric coffee grinder.
    • Milk frother: I use a handheld milk frother to make creamy, frothy milk for my matcha. It’s lightweight, easy to store, and makes my morning drink feel like a treat.
    • Loose leaf tea steeper: If you like drinking loose leaf tea, a small tea steeper is a must. It barely takes up any space and makes it easy to enjoy high-quality tea without the waste of tea bags.
    A woman uses the Aeropress Go coffee press in her Sprinter van
    Using the Aeropress Go coffee maker in my camper van

    Food Storage

    When it comes to food storage in a camper van, saving space and keeping things organized is key. I like to use reusable, non-plastic options that are compact, durable, and easy to clean.

    • Collapsible silicone tupperware: Space is always at a premium in a camper van, and collapsible tupperware is a great solution. When you’re not using them, they flatten down and barely take up any room.
    • Stasher bags: Stasher bags are reusable, durable, and come in a variety of sizes. They’re perfect for packing to-go snacks for hikes, storing leftovers in the fridge, or even reheating food — they’re microwave-safe and can handle being put in boiling water. Wait until these go on sale though since they are pretty expensive!
    silicon tupperware and stasher bags on counter in Rossmonster Baja truck camper

    Clean-Up

    Keeping your van kitchen clean is much easier when you have the right tools. I like to keep things simple with quick-drying towels and compact cleaning gear that doesn’t take up much space.

    • Microfiber hand towels: These ultra absorbent (and cheap!) microfiber towels are great for drying dishes and hands, and they take up very little space.
    • Quick-dry towel or dish drying mat: When doing dishes, we place a quick dry towel on the counter to lay out the clean dishes off before we dry them.
    • Dish brush with soap in the handle: Makes washing dishes quick and easy without needing a separate soap bottle.
    • Eco-friendly dish soap: Using biodegradable, non-toxic soap helps protect the environment — especially when you’re draining grey water outdoors.
    Dishes on the counter in the Rossmonster Baja Trail truck camper

    Final Thoughts

    After years of part-time van life — and now traveling full-time with my son — I’ve learned that having the right kitchen setup can make or break your experience on the road. Keeping it simple, convenient, and easy to clean helps us spend less time dealing with dishes and more time soaking up the places we’re there to explore.

    I hope this list of my favorite campervan cooking equipment and van life kitchen essentials helps you feel more confident in building out your own kitchen setup.

    If you have any favorite kitchen gear you can’t live without, I’d love to hear about it in the comments.

    Save this post to Pinterest

    The post Camper Van Cooking Equipment I Swear By (a complete checklist) appeared first on Bearfoot Theory.

    15 Trail-Tested Tips for Backpacking With a Dog (What I’ve Learned)

    The first time I ever tried backpacking with a dog was back in 2010 with my Rhodesian ridgeback, Johnny. Honestly, I had no idea what I was doing—and it showed. Partway through the hike, Johnny overheated and just… stopped. He refused to move.

    At 80 pounds, carrying him wasn’t an option. I panicked. It took a lot of coaxing (and a lot of treats) to get him down to a stream where he finally cooled off. It was scary, and I was so worried for his safety that I never took him backpacking again.

    Fast forward to now, and things look a lot different. The dog I got next is Charlie. He’s a border collie with boundless energy and trail smarts to match. He’s the ultimate hiking partner, and thanks to his athleticism—and everything I’ve learned over the years—I felt confident giving backpacking with a dog another try.

    Since then, Charlie and I have done tons of overnight trips, and I’ve picked up a lot of knowledge about what makes for a safe, successful backcountry adventure with a canine companion.

    In this post, I’m sharing everything I’ve learned from experience, including:

    • How to choose a dog-friendly trail and prep your pup for the terrain
    • What gear your dog actually needs (and how to train them to carry it)
    • How to manage hydration, nutrition, and paw care on the trail
    • What to do at camp to keep your dog safe, happy, and well-rested
    • How to follow Leave No Trace with your dog in the backcountry

    Whether it’s your first overnight or your tenth, I hope this helps you and your dog have an amazing trip.

    1) Choose a Dog-Friendly Trail

    The very first thing I check before planning a backpacking trip with my dog is whether the trail even allows dogs. A lot of National Parks are off-limits, which is a bummer, but National Forest and BLM lands are usually much more welcoming. When I’m not sure, I just call the local ranger station and ask.

    Once I’ve confirmed dogs are allowed, I start looking at whether the trail is actually good for a dog. Just because dogs are permitted doesn’t mean the trail is going to be safe or comfortable for them. These are the things I personally look for:

    • Water access: I try to pick routes that have creeks, lakes, or at least reliable water sources along the way. Charlie loves to splash around to cool off, and it also means I don’t have to carry as much water for him. When he gets a chance to play in the water, he’s noticeably more relaxed and happy on the trail.
    • Reasonable terrain: If a trail is super rocky or rough, it can really mess with a dog’s paws—especially on longer hikes. I’ve learned the hard way that terrain that looks “fun and rugged” for me might be painful for Charlie, so I lean toward smoother trails or ones with soft ground when possible.
    • Cooler temps or plenty of shade: After my scary experience with Johnny getting heat exhaustion, I’m much more cautious about the weather. If it’s going to be really hot, I’ll either go somewhere higher in elevation, look for shaded forest trails, or skip the trip altogether. Dogs feel so much hotter than humans due to their hair, so it’s best to play it safe here.
    • Wildlife considerations: Some animals—like grizzlies or moose—really don’t like dogs. I’m not saying you shouldn’t hike in areas where those animals live, but you do need to be aware and take extra precautions. I always read recent trail reports, carry bear spray when needed, and keep Charlie close when I know there’s a chance we could encounter something dangerous.
    Backpacking on trail in Northern California with dog following behind
    Do research ahead of time to find dog-friendly trails

    2) Make Sure Your Dog is Physically Prepared

    Not all dogs are built for backpacking. Breeds like bulldogs struggle with heat and endurance, so if you’re still choosing a dog, look for an active breed that enjoys exercise.

    That said, size isn’t everything—small dogs – like my mini-aussie Gumbo – can totally hit the trail. They just might need help over obstacles and won’t be able to carry much.

    If your dog is new to hiking, start with short day hikes and build up slowly. Dogs need to condition just like we do, especially if they’ve been mostly indoor pets. When Charlie was getting started, I took him on gradually longer hikes to see how he handled it.

    Once your dog has some trail experience, pick routes that match their ability. Charlie can do big mileage now, but when he was a puppy, I kept it easy so he could build stamina and confidence. Don’t expect your dog to do 10-mile days right off the bat—they’ll enjoy it a lot more if you ease into it.

    Man picking up ball in snow with tennis ball launcher while dog stares at the ball expectantly
    Go on day hikes with your dog and keep them active before taking them backpacking

    3) Keep Your Dog Under Control at All Times

    Even if your dog is great off-leash (like Charlie usually is), I always carry a leash where I can grab it fast. You never know when you might run into wildlife—or a hiker who doesn’t love dogs as much as you do. If your dog starts to bolt after a deer, you’ll want a way to reel them in quickly.

    When our dogs are off-leash, we use e-collars set to vibrate mode. It’s super effective for getting their attention when they start to wander or get distracted. If we need them to heel, a quick buzz usually does the trick.

    If we’re on a trail where leashes are required—I use a hands-free waist leash. It makes hiking with trekking poles – see my favs here – way easier and keeps my hands free for navigating rougher sections.

    If you’re thinking about letting your dog off-leash, make sure they’re fully trained and have solid recall. If they don’t come the first time you call, they’re not ready. And just in case something goes wrong, make sure your dog has current ID tags and a microchip.

    A man backpacking with his dog next to a waterfall
    Make sure your dog has up-to-date ID tags and has great voice recall

    4) Let Your Dog Carry Their Own Gear

    Once Charlie started joining us on backpacking trips, getting him a backpack was a total game-changer. It lightened my pack and gave him a little job to do—which, as a working dog, he loves. Many dogs enjoy having a “task,” and carrying their own food and gear is a great way to keep them engaged on the trail.

    I recommend starting with no more than 10% of your dog’s body weight.

    We use the Ruffwear Approach Pack, which has been perfect for Charlie. It’s durable, fits well, and the saddlebags are streamlined enough that they don’t flop around when he runs or scrambles over rocks. Ruffwear also makes a lighter version called the Front Range Pack if your dog’s carrying less weight or just getting started.

    In his pack, Charlie carries a little bit of food, a collapsible bowl, a ziplock of treats, and poop bags – so nothing too crazy, but I find that it keeps him focused on the trail.

    A dog backpack allows your dog to carry their own food, water, and treats

    5) Make Sure Your Dog Gets Adequate Nutrition

    Backpacking burns a ton of calories—for both you and your dog. When Charlie’s on the trail, he definitely eats more than usual, so I always bring a little more food than I think he’ll need.

    I also pack lightweight treats to reward good trail behavior and give him an energy boost. Freeze-dried treats are my go-to—they’re light, don’t crumble, and Charlie will do pretty much anything for them.

    If you’re backpacking in bear country, make sure your dog’s food and treats go in your bear canister, right along with your own. Not only will this protect it from bears, it’ll also keep out mice, squirrels, and other critters who would love to chew through your pack for a snack. If you’re not using a canister, still be smart—never leave dog food unattended in your tent or backpack.

    Man feeding dog treats while hiking. Dog is wearing a dog backpack
    Bring extra food and snacks on your trip to keep your dog well-nourished and energy levels high

    6) Keep Your Dog Hydrated

    Staying on top of hydration is one of the most important parts of backpacking with a dog. I always make sure Charlie has access to clean water throughout the day—just like I do for myself. And yes, I filter his water too (see my next point).

    When we’re at camp or taking a break, I set out his collapsible bowl (we use one from Ruffwear that fits right in his backpack) and offer him water. On the trail, I make a point to stop every hour or two for a drink, and I watch for early signs of dehydration like a dry nose or extra panting.

    Dog drinking from collapsable water bowl while out for a hike
    Make sure your dog always has frequent, easy access to water

    7) Filter Your Dog’s Water

    Just like I wouldn’t drink straight from a stream, I don’t let Charlie drink untreated water either. Dogs can get sick from the same pathogens we can—like giardia or other parasites—and the last thing you want is a sick dog in the middle of the backcountry.

    So whatever I’m using to filter my own water, I use it for his too. I just filter some into his collapsible bowl, and we’re good to go. It’s quick, easy, and totally worth the peace of mind.

    8) Keep Your Dog Cool in the Heat

    After what happened with Johnny, I’m super cautious about hiking in hot conditions. Heat exhaustion is no joke, and dogs can overheat fast—especially on exposed trails with little shade.

    If it’s hot out, I build in more breaks, find shady spots to rest, and let Charlie cool off in streams whenever we come across one. He loves splashing around, and it does wonders for keeping his core temperature down. I avoid hiking in the middle of the day if I can, especially in hotter climates.

    The main thing is to watch your dog closely. If they’re panting heavily, slowing down, or looking uncomfortable, stop and cool them off—don’t try to push through it. I’d rather arrive at camp late than risk my dog’s safety.

    Young dog splashing around in clear river in northern California
    Help keep your dog cool by stopping for breaks in the shade, keeping them hydrated, and allowing them to splash around in water

    9) Protect Your Dog’s Paws While Backpacking

    Your dog’s paws take a beating on the trail, especially if you’re hiking on rocky or rough terrain. I’ve learned to check Charlie’s paws regularly—usually at breaks and definitely at the end of the day—to catch any cuts, cracks, or rubbing early before they turn into real problems.

    We’ve tried booties, but Charlie absolutely hated them. He would do anything to get them off. What works way better for us is a wax-based paw balm called Musher’s Secret. I put it on in the morning before we start hiking and again at night. It helps moisturize his paws and adds a layer of protection against rough surfaces and hot ground. You just have to make sure they don’t lick it off.

    If you’re not sure how your dog’s paws will hold up, start by doing a few longer hikes on similar terrain and see how they do. And always pack a small paw care kit—mine includes Musher’s Secret, some gauze, tape, and a small pair of scissors—just in case we need to deal with a cut on the trail.

    10) Keep an Eye on Your Dog at Night

    Once we’re at camp, I like to give Charlie a little freedom to move around—but I still want to know exactly where he is. To make that easy, I clip a small LED light to his collar so I can spot him at a glance, even if he wanders into the trees or behind a bush.

    It’s such a simple trick, but it gives me peace of mind. I don’t have to constantly call him or worry that he’s wandered too far—I can just follow the little glow bouncing around the campsite.

    11) Follow Leave No Trace Practices with Your Dog’s Poop

    Leave No Trace principles apply to your dog just like they do to you.

    I was told by rangers in Yosemite that when you are backpacking with your dog, all poop should be buried in a cathole 6–8 inches deep and at least 200 feet from water and camp. If your dog goes too close to a stream or right in the middle of camp, you can use your poop shovel to move it to an appropriate spot and bury it properly. Alternatively, you can carry it out in poop bags.

    I store my backpacking poop shovel in a ziplock bag inside Charlie’s backpack to keep things sanitary and easy to access.

    Leaving dog waste out in the open isn’t just gross for other hikers—it can contaminate water sources and disrupt the ecosystem.

    12) Know Basic Dog First Aid

    I’m not a vet, and I won’t pretend I know how to handle every possible dog injury on the trail—but I do believe in being prepared for the basics.

    Before I took Charlie backpacking, I made sure that I understood how to treat common, minor issues like a cut paw or a scraped nose. I don’t need to be an expert—I just need to be able to keep things from getting worse until we can get off the trail.

    I carry essentials like gauze, tape, antiseptic wipes, and tweezers, plus a few dog-specific items like paw balm and sometimes backup booties if they are absolutely necessary.

    * Fun tip: If your dog hates booties, try putting a toddler-sized sock over their paw instead. You can use tape to tighten it so it doesn’t fall off.

    If you’re not sure where to start, there are plenty of pre-made dog first aid kits available online, and you can always customize one to fit your trip.

    13) Give Your Dog Room to Sleep in Your Tent

    If your dog is sleeping in your backpacking tent with you (which I definitely recommend), make sure there’s enough space for everyone to get a good night’s rest. When it’s me, my partner, and Charlie, we bring a 3-person tent so he has his own space.

    To make Charlie more comfortable, we pack a closed-cell foam pad just for him. It weighs barely over a pound, but it gives him insulation from the cold ground and a soft spot to crash after a big day. It also helps him settle in quickly—he knows it’s his space when we set it down.

    Man snuggling with dog in tent on backpacking trip
    Opt for a larger tent model to allow room for both you and your dog

    14) Be Prepared for Emergencies (Even If You Hope You’ll Never Need To)

    I never expect something to go wrong on the trail—but I’ve learned to think through the “what ifs” anyway. Especially when I’m backpacking with Charlie, I like to have a rough plan in mind in case he gets injured or something unexpected happens.

    I carry a Garmin InReach on all of our trips. I’m obviously not going to hit the SOS button if Charlie’s injured, but it’s peace of mind knowing I can text a friend or family member for help if we need to bail early or I can’t get him out on my own. It’s also a good backup if we lose the trail or run into bad weather.

    Before heading out, I usually ask myself:

    • Could I carry or assist my dog if he got hurt and couldn’t walk out?
    • How far am I from the trailhead or nearest road?
    • Will I have cell service, or do I need to rely on my Garmin?

    I don’t obsess about worst-case scenarios, but having a loose plan helps me feel more confident out there.

    15) Wildlife Awareness on the Trail

    Before you go hiking with your dog, it’s essential to brush up on basic wildlife safety tips so you know how to react if you have a run-in with an animal on the trail. I always carry bear spray, leash my dogs, and stay more alert than usual. It’s just not worth the risk to let them roam in areas where a wrong move could escalate fast.

    Some animals, like moose, are especially aggressive toward dogs, and a loose dog can make a dangerous situation worse. When we were in the Canadian Rockies, our dogs stayed leashed the entire time.

    I also treat dog food like human food—everything scented goes in a bear canister to avoid attracting unwanted visitors around camp.


    Backpacking with your dog is one of the most rewarding ways to experience the outdoors. It’s not always easy—there’s extra planning, extra gear, and a few more variables to manage—but sharing those quiet mornings, trail miles, and campfire hangs with your pup makes it all worth it.

    If you’re heading out soon, I hope this guide helps you feel confident and ready. And if you’ve already hit the trail with your pup, I’d love to hear about it—drop your best tips or trail stories in the comments!

    Save this post to Pinterest

    The post 15 Trail-Tested Tips for Backpacking With a Dog (What I’ve Learned) appeared first on Bearfoot Theory.

    Rossmonster Baja Trail Adventure Truck Review

    I started van life in 2016 and have since lived in three different Sprinter Vans, logging thousands of days on the road. But after attempting full-time travel with my newborn and two dogs, it quickly became clear that we needed more space to make this lifestyle feel sustainable.

    When searching for the perfect adventure vehicle, I wanted something that would give our family of three more functional living space without sacrificing off-road capability or driveability. I didn’t want something so big—like a trailer or a massive slide-in truck camper—that it would limit where we could camp, but I also knew that another van wouldn’t give us the space we needed.

    That’s what led me to the Rossmonster Baja Trail—a fully built-out truck camper designed for off-grid travel. It’s built on a Ford F-350 and features a hard-sided pop-top, giving us extra interior space when parked while keeping the truck’s low profile and maneuverability on the road.

    Kristen Bor and her son standing outside the Rossmonster Baja Trail LX at sunset

    I was also drawn to the Rossmonster Baja’s pass-through feature. Coming from a van, I didn’t want to lose the ability to move freely between the driver’s seat to the camper. The layout also seemed very functional — all without feeling cramped — with its two separate beds, kitchen, and full bathroom.

    I picked up my Rossmonster Baja Trail in December 2024, and since then, it has become our full-time home on the road. With our house in Utah rented out, we’re fully committed to long-term travel, and so far, we’ve taken the Baja Trail through Arizona and all the way down to the bottom of Baja California. I’m excited to share all the little details—the things I love, what surprised me, and a few things I’d tweak.

    If you’re considering a Rossmonster Baja Trail, this review will help you decide if it’s the right fit for you. If you have any questions, shoot me an email or message me on Instagram. If you do reach out to Rossmonster, let them know I sent you—they’ll take great care of you!

    Dinette inside the Rossmonster Baja Trail LX
    I love how the inside of my Rossmonster Baja turned out!

    Ford F-350 Chassis

    The Rossmonster Baja Trail is built on the Ford F-350 chassis, and I expected it to feel massive and intimidating to drive. I was so wrong—this truck drives like a dream.

    One big appeal of the Ford chassis for me was knowing that we could get it serviced almost anywhere, even in rural areas and small mountain towns across North America. If we ever run into trouble, there’s a good chance we’ll be able to find a mechanic who can work on an F-350. That peace of mind was a huge factor in choosing this platform for long-term travel.

    The Rossmonster Baja can be built on either the 6.7L Power Stroke V8 Turbo Diesel or a gas engine, but I chose the diesel because it’s more powerful and has extra torque which helps carry the weight of the camper. The diesel also gets slightly better fuel economy and has greater towing capacity should we ever decide to tow anything. Finally, diesel engines are built to last longer than gas engines, meaning it will hold its value longer.

    Rossmonster Baja Trail LX adventure truck camper driving on a dirt road with the ocean in the background in Baja

    Driveability

    The Rossmonster Baja Trail accelerates quickly, even with the fully built-out camper on the back. I thought it might feel heavy and sluggish, but the turbo diesel engine is very powerful. We never feel like we’re struggling to keep up on highway passes.

    The turning radius is surprisingly good, and despite its size, I can still maneuver in tight parking lots without feeling too stressed. The steering is smooth and responsive, making it much easier to handle than I anticipated.

    The Baja comes with two backup cameras—one factory-installed that displays on the dash screen and a Wolf Box camera that replaces the rearview mirror, showing a constant live feed of what’s behind the truck. Having this full-time rear view makes lane changes and merging way safer since I always know what’s around me.

    The truck also comes with a factory camera that shows the front of the truck from the bumper’s point of view when 4×4 is engaged. This makes it much easier to see rocks and ruts in the road when we are exploring dirt trails.

    The Wolfbox rear view mirror and apple car play screen in the F350 of the Rossmonster Baja Trail LX

    Off-Road Capability & Suspension

    One of the biggest priorities when choosing a new rig was off-road capability. After years of pushing our Sprinter Van to its limits (and probably taking it places we had no business going), I wanted a rig that was at least as capable—if not more—when it came to tackling rough terrain and accessing remote trails.

    With beefy tires, a low center of gravity, and a suspension specifically tuned for off-road performance, the Rossmonster Baja feels just as comfortable on the highway as it does on rugged backroads. We’ve tested it on beaches, rocky roads, and rough desert terrain, and it has handled everything impressively well.

    • Wheels and tires – The Baja comes standard with Method Race wheels and 37-inch BF Goodrich all-terrain tires. These provide a smooth ride on the highway, solid traction in bad weather, and impressive grip off-road.
    • Carli Pintop suspension – This suspension is specifically tuned for the weight of the camper, making the Baja feel smooth and responsive both on and off-road. Between the upgraded shocks, low profile, and low center of gravity, body roll is minimal, and the truck feels stable in wind at high speeds and on uneven terrain.
    closeup of the suspension in the Rossmonster Baja Trail LX truck camper on a dirt road
    close up of the tires on the Rossmonster Baja Trail LX truck camper in the snow

    Camper Shell Construction

    The Rossmonster Baja is built with a fiberglass composite shell and an aluminum frame, designed to be lightweight and durable. The big advantage of fiberglass is that it’s easy to repair if we were ever to get any dings or dents in the camper shell. Just about any body shop in the U.S. should be able to fix it.

    On top of that, the shell is a single-piece construction, meaning there are no seams to worry about leaking or failing over time.

    So far, the build quality has exceeded my expectations. The camper feels solid, well-built, and thoughtfully designed, and the interior is holding up incredibly well, even after driving rough roads down in Baja California. The materials and finishes are durable and functional, with no rattling or shifting while driving.

    Kristen Bor sitting next to the Rossmonster Baja Trail LX on a beach in Baja next to the ocean

    Hard Walled Pop-Top

    Before discovering the Rossmonster Baja, I was hesitant about a pop-top camper. Traditional soft-sided pop-ups come with a few big drawbacks—they lack insulation for four-season use, they stay wet if you have to close them in bad weather, and they can’t support overhead cabinets, which I absolutely wanted for storage.

    At the same time, I didn’t love the idea of a traditional slide-in truck camper either. Most of them are over 13 feet tall, which significantly limits where you can go, especially when it comes to tree clearance and off-road trails.

    The Baja’s hard-sided pop-top solves all of these problems.

    • Lower driving height: The Baja is 9’11” when driving and 11’1″ when fully popped up, making it much more manageable than a traditional truck camper while still offering full standing room at camp
    • Fully electric operation: To lift the pop top, you just press a button, and in 45 seconds, the roof is up. No manual cranking, no heavy lifting.
    • Supports overhead storage: Unlike soft-sided pop-ups, the hard walls allow for overhead cabinets offering a lot more storage.
    • Still functional when closed: With 5 feet of interior height when the roof is down, we can still grab a snack or use the bathroom without having to lift the roof.
    • Fully insulated: The solid walls provide four-season insulation. This also reduces food smells, which will be great for trips to bear country.
    • Triple sealed: The pop-top has three different layers of seals that ensure that no dust, bugs, or light enter the top while it is up, down, or while we are driving.
    Rossmonster Baja Trail LX parked at an RV park next to a Four Wheel Camper
    Here we are parked next to a Four Wheel Camper soft-sided pop-up built on an identical chassis

    Interior Layout Overview

    The layout of the Baja is one of the biggest reasons I chose this camper, and now that we’ve been living in it full-time, I can confidently say it works incredibly well for our family.

    The width of the F-350 (about a foot wider than a Sprinter) makes a huge difference in livability—we all have room to move around without constantly bumping into each other. The high ceiling (6’5” when popped up) makes the space feel open and even my tallest friends can stand up straight inside.

    Cabover Bed

    When you step inside the side door, our bed sits above the cab. At 59″ wide by 74″ long, it’s about the size of a queen bed, giving my partner and me (plus our two dogs) enough space to sleep comfortably. The mattress it came with is fairly comfortable, but I added a 2-inch latex topper for extra cushion, which made a big difference.

    The headspace in the bed is 32″, which is just shy of letting me sit up fully. However, there’s a skylight above the bed that adds about 6 extra inches of headroom when you’re positioned underneath it. I do wish there was a bit more vertical space, but since our bed is just for sleeping and watching our iPad at night, it feels plenty adequate for that purpose.

    Kristen Bor lying in the bed of the Rossmonster Baja Trail LX

    To get up in the bed, you use the ladder that stows flush against the wall when it’s not in use.

    Kristen Bor setting up the ladder to the bed in the Interior of the Rossmonster Baja Trail LX adventure truck camper

    Full Bathroom

    The Rossmonster Baja Trail LX is the floor model that comes with a full bathroom, including a shower and toilet—something I didn’t have in my last two vans. I only had 25 gallons of water in my vans, but in the Rossmosnter, I have a 40 gallon water tank. So having a shower in here makes a lot more sense, especially now that I have to worry about bathing a toddler on the road. With so much water, we can take showers without stressing about running out of water for drinking, cooking, or dishes.

    Kristen Bor sitting on the trelino toilet in the Rossmonster Baja Trail LX

    The bathroom feels surprisingly spacious for a truck camper. I can sit comfortably on the toilet without my legs touching the wall, which isn’t always the case in smaller RV bathrooms. The shower height is 6’2″, so most people can stand up straight without having to hunch over too much. The shower head is detachable and has an on/off switch, allowing you to direct the spray exactly where needed while conserving water.

    The shower has a slatted teak floor above the shower basin, which allows dirt and grime to rinse down while keeping your feet out of any standing water. Grey water drains into an 11-gallon tank, which has been enough for us to manage with regular dumping.

    For hot water, the Baja uses a hydronic heating system. It takes about 5-10 minutes to heat up, but once it’s ready, you have unlimited hot water.

    We went with the Trelino separating toilet, which has a pee canister and a waste bin lined with a bag that can be tossed in the trash. I like the bag system, but the toilet itself has room for improvement. The good news is it’s fully removable, so if I want to try a different toilet, it’s an easy swap.

    I’m so glad we have a full bathroom (the LX model), but if you don’t need one, the Baja also comes in an EX model that prioritizes additional counter space and storage. Instead of a dedicated bathroom, it features a toilet tucked inside a small cabinet and a folding shower that sets up in the middle of the camper when you need a quick rinse. Both models also have an outdoor shower hookup that’s connected to the hot water lines.

    Kitchen

    The kitchen in the Baja LX floorplan is split galley style, with counter space on both sides, a two-burner induction stove, a fridge, a sink, and an additional flip-up counter next to the stove.

    With two burners on the induction stove, I left our portable propane camp stove behind. While I do miss cooking outside occasionally, it’s one less piece of gear to carry, and we don’t have to deal with carrying propane. The induction stove boils water fast, easily wipes clean, and cools down quickly after use, so it’s not a lingering hazard in a small space.

    Kristen Bor cooking on the induction stove in the Rossmonster Baja LX

    The Isotherm Cruise Elegance fridge holds about a week’s worth of food. I’ve had this exact fridge in all of my van builds (it’s one of the industry’s most popular fridges), and while it works well, my biggest issue is that the freezer ices over monthly. Defrosting it requires pulling out all the food, which can be a hassle when there’s nowhere else to store it. Other than that, I don’t have any complaints.

    I also love the spacious sink, which makes doing dishes easy. The faucet stows down while driving, so there’s no risk of it shifting or leaking. A custom cutting board fits over the sink, doubling as extra counter space when needed—a thoughtful touch that helps maximize functionality in a small kitchen.

    Dinette / Second Bed

    At the very back of the camper, the dinette serves as both a functional workspace and a comfortable lounge area. It comfortably seats four, making it perfect for meals, working, or just relaxing. The table is mounted on a Lagun swivel system, allowing you to quickly move it out of the way when needed. The seating is surprisingly supportive, and I can work on my laptop for hours without dealing with back pain—something I couldn’t say about all my previous setups.

    Kristen Bor and her son sitting in the dinette of the Rossmonster Baja Trail LX adventure truck camper

    When it’s time to convert the dinette into a bed, the process takes about two minutes. The tabletop drops down onto a pair of slats, and two of the side cushions fit on top to create a large, flat sleeping surface.

    This second bed is big enough to fit my son’s travel crib right on top, and we installed L Track on the ceiling to hang a blackout curtain, giving him his own private sleep space. When he’s not sleeping, the bed mode creates a huge, comfortable lounge area where we can all hang out, read, and play together. It’s one of the most versatile parts of the camper and has made full-time life on the road much more enjoyable.

    Kristen Bor and her son sitting on the second bed in the Rossmonster Baja Trail LX
    travel crib set up in the dinette area of the Rossmonster Baja Trail LX adventure truck camper
    Black out curtains hanging from the ceiling in the Rossmonster Baja LX

    Pass-Through

    Coming from a van, I didn’t want to lose access to the driver’s seat while inside the camper. When I first started van life in 2016, I was traveling solo, and being able to hop into the driver’s seat without stepping outside was one of the main reasons I chose a van over other types of campers. It made me feel safer, knowing I could drive away in an emergency without exposing myself to whatever was outside.

    When I started looking at truck campers, I realized that very few models offer a true pass-through. The Rossmonster Baja is one of the rare exceptions. Between the back seat of the truck cab and the camper, there’s a 24” x 36” pass-through, which, while not big enough to walk through like I could in my Sprinter, is plenty large enough to crawl through easily. It gives me that same peace of mind I had in my van, knowing I have quick access to the driver’s seat if needed.

    Kristen Bor crawling through the pass-through in the Rossmonster Baja Trail LX adventure truck camper

    Beyond the safety aspect, I use the pass-through all the time for passing gear between the camper and truck cab. When it’s time to hit the road, I can easily pass water, snacks, my son’s toys, or anything else we need up front without having to step outside, which makes getting ready to go quicker.

    My son loves climbing through the pass-through when we are camping, turning it into an extra play space. The dogs use it too. This is really helpful if we have to park and leave them in the truck for a bit, they can go to the back of the camper where it’s insulated and doesn’t get nearly as hot as the truck cab. The pass-through is one of those features I didn’t want to compromise on, and I’m really glad we have it in the Rossmonster.

    Storage

    I was initially worried about losing storage space compared to a van, and I won’t say I don’t miss the huge garage we had under our Sprinter bed. But with the combination of interior storage, extra space in the truck cab, and the gear boxes on the back, I’ve found there’s plenty of room for all of our essentials, even for full-time living. If you’re traveling part-time, it would be even easier to make it work.

    storage boxes on the back of the Rossmonster Baja Trail LX stuffed full of gear

    Here are the major storage areas in the Baja Trail:

    • Overhead cabinets – Surprisingly spacious and perfect for storing food, dishes, and my work gear. These cabinets wrap around the camper and hold more than I expected.
    • Large kitchen cabinet – Big enough for all of our cookware. We fit pots and pans, an Instant Pot, a small air fryer, an electric kettle, a Vitamix, and Tupperware, all in one space.
    • Slim cabinet next to the bathroom – A great spot for toiletries, first-aid supplies, and miscellaneous small items we want easy access to.
    • Clothing storage – Two large cabinets span across the bed, providing plenty of space for all of our clothes. I get one side, and my partner gets the other, which makes it easy to keep things separate.
    • Truck cab – If you don’t need all the seats, the cab becomes a massive extra storage space. Up there, we keep a bin with all of our shoes, backpacks, my son’s Strider bike, and other frequently used gear. It’s easy to access and keeps clutter out of the camper.
    • Gear boxes on the back – The molle panel on the back holds extra storage boxes for bulkier gear. To give you an idea of the capacity, right now our two boxes contain: 2 big bags of dog food, 2 camp chairs, a camp table, a large kid carrier backpack, extra diapers, a stroller, tools and hoses, 2 yoga mats, and 3 duffel bags. Rossmonster can even custom-build boxes based on your needs. For example, in winter, we can swap one of our boxes for a custom ski box, making it super easy to carry gear for different seasons.
    • Dinette storage – Most of the space in the dinette is consumed by the power, water, and heating systems. However, at the foot of the dinette there is a small storage area where we put all of our dog stuff. There is also a small amount of storage under the passenger side bench.

    While the storage in the Baja isn’t as obvious as in a camper van, I’ve found that with some smart prioritizing and a little bit of Tetris, we can fit everything we need without feeling like we’re constantly shuffling things around.

    Power System

    The Rossmonster Baja is powered by a robust Victron Energy system, designed to handle all of our off-grid power needs. The setup includes a 1000Ah LiFePO4 battery bank, a 3000W inverter, 600W of solar, and alternator charging while driving, ensuring we have multiple ways to keep the system topped up.

    A 1000Ah battery bank might sound like overkill, but I’m really glad we have such a high-capacity system, especially since we have AC, a microwave, and a Starlink Mini, all of which are big power draws. With this setup, we never have to worry about running out of power, even when using multiple appliances at once.

    The 3000W inverter allows us to run multiple high-powered devices simultaneously without tripping the system. For example, we can use the induction stove and air fryer at the same time, which makes cooking much more convenient.

    The 600W of solar provides ample recharge on days when we’re not driving, keeping the batteries topped up even when stationary. Since the batteries also charge from the alternator while driving, we rarely have to think about power management.

    So far, the system has been performing exactly as expected, giving us more than enough power for daily life on the road.

    Kristen Bor standing in the skylight showing the roof of the Rossmonster Baja Trail LX

    Hydronic Heat System

    The Aquahot hydronic heating system is an efficient and effective way to keep the inside of our camper comfortable in any weather. We have camped in single digits in the snow, and you could have never guessed how cold it was outside.

    The Aquahot system runs on diesel fuel from the truck’s main fuel tank, eliminating the need for a separate fuel source.

    Victron energy and Aqua hot controls in the Rossmonster Baja Trail LX adventure truck camper
    The Aquahot control panel is very simple to use

    The system works by heating a thermal mass of coolant in an exterior burner, which is then circulated inside the camper in three different ways:

    • Hot Air – The hot air is pushed into the camper underneath the bathroom with close proximity to both sleeping areas. The heater runs on a thermostat, so once it reaches your desired temperature inside, the heater switches to standby.
    • Instant hot water – Once the system heats up (which takes about 10 minutes), we have endless on-demand hot water in the shower and the sink.
    • Heated Floors – This makes chilly mornings so much more comfortable by keeping the floor warm.

    What’s great is that these three functions can be operated independently, so we only have to run the portions we need at any given time, making the system more efficient and customizable.

    Air Conditioning / Cooling

    I’ve never had AC in any of my vans, so having an AC unit in here is a welcome addition. We haven’t had the need for AC yet, but in a quick test run, it did a solid job of taking the edge off the heat and making the camper more comfortable.

    I’m not sure yet if we’ll be able to run it all night, as I still need to see exactly how much power it consumes over an extended period. What I’m most excited about is having AC for those moments when we need to leave the dogs in the truck for a couple of hours in the summer and being able to cool the camper down while my son naps during the day. Having that extra bit of temperature control will make summer travel so much easier.

    In addition to the AC, the Rossmonster Baja Trail has windows all around, all of which have integrated screens and blackout shades, so we can get a cross breeze without dealing with bugs. There’s also a MaxxAir fan over the dinette and a large skylight with an integrated screen above the bed, both of which add to the ventilation. On warm days when we don’t want to run the AC, simply opening the windows and cranking the fan pulls in fresh air and keeps the camper feeling comfortable.

    Kristen Bor standing in the skylight of the Rossmonster Baja Trail LX
    This skylight above the bed is awesome! At night you can stargaze through it, and the fresh air makes you feel like you are sleeping outside

    Exterior Accessories

    In addition to the storage boxes on the back, there are a few exterior accessories on the Baja that I find useful for day-to-day life on the road.

    • Fiama awning – This runs the full length of the camper, providing shade over the patio and windows to help keep the interior cool. It’s great for creating an outdoor living space, especially in hot weather. The only downside is that it’s not built to withstand strong winds, so if it gets breezy, we have to pull it in to prevent damage.
    • IMax Trax table with MKII boards – This is one of my favorite exterior features and something we use daily. The MKII traction boards are mounted to the side of the camper, making them easily accessible if we ever need them for recovery (we already used them down here in Baja California to help one of our neighbors get unstuck on the beach). When parked, the boards flip down into a convenient table. This is especially useful for keeping everything out of reach of kids and dogs.
    • On-board air compressor – If you plan to drive on sand or rough terrain, being able to air down your tires is key for better traction. The onboard compressor makes it easy to refill them afterward, so you don’t have to hunt for a gas station or carry a bulky portable pump.
    • Starlink Mini – Rossmonster includes a roof-mounted Starlink hookup that is wired for use even while driving. It’s incredibly convenient not having to store the dish or set it up every time we stop, making connectivity on the road seamless.
    • 50” OnX6 Baja Designs light bar – We haven’t needed to use this yet since we rarely drive at night, but it’s reassuring to have in case we ever need extra visibility for off-road travel in the dark.

    Customer Service

    Beyond the quality of the build itself, Rossmonster’s customer service has been outstanding. Like with any custom-built camper, a few small things have come up—one of the reading lights in our bed stopped working, for example. I let Rossmonster know, and by the end of the day, they had a new light in the mail, along with detailed instructions on how to swap it out. Their team is small, but it’s clear they take a ton of pride in their work and genuinely care about customer satisfaction.

    Having a company that stands behind its product and is responsive when things need attention gives me a lot of confidence in this rig for long-term travel.

    Final Thoughts

    After the last few months of full-time travel in the Rossmonster Trail Baja Trail, I can confidently say it’s been the perfect rig for our family. It strikes the ideal balance between comfort and capability, giving us the space we need without limiting where we can go.

    If you’re looking for a highly functional, rock-solid, adventure-ready truck camper, the Baja Trail is a fantastic choice.

    Got questions about my Rossmonster Baja review? Leave them down in the comments below!

    Save this post to Pinterest

    The post Rossmonster Baja Trail Adventure Truck Review appeared first on Bearfoot Theory.